Runtime DataBinding(使用UI Builder)
以下將示範如何使用UI Builder與ScriptableObject來建立DataBinding
- 在Unity編輯器中,建立一個Script
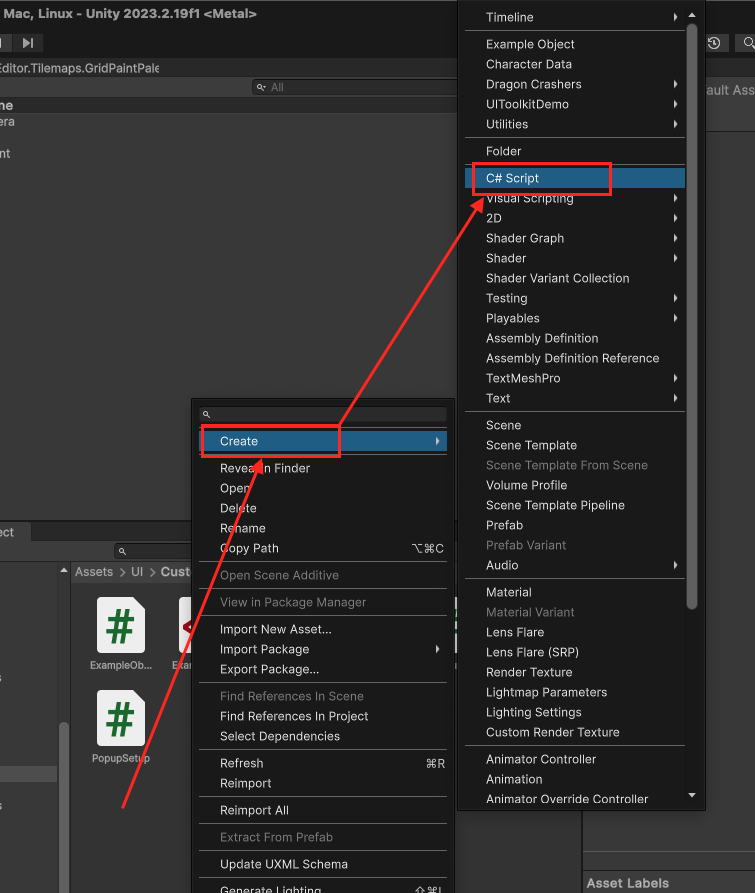
- 建立一個名為
ExampleObject的ScriptableObject(檔案會是ExampleObject.cs),它包含了- 一個
stringvector3Label, - 一個
Vector3vector3Value - 一個
floatsumOfVector3Properties,這個sumOfVector3Properties是一個readonly的屬性其值來自於vector3Label中的x,y與z之和, - 一個
floatdangerLevel是一個 0 ~ 1之間的數值。之後在UI Builder中更改使用Value To Progress設定,讓它可以根據ConverterGroup顯示對應的值1
2
3
4
5
6
7
8
9
10
11
12
13
14
15
16
17
18
19
20
21
22
23
24
25
26
27
28
29
30
31
32
33
34
35
36
37
38
39
40
41using Unity.Properties;
using UnityEditor;
using UnityEngine;
using UnityEngine.UIElements;
[]
public class ExampleObject : ScriptableObject
{
[]
public static void RegisterConverters()
{
// Create local Converters
var group = new ConverterGroup("Value To Progress");
// Converter groups can have multiple converters. This example converts a float to both a color and a string.
group.AddConverter((ref float v) => new StyleColor(Color.Lerp(Color.red, Color.green, v)));
group.AddConverter((ref float value) =>
{
return value switch
{
>= 0 and < 1.0f / 3.0f => "Danger",
>= 1.0f / 3.0f and < 2.0f / 3.0f => "Neutral",
_ => "Good"
};
});
// Register the converter group in InitializeOnLoadMethod to make it accessible from the UI Builder.
ConverterGroups.RegisterConverterGroup(group);
}
[]
public string vector3Label;
public Vector3 vector3Value;
[]
public float sumOfVector3Properties => vector3Value.x + vector3Value.y + vector3Value.z;
[]
[] public float dangerLevel;
}
- 一個
- 在Unity編輯器中,選擇
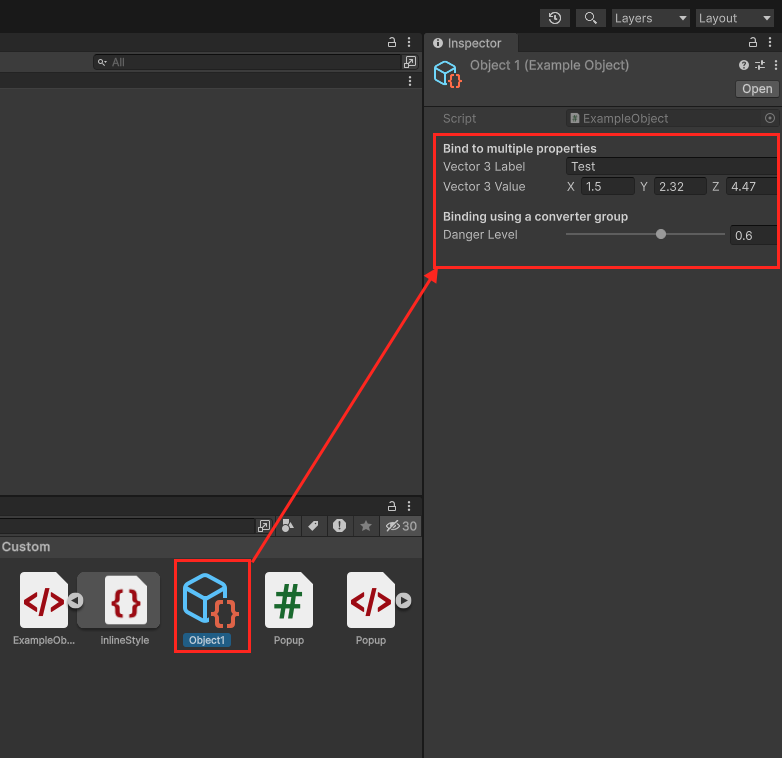
Create>Example Object,建立一個Example Object並命名為Object1(檔案會是Object1.asset)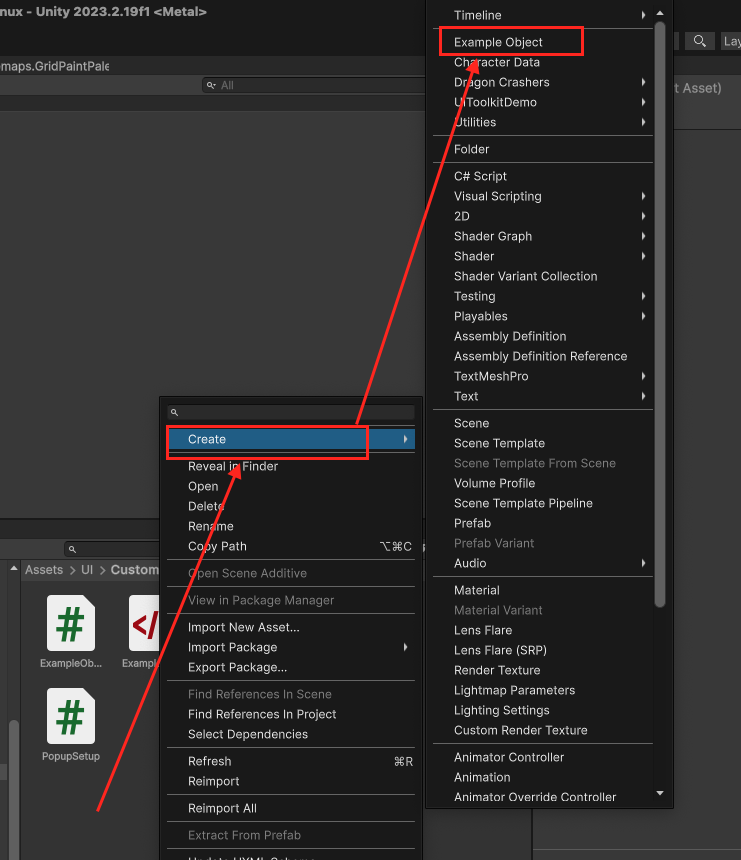
- 建立一個
UXML,命名為ExampleObject(檔案會是ExampleObject.uxml)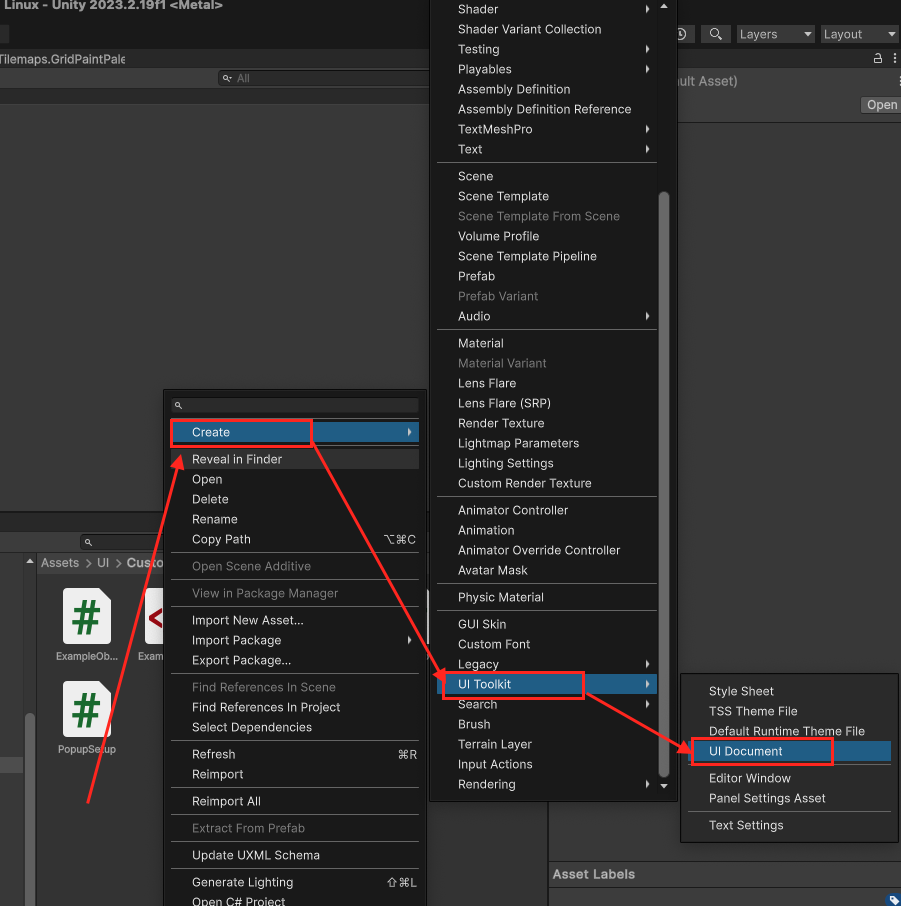
- 點擊剛剛建立的
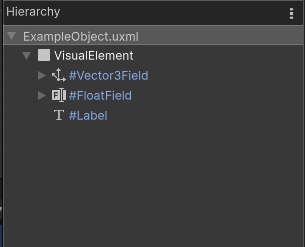
ExampleObject.uxml,開啟UI Builder - 在Hierarchy panel中,加入一個
VisualElement - 在剛剛建立的
VisualElement中加入Vector3Field,FloatField與Label - 最後Hierarchy panel畫面為
- 選擇最上層的
VisualElementUI Element,在右邊找到Data Source,選擇之前建立的Object1.asset,這樣做,會將它的Child Elements都預設綁定Object1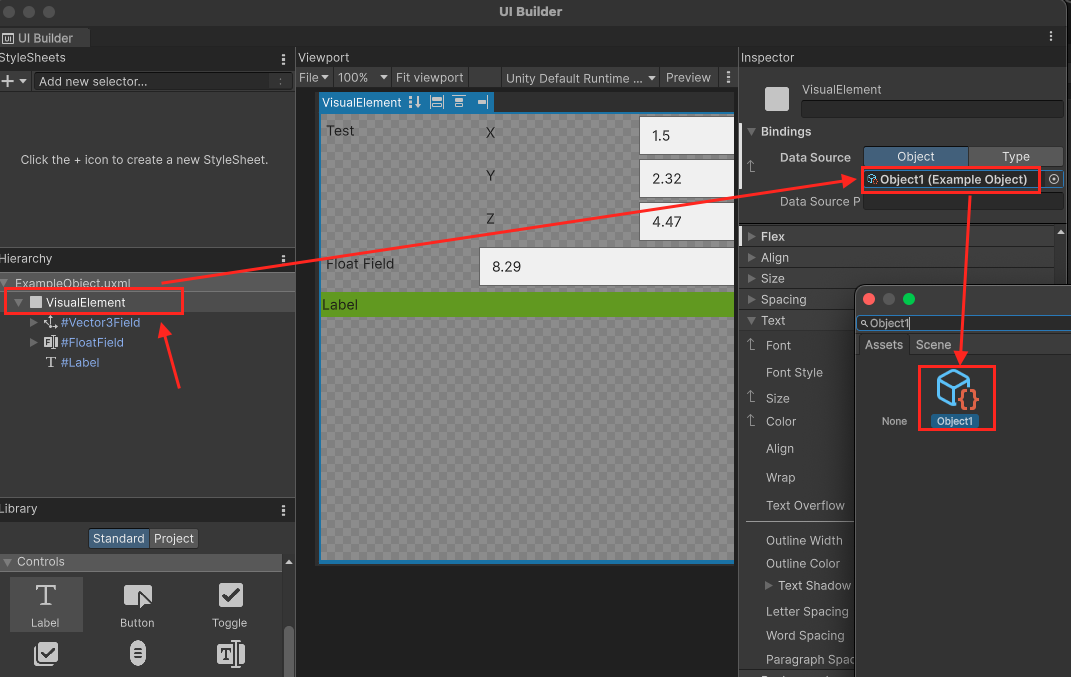
- 選擇
Vector3FieldUI Element,在右邊找到Label,對Label按一下滑鼠右鍵,點選Add binding...,在Data Source Path中找到並選擇vector3Label,Binding Mode選擇To Target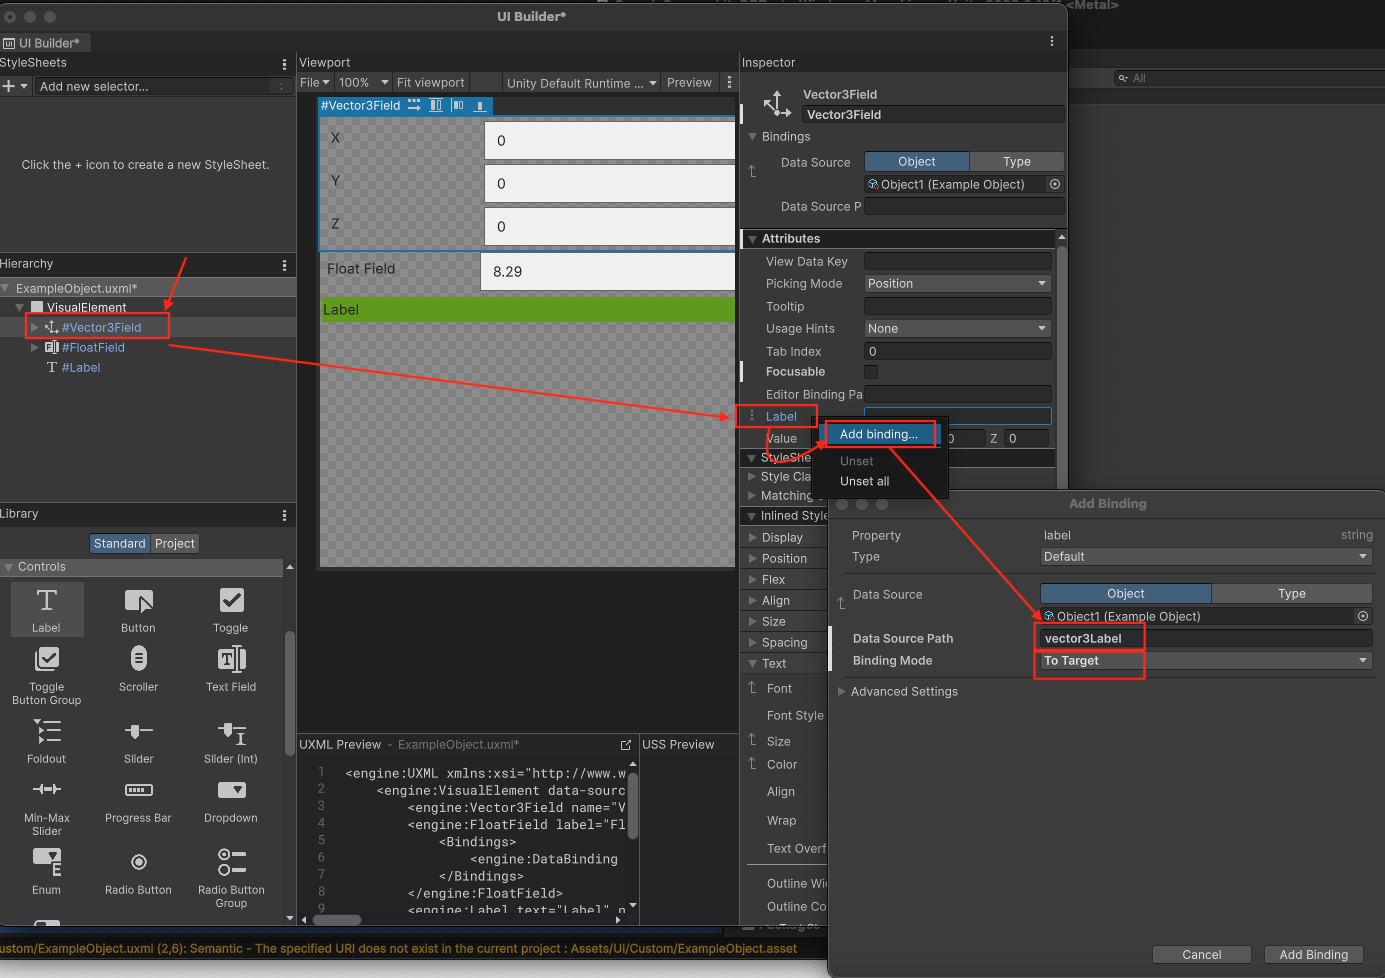
- 接下來,對
Vector3Field的Value按一下滑鼠右鍵,點選Add binding...,在Data Source Path中找到並選擇vector3Value,Binding Mode選擇To Target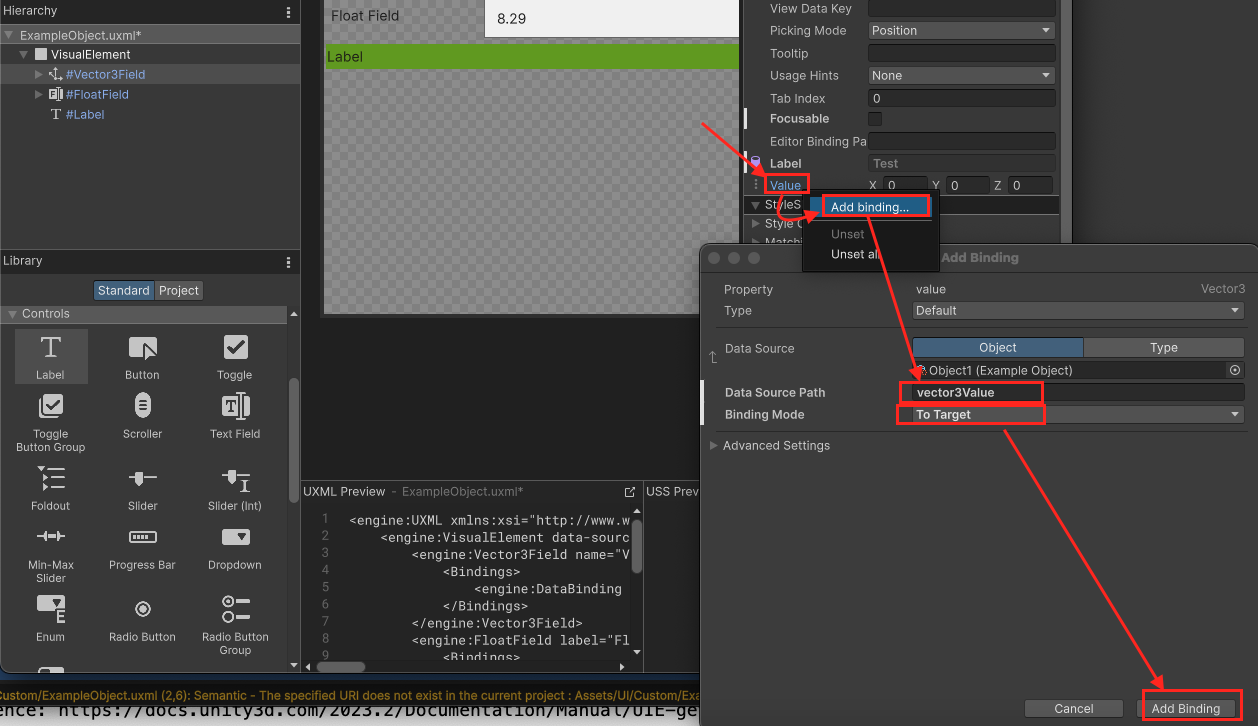
- 選擇
FloatUI Element,在右邊找到Value按一下滑鼠右鍵,點選Add binding...,在Data Source Path中找到並選擇sumOfVector3Properties,Binding Mode選擇To Target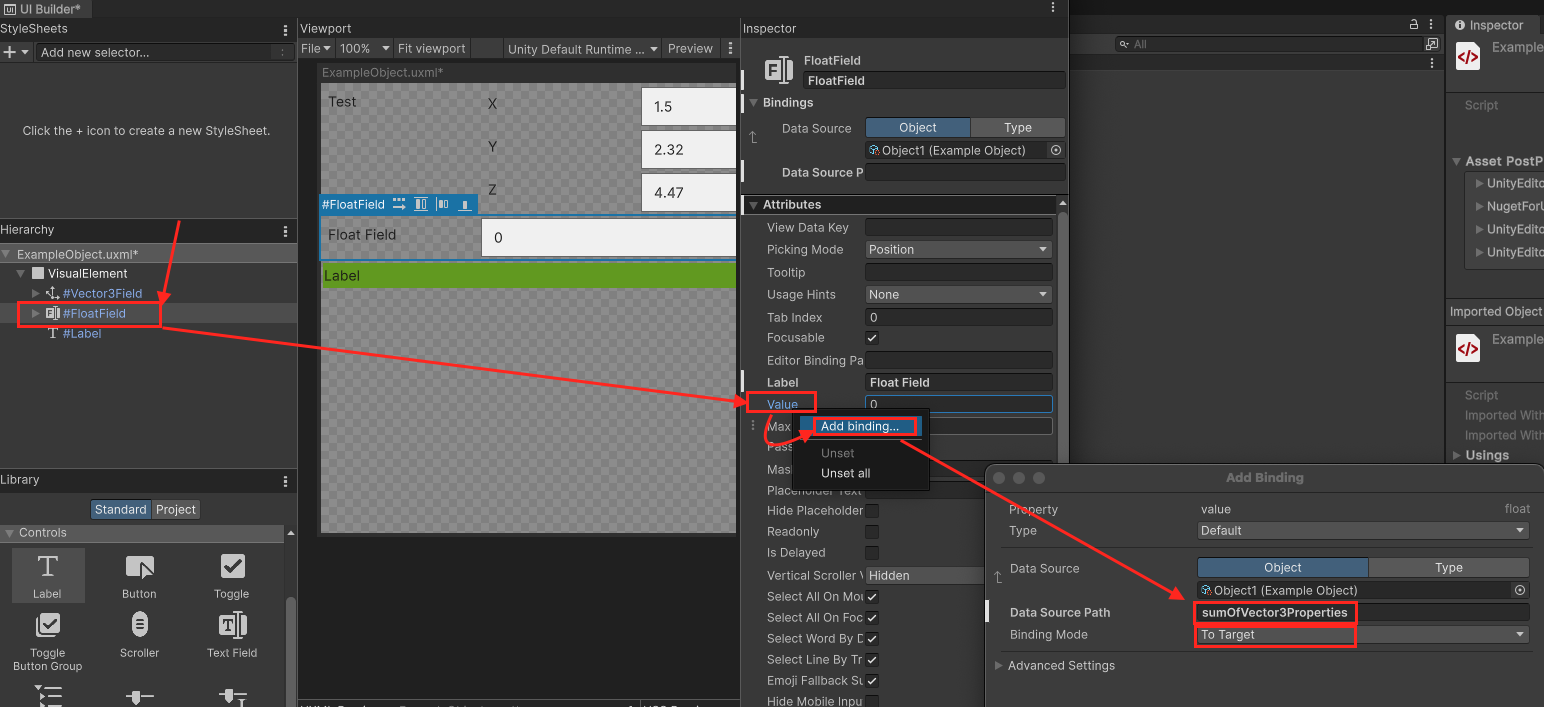
- 選擇
LabelUI Element,- 在右邊找到
Text,對Text按一下滑鼠右鍵,點選Add binding...,在Data Source Path中找到並選擇dangerLevel,Binding Mode選擇To Target - 接著打開
Advanced Settings找到Converters>To target property (UI)選擇Value To Progress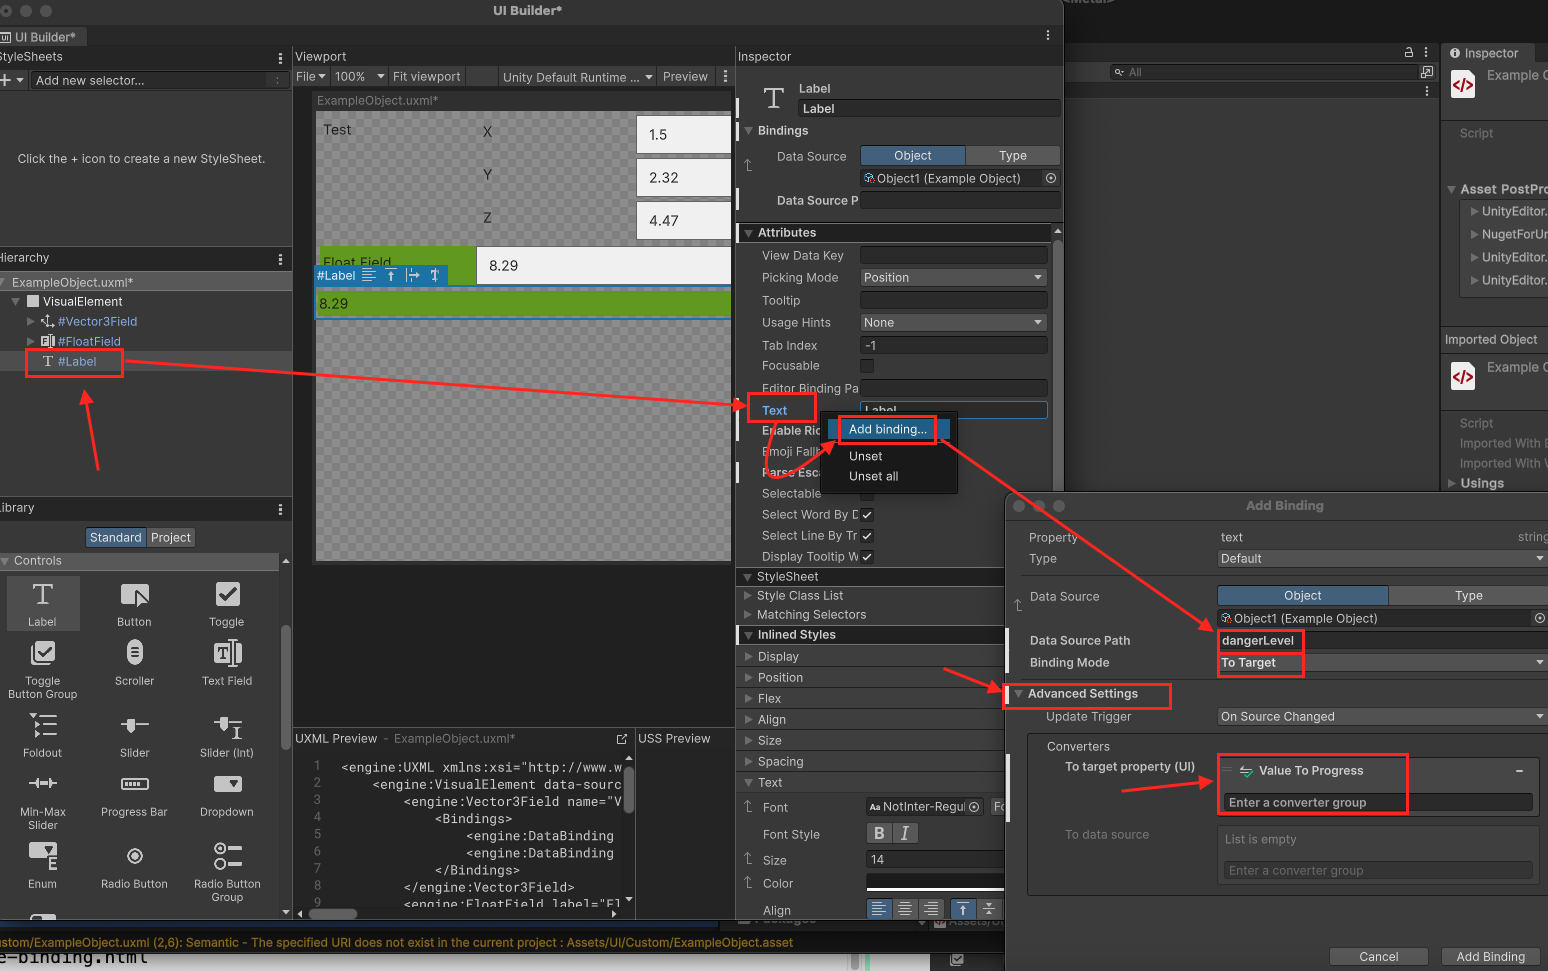
- 接下來,在右邊找到
Color,對Color按一下滑鼠右鍵,點選Add binding...,在Data Source Path中勾選Show only compatible之後才會出現可以選擇的相容屬性,選擇dangerLevel,Binding Mode選擇To Target - 接著打開
Advanced Settings找到Converters>To target property (UI)選擇Value To Progress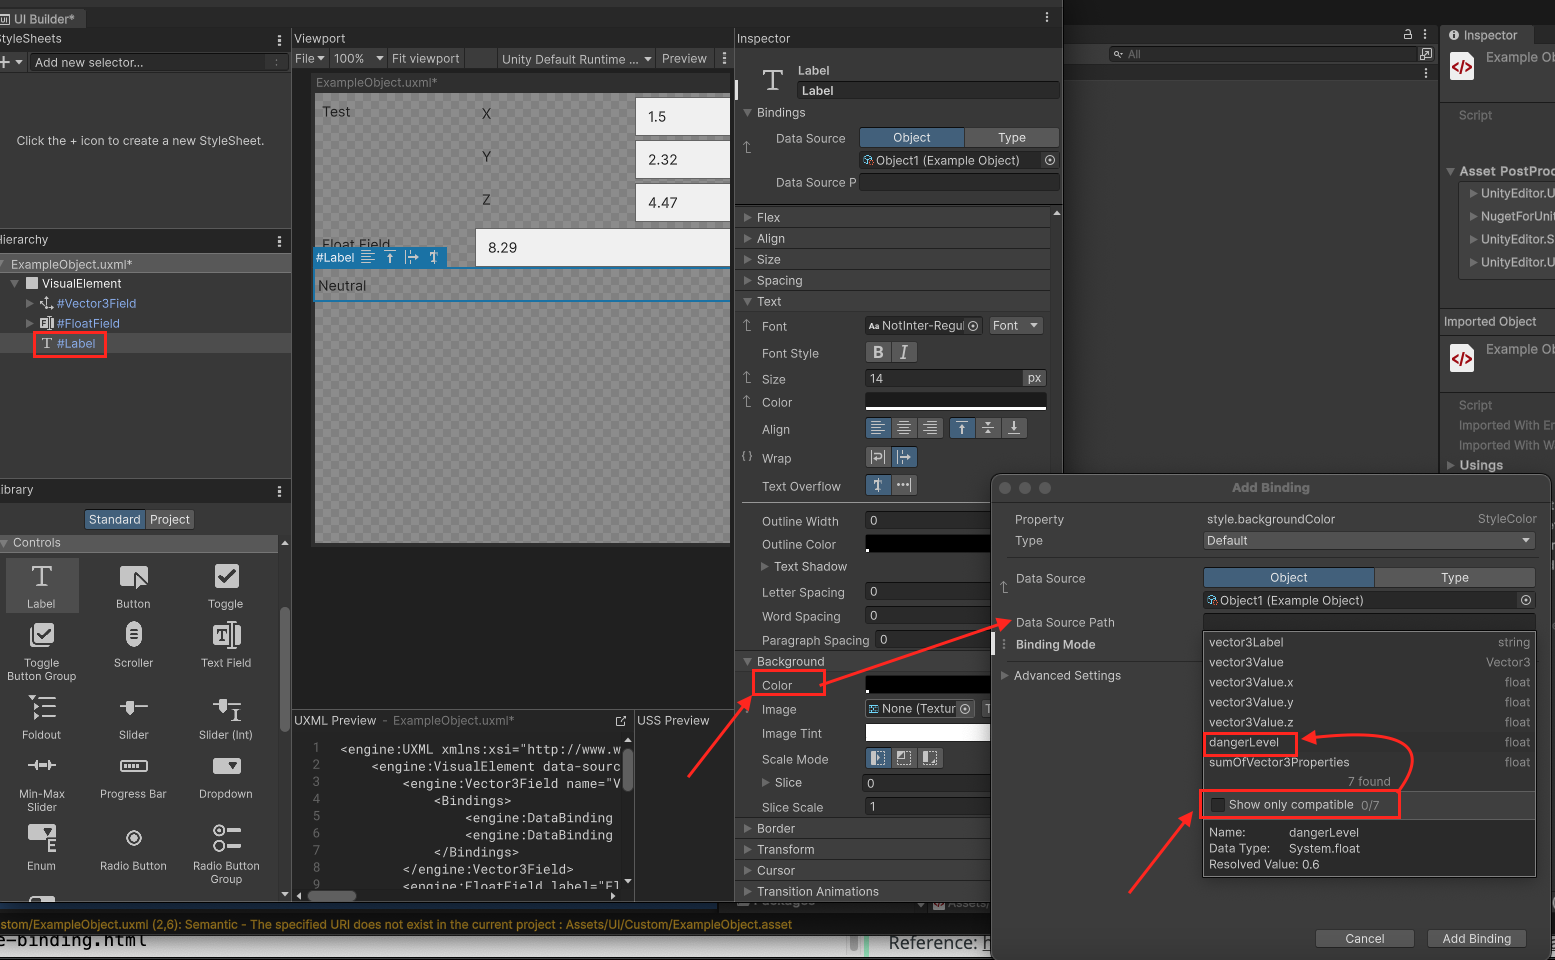
- 在右邊找到
- 至此,這個UI與 ExampleObject的綁定就算完成了,
UXML可能會為1
2
3
4
5
6
7
8
9
10
11
12
13
14
15
16
17
18
19
20
21
22
23
24<engine:UXML xmlns:xsi="http://www.w3.org/2001/XMLSchema-instance" xmlns:engine="UnityEngine.UIElements" xmlns:editor="UnityEditor.UIElements" noNamespaceSchemaLocation="../../../UIElementsSchema/UIElements.xsd" editor-extension-mode="False">
<engine:VisualElement data-source="project://database/Assets/UI/Custom/Object1.asset?fileID=11400000&guid=a0e72bbf894f04543b805067235fe91c&type=2#Object1" style="flex-grow: 1;">
<engine:Vector3Field name="Vector3Field" focusable="false">
<Bindings>
<engine:DataBinding property="label" binding-mode="ToTarget" data-source-path="vector3Label" />
<engine:DataBinding property="value" binding-mode="ToTarget" data-source-path="vector3Value" />
</Bindings>
</engine:Vector3Field>
<engine:FloatField label="Float Field" name="FloatField">
<Bindings>
<engine:DataBinding property="value" binding-mode="ToTarget" data-source-path="sumOfVector3Properties" />
<engine:DataBinding property="text" binding-mode="ToTarget" data-source-path="dangerLevel" source-to-ui-converters="Value To Progress" />
<engine:DataBinding property="text" binding-mode="ToTarget" data-source-path="dangerLevel" source-to-ui-converters="Value To Progress" />
</Bindings>
</engine:FloatField>
<engine:Label text="Label" name="Label" enable-rich-text="false" parse-escape-sequences="true">
<Bindings>
<engine:DataBinding property="value" binding-mode="ToTarget" data-source-path="sumOfVector3Properties" />
<engine:DataBinding property="text" binding-mode="ToTarget" data-source-path="dangerLevel" source-to-ui-converters="Value To Progress" />
<engine:DataBinding property="text" binding-mode="ToTarget" data-source-path="dangerLevel" source-to-ui-converters="Value To Progress" />
</Bindings>
</engine:Label>
</engine:VisualElement>
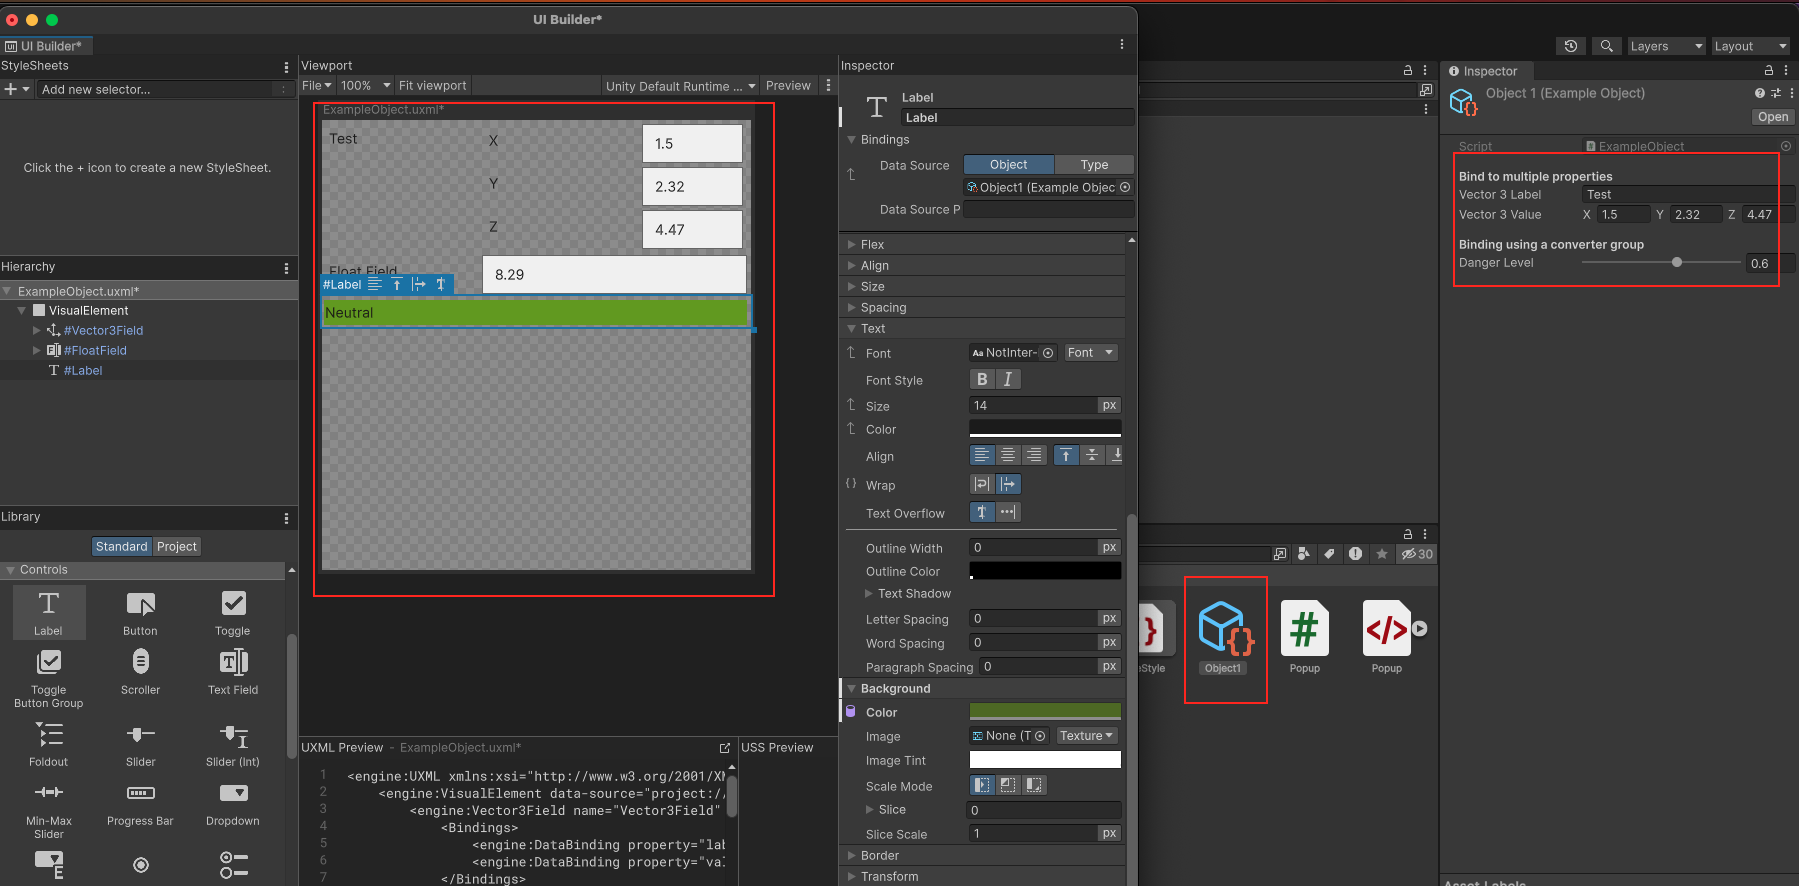
</engine:UXML> - 可以調整Object1來觀察UI的變化
- 結果
Reference: https://docs.unity3d.com/2023.2/Documentation/Manual/UIE-get-started-runtime-binding.html