Unity Style Sheet (USS)

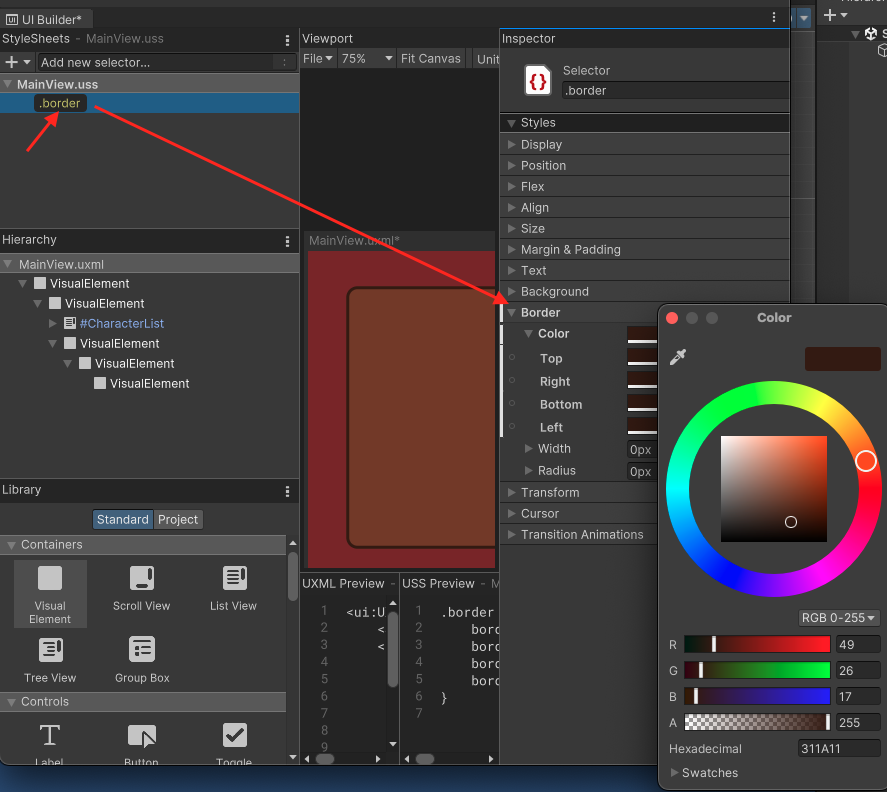
USS檔案以.uss為副檔名,它是一個文字檔,可以定義UI共用的風格(style),讓App更容易管理整體的風格。
一個USS會包含以下

  • Style rules:一個style rule會有一個selector與一個declaration block。
    • Selector定義了哪些visual element會應用這個style rule
    • Declaration block:使用角括弧(curly braces),在其中可以定義多個style。
      • 每個sytle都會有一個property與value,並在結尾要加上一個分號(semi-colon)

句法如下

1
2
3
4
selector {
property1: value;
property2: value;
}

例子

1
2
3
Button {
width: 200px;
}

Type selector:會挑選符合對應C#或是visual element type的elements

1
2
3
4
Button {
border-radius: 8px;
width: 100px;
}

注意以下是不合法的Type selector

1
2
3
UnityEngine.UIElements.Button { 
...
}

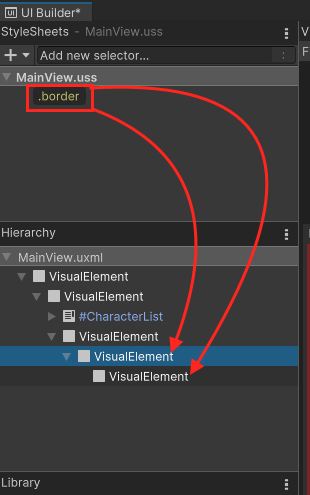
Class selector:會挑選有指定該USS class的elements。

在class的命名中:

  • 在名字中不要有英文句號
    • 假設一個class名為yellow.button,在建立USS規則(USS rule)的話會這樣使用.yellow.button{...},這樣會被當成yellowbutton兩個class
  • 不可以以數字作為開頭
  • class名稱是大小寫敏感的(case-sensitive)
  • USS中,class selector要以英文句號 . (period)開頭
  • UXML中,只需設定class名稱,如:class="yellow"即可

下面定義了一個 yellow class selector rule,注意它前面有一個英文句號(period),

1
2
3
.yellow {
background-color: yellow;
}

在UXML中要使用的話,使用class="名稱"例如:
<Button name="OK" class="yellow" text="OK" />

一個簡單的例子如下:

1
2
3
4
5
6
7
8
<UXML xmlns="UnityEngine.UIElements">
<VisualElement name="container1">
<VisualElement name="container2" class="yellow">
<Button name="OK" class="yellow" text="OK" />
<Button name="Cancel" text="Cancel" />
</VisualElement>
</VisualElement>
</UXML>

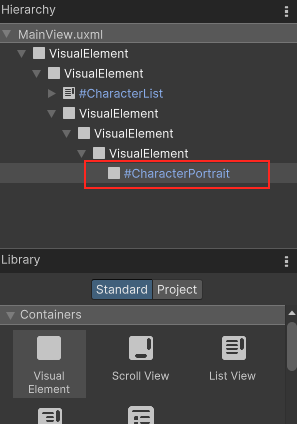
Name selector:會挑選name相符合的elements。(有點類似CSS中的ID selector)。

name的使用:

  • 為element設定name的方式有兩種
    1. 在C# script中使用 VisualElement.name
    2. 在UXML中使用 name 屬性,例如:<VisualElement name="my-nameName">.
  • 為了避免意外,name必須唯一。
  • 在USS中,name selector需要以 #(number sign) 開頭
    • 例如#ElementName { ... }
  • 在UXML中,只需設定class名稱,如:name="my-nameName"即可
    • `<Button name="#OK" />`這個是不合法的。
      

下面定義一個name為Cancel的name selector rule

1
2
3
4
5
#Cancel {
border-width: 2px;
border-color: DarkRed;
background-color: pink;
}

在UXML中使用的話,使用name="名稱"例如:<Button name="Cancel" text="Cancel" />

1
2
3
4
5
6
7
8
<UXML xmlns="UnityEngine.UIElements">
<VisualElement name="container1">
<VisualElement name="container2" class="yellow">
<Button name="OK" class="yellow" text="OK" />
<Button name="Cancel" text="Cancel" />
</VisualElement>
</VisualElement>
</UXML>

Universal selector:也稱為wildcard selector,它會匹配所有的element。

* (asterisk)為Universal selector

下面定義一個Universal selector

1
2
3
* {
background-color: yellow;
}

以下的UXML的所有element都會應用這個background-color: yellowstyle

1
2
3
4
5
6
7
8
<UXML xmlns="UnityEngine.UIElements">
<VisualElement name="container1">
<VisualElement name="container2" class="yellow">
<Button name="OK" class="yellow" text="OK" />
<Button name="Cancel" text="Cancel" />
</VisualElement>
</VisualElement>
</UXML>

Descendant selector:會在visual tree中選出匹配的後代elements。注意,使用這個selector比較消耗效能

語法如下:

1
selector1 selector2 {...}

例子:這個例子會選擇#container1之下含有yellow class的所有child elements。

1
2
3
4
#container1 .yellow {
background-color: yellow;
}

在UXML中的設定如下,#container1有一個child element,#container2class="yellow"

1
2
3
4
5
6
7
8
9
<UXML xmlns="UnityEngine.UIElements">
<VisualElement name="container1">
<VisualElement name="container2" class="yellow">
<Button name="OK" class="yellow" text="OK" />
<Button name="Cancel" text="Cancel" />
</VisualElement>
</VisualElement>
</UXML>

結果如下圖,#container2#OK以及#Cancel的背景色都被改變了,但#container1的背景沒有被改變


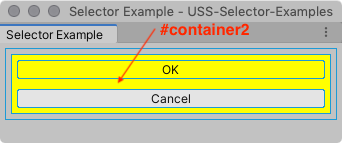
Child selector:會在visual tree中選出匹配的child elements。

語法如下:

1
selector1 > selector2 {...}

例子:這個例子會選擇#container1的child中含有yellow class的所有child elements。

1
2
3
4
#container1 > .yellow {
background-color: yellow;
}

在UXML中的設定如下,

1
2
3
4
5
6
7
8
<UXML xmlns="UnityEngine.UIElements">
<VisualElement name="container1">
<VisualElement name="container2" class="yellow">
<Button name="OK" class="yellow" text="OK" />
<Button name="Cancel" text="Cancel" />
</VisualElement>
</VisualElement>
</UXML>

這個的child selector style rule 只會匹配到#container2

  • 這是因為#container2#container1的child element,並且含有yellow class。
  • #OK#Cancel不匹配的原因是因為它們是屬於#container2的child而不直接的屬於#container1的child,所以匹配不到。

你也可以把wildcard selector使用在這些複雜的selector,例如以下這個selector rule,它會找出yellow class下的所有Button element

1
.yellow > * > Button{..}

Multiple selector:Multiple selector是組合多個simple selector它會選出符合simple selector的elements。

以下是語法

1
selector1selector2 {...}

如果Multiple selector區分不出selector的話,會把它們當作一個,例如ListViewButton這兩個type selector,若想使用Multiple selector會變成下面這樣

1
ListViewButton{...}

USS parser無法辨識出它是兩個selector,會把它當作一個ListViewButton
因為Class與Name selector有一個前綴詞(分別是.#),所以可以辨認出來,而Type selector沒有,所以在使用Multiple selector若是想要用Type selector的話,Type selector必須放到第一個。

1
ListView.yellow#vertical-list{...}

在下面這個例子中,最後會選出來的是<Button name="OK" class="yellow" text="OK" />

1
2
3
Button.yellow {
background-color: yellow;
}
1
2
3
4
5
6
7
8
<UXML xmlns="UnityEngine.UIElements">
<VisualElement name="container1">
<VisualElement name="container2" class="yellow">
<Button name="OK" class="yellow" text="OK" />
<Button name="Cancel" text="Cancel" />
</VisualElement>
</VisualElement>
</UXML>

Reference: https://docs.unity3d.com/Manual/UIE-about-uss.html

Unity Extensible Markup Language(UXML)

UXML啟發於HTMLXAMLXML,它定義並保存了UI的結構,可以使用Inline Style或是透過Unity Style Sheet來更改UI的風格(Style)。

UXML使用了類似樹狀的結構來保存UI,它存在父子關係(parent-child relationships)以及一個根元素(root element)

以下是UXML的範例

1
2
3
4
5
6
7
8
9
10
11
12
<?xml version="1.0" encoding="utf-8"?>
<UXML ...>
<Box>
<Toggle name="boots" label="Boots" value="false" />
<Toggle name="helmet" label="Helmet" value="false" />
<Toggle name="cloak" label="Cloak of invisibility" value="false"/>
</Box>
<Box>
<Button name="cancel" text="Cancel" />
<Button name="ok" text="OK" />
</Box>
</UXML>
  • UXML declaration:在上面範例的第一行,是UXML declaration,它是可選的,
    • 如果你使用UXML declaration的話,必須把它放在第一行,
    • 使用UXML declaration的話,必須為它設定version
    • encoding則是可選的,但是如果使用encoding的話,必須指定它的編碼。
  • Document root:<UXML>為文件的根element,在此定義namespace與schema definition files的位置。
    • Namespace:在UI Toolkit中每個element的Namespace不是在UnityEngine.UIElements就是在UnityEditor.UIElements
      • UnityEngine.UIElements:此命名空間下的elements會作為Unity runtime時的一部分
      • UnityEditor.UIElements:此命名空間下的elements可在Unity Editor使用
      • 在使用時,你可以指定element的namespace,例如:<UnityEngine.UIElements:Button />
      • 或是在UXML declaration中指定它的prefix,如xmlns:engine="UnityEngine.UIElements",在使用時會變為<engine:Button />
      • 注意:不要把自訂的control class放到UnityEngine.UIElementsUnityEditor.UIElements不然UI Builder會把你自訂的control隱藏。
    • Schema definition:它指定了每個UXML element可以包含哪些attributes和子element。

所有Element都會繼承VisualElement,這個VisualElement提供了以下attributes

  • name: 用來辨認這個element,它的名稱應該要唯一。
  • picking-mode: 設定為Position表示可以回應滑鼠事件,設定為Ignore表示忽略滑鼠事件
  • focus-index: (OBSOLETE過時了) Use tabIndex and focusable.
  • tabindex: 一個整數,定義這個element的tabbing position
  • focusable: 一個Boolean,表示這個element是focusable.
  • class: 類似HTML的class,你可以為特定的element加上class,讓它們應用到指定的style;你也可以把它當做篩選element的工具,透過UQuery來找到特定class的elements。
  • tooltip: 當滑鼠指到該element時,會顯示提示字串
  • view-data-key : 一個字串,作為element序列化(serialization)時使用的Key

使用Unity建立UXML:

  • 選擇Asset -> Create -> UI Toolkit -> UI Document
  • 預設它會幫你建立一個noNamespaceSchemaLocation
1
2
3
<ui:UXML xmlns:ui="UnityEngine.UIElements" xmlns:uie="UnityEditor.UIElements" xsi="http://www.w3.org/2001/XMLSchema-instance" engine="UnityEngine.UIElements" editor="UnityEditor.UIElements" noNamespaceSchemaLocation="../../UIElementsSchema/UIElements.xsd" editor-extension-mode="False">
</ui:UXML>

Reference: https://docs.unity3d.com/Manual/UIE-WritingUXMLTemplate.html

UI Builder - 2 (開始使用UI Builder)

使用UI Builder建立UI的流程一般會是

  1. 建立一個新UI Document (UXML)
  2. 為你的UI結構加入element
  3. 在 Inspector 中調整element的attributes與style
  4. 如果有多個element使用相同的style,可以建立USS style sheets與selectors(類似網頁的css)
  5. 測試UI是否符合你的需求,並將inline style放到USS中
  6. 儲存UI Document (UXML)

以下範例將

  • 建立一個root element作為background,這個root element會含有兩個containers。
    • 一個container用來放角色名稱的list,
    • 另外一個用來放角色的詳細資訊。
      • 在這個角色的詳細資訊container中會加入background與foreground frames。
      • 以及兩個label,用來顯示角色名稱

建立Root Element

  1. 首先建立一個Unity專案
  2. 開啟UI Builder, Window > UI Toolkit > UI Builder
  3. 在UI Builder的Viewpoint中左上角找到File > New建立一個新的UXML document
  4. 選擇Save,儲存為MainView.uxml
  5. 在左下角Library中,找到VisualElement,將它拖入Viewport中(雙擊VisualElement也可以)
  6. 在右側``Inspector`中,找到Inlined Styled,可以在此處修改element的風格
  7. 找到Flex,將Grow設為1,這會把flex-grow的值設為1,讓它填滿整個螢幕
  8. 接著找到Align,將Align ItemsJustify Content都設為Center
  9. Background的Color設為#732526,並將透明度設為255

建立Parent Container

  1. 在左下角Library中,將VisualElement拖入前面建立的rootVisualElement中。
  2. 將這個新建VisualElement它的Flex中的Direction設為row,並把它Size中的Height設為350 pixels

建立角色名稱List Container

  1. 在左下角Library中,找到ListView將它拖入前面建立的Parent ContainerVisualElement
  2. 修改這個ListView的name,改為CharacterList
  3. 將這個ListViewSize中的Width設為230 pixels,並找到Margin & Padding > Margin > RightRight設為6
  4. 設定它的Background > Color#6E3925,並設定透明度為255
  5. 設定它的Border > Color#311A11,並設定透明度為255
  6. 設定它的Border > Width設為4pixels,Radius設為15pixels。

此時你的UI看起來會長這樣

建立角色詳細訊息 Container

  1. 在Parent Container中再加入一個VisualElement
  2. 將它 Align > Align Items設為flex-end,並且把Align > Justify Content設為space-between
  3. 將它Flex > Basis > Shrink設為0,並且把Flex > Basis > Grow也設為0
  4. 在這個VisualElement中加入一個VisualElement
  5. 為這個VisualElement設定Size > Width276pixels;Align > Align ItemscenterAlign > Justify Contentcenter;最後設定Margin & Padding > Padding8 pixels。
  6. 為這個VisualElement設定Background > Color#AA5939,並設定透明度為255
  7. 為這個VisualElement設定Border > Color#311A11,透明度設為255
  8. 為這個VisualElement設定Border > Width設為4pixels,Radius設為15pixels。

此時你的UI看起來會長這樣

建立角色詳細訊息框背景

  1. 在角色詳細訊息 Container中加入一個VisualElement
  2. 將它的SizeWidthHeight設為120pixels
  3. 將它的Margin & Padding > Padding設為4pixels
  4. 將它的Background > Color設為#FF8554,透明度設為255
  5. 將它的Border > Color#311A11,透明度設為255
  6. 將它的Border > Width設為4pixels,Radius設為15pixels

    此時你的UI看起來會長這樣

建立USS來管理Style

在建立UI時,可以發現Border的Style都是一樣的,因此我們可以把它們拿出來放到一個USS中方便管理

  1. StyleSheet選擇 + > Create New USS
  2. 儲存為MainView.uss
  3. 點擊新建的MainView.uss,並在右側的InspertorSelector輸入框中輸入.border,之後在點擊Create New USS Selector
  4. 接著你可以在左側的StyleSheet中看到剛剛建立的.borderclass
  5. 點擊.borderclass後,在右側的Inspertor,將Border > Color設為#311A11
  6. 將它的Border > Width設為2pixels,Radius設為15pixels
  7. 將這個.borderclass拖動到角色詳細訊息 Container角色詳細訊息框VisualElement
  8. 點選角色詳細訊息 Container角色詳細訊息框VisualElement,在右側的Inspertor中找到Border,並對Border按下滑鼠右鍵,會跳出一個選單,選擇Unset將Border的inline style清除。

建立角色詳細訊息框前景

  1. 角色詳細訊息框背景VisualElement加入一個VisualElement並將它命名為CharacterPortrait
  2. 設定它的Flex > Grow1,這樣它裡面的圖片就可以充滿整個可用空間。
  3. 設定它的Background > Scale Modescale-to-fit,這樣它的圖片就可以充滿element size,並且保持適當的長寬比(aspect ratio)

建立角色詳細訊息Labels

  1. 角色詳細訊息框背景VisualElement加入兩個Labels,並分別命名為CharacterNameCharacterClass
  2. 選擇#CharacterName,將它的Text > Font Style改為BText > Size改為18 pixels
  3. Attributes > Text中可以更改顯示的字串

最後你的UI看起來會長這樣

Reference: https://docs.unity3d.com/Manual/UIB-getting-started.html


上一篇:UI Builder - 1 (UI Builder介面簡介)

下一篇:UI Builder - 3 (使用C# Script操控UI)

UI Builder - 1 (UI Builder介面簡介)

UI Builder,是一個可視化的UI編輯工具,讓你可以在使用UI Toolkit時可以編輯UI assets,如UI Documents(.uxml)與StyleSheets(.uss),此外還可以安裝以下的package增加額外的功能

  • com.unity.vectorgraphics:讓你可以將VectorImage指定為元素(element)的background style
  • com.unity.2d.sprite:讓你可以將 2D Sprite asset(或sub-asset)指定為元素的background style。安裝了此套件後,還可以直接從Inspector窗格中打開2D Sprite編輯器。

選擇 Window -> UI Toolkit -> UI Builder便可開啟UI Builder畫面

  • StyleSheets:讓你編輯目前UI Document(UXML)的StyleSheets(USS)
  • Hierarchy:顯示目前UI Document的element結構樹
    • 在這個Hierarchy中顯示的是element的name attribute,如果這個element沒有name則顯示它的C# type
  • Library:顯示目前可以使用的elements,其中Standard為Unity內建的elements;Project則為專案中自訂的element (.uxml assets以及繼承VisualElement並有在UxmlFactory設定可以被UXML實體化的C# element )。
  • Viewport:會顯示UI Document (UXML) 的畫面,並會儲存目前UI Document (UXML)的平移(pan)和縮放(zoom)狀態
    • 使用滑鼠中鍵(Middle-click),或是使用Ctrl/Cmd + Alt/Option + 滑鼠左鍵可以拖動Viewport。
    • 使用滑鼠滾輪可以縮放Viewport。
  • UXML Preview與USS Preview:此處可以預覽UI Builder產生的UXML與USS
  • Inspector:與Unity原有的Inspector類似,根據選擇的element顯示對應的設定內容

下一篇:UI-Builder-2-(開始使用UI-Builder)

Visual Tree

UI Toolkit是用於開發使用者介面 (UI) 功能、資源和工具的集合,UI Toolkit啟發於 web technologies。它是一個retained-mode UI system,支援stylesheets,dynamic與contextual event handling

  • Visual element:在UI Toolkit中,組成UI的最基礎block為Visual element,在C#程式碼中,它繼承VisualElement,你可以設定它的風格(style),定義它的行為,讓它作為UI的一部份顯示在screen上面。
  • Visual Tree:由Visual element組成的有序且具父子關係(parent-child relationships)的樹狀結構(hierarchy tree)。

    一個簡單的 Visual Tree
    • 所有在Visual Tree中的node都繼承VisualElement,VisualElement的子類定義了各種UI的功能如ButtonText input fields等,稱為Controls,Unity提供很多內建的Controls
    • Panels:是一個visual tree的parent object,它擁有rootVisualElement,但是它不是visual element,panel也負責處理focus control與為visual tree分派事件(event dispatching)。
    • Draw order:visual tree是使用depth-first search,因此他的順序會是
      1. 最上面的visual element
      2. 這個visual element的第一個child element
      3. 這個child element的後代
    • 座標(Coordinate)與位置(Position)系統:在UI Toolkit中,它使用style properties中的layout parameters去計算每個element的座標與位置,基於Flexbox。
      • 相對(Relative)位置:相對於元素計算位置的座標,布局系統(layout system)計算元素的位置,然後將座標添加為偏移量。父元素可以影響子元素的大小和位置,因為布局引擎在計算元素位置時將它們考慮在內。子元素只能影響父元素的大小。
      • 絕對(Absolute)位置:相對於父元素的座標,這繞過自動布局計算,直接設置元素的位置。在相同父元素下的同級元素(Sibling elements)對該元素的位置沒有影響。同樣地,該元素不影響相同父元素下其他同級元素的位置和大小。

Reference: https://docs.unity3d.com/Packages/com.unity.ui.builder@1.0/manual/uib-interface-overview.html
https://docs.unity3d.com/Manual/UIElements.html

Physics Material實體材質

實體材質,決定你的物體摩擦力與彈性,讓你的物件可以滑動或是反彈

在專案的畫面中使用滑鼠右鍵,找到Create ->

  • 如果是2D,選擇 -> 2D -> Physics Material 2D
  • 如果是3D,選擇 -> Material

參數簡介

  • Dynamic Friction:已在移動時使用的摩擦力,通常為0到1之間的值
    • 值為0時,就像冰一樣,會滑動
    • 值為1時,將使物件迅速靜止,除非使用很大的力或重力推動該物件
  • Static Friction:當物件靜止在表面上時的摩擦力,通常為0到1之間
    • 值為0時,就像冰一樣,會滑動
    • 值為1時,將使物件很難推動
  • Bounciness:表面的彈性,
    • 值為0時,不會反彈
    • 值為1時,在反彈時不會產生任何能量損失,可以一直反彈
  • Friction Combine:兩個碰撞物件的摩擦力的組合方式
    • Average:對兩個摩擦值求平均值
    • Minimum:使用兩個值中最小的值
    • Maximum:使用兩個值中最大的值
    • Multiply:兩個摩擦值相乘
  • Bounce Combine:兩個碰撞物件的彈性組合方式,其模式與Friction Combine相同

碰撞器(Collider)

剛體(Rigidbody)賦予了物件可以接受力,而碰撞器(Collider)則賦予物件碰撞的形狀(edit collider),以及是否可以會其他物件碰撞,越複雜形狀的碰撞器越耗效能。

參數簡介

  • Is Trigger:是否是觸發器,如果啟用則該collider將用於觸發事件,並被物理引擎忽略,主要用於進行沒物理效果的碰撞檢測
  • Material:物理材質,可以確定碰撞體和其他物件碰撞時的交互方式
  • Center:碰撞體在物件局部中的中心點位置

Unity Rigidbody

Rigidbody(剛體)component:可將Rigidbody應用到你的遊戲物件(GameObject)上,讓這個GameObject可以被物理的方式控制,也將是說讓這個GameObject可以被physics forces(物理力,如推力,阻力等) 與 torque(扭力)作用。

另外在2D遊戲中,則是使用Rigidbody2D component它只會做用在2D環境,也就是說只能在XY plane上作用。

參數簡介

  • Body Type(Rigidbody2D)
    • Dynamic(動態,預設值)
      • 運動時受力影響,並且接受完全的物理模擬,包括重力、碰撞、施加力等,最耗效能。
    • Kinematic(運動學)
      • 不受力影響但可移動,其運動行爲是被我們開發者完全限定的,可以碰撞,沒有設定質量(Mass)的參數
      • 只會與Dynamic2D碰撞
    • Static(靜態)
      • 不受力影響也不會動,會與動態類型剛體碰撞,最不消耗效能。
  • Mass:質量,預設為千克,質量越大慣性越大,質量越大越不容易被別的物體推動
  • Drag:空氣阻力,根據移動物件時影響物件的空氣阻力大小,0表示沒有空氣阻力
  • Angular Drag:根據樞紐旋轉物件時影響物件的空氣阻力大小,0表示沒有空氣阻力
  • Use Gravity:是否受重力影響
  • Is Kinematic:如果啟用此選項,則物件不會被物理引擎驅動,只能透過Transform對其進行操作,
    • 對於移動平台,或者如果要動畫化附加了HingeJoint的剛體,此屬性非常有用
  • Interpolate:插值運算,讓剛體物體移動更平滑
    • None:不使用
    • Interpolate:根據前一幀的變換來平滑變換
    • Extrapolate:根據下一幀估計的變換來平滑變換
  • Collision Detection:碰撞檢測,用於防止快速移動的物體其他物體而不檢測碰撞
    • Discrete:預設值,離散檢測,
      • 最不耗效能的檢測,
      • 對場景中所有其他碰撞體使用離散碰撞檢測,
      • 用於一般碰撞。
      • 可能會出現當物體移動太快造成偵測不到與其他物體碰撞。
    • Continuous:連續檢測,
      • 對動態碰撞體(具有剛體),使用離散檢測
      • 對靜態碰撞體(沒有剛體),使用連續檢測
      • 對於所有其他剛體碰撞使用離散檢測
      • 較消耗物理效能
    • Continuous Dynamic:連續動態檢測
      • 對動態碰撞體(具有剛體)與靜態碰撞體(沒有剛體)都使用連續碰撞檢測
      • 對於所有其他剛體碰撞使用離散檢測
      • 用於快速移動的物體
    • Continuous Speculative:連續推測檢測
      • 對剛體和碰撞體使用推測性連續碰撞檢測,
      • 一般比Continuous Dynamic的成本低
  • Constraints:約束,對剛體運動的限制
    • Freeze Position:有選擇地停止剛體沿世界X, Y, 和 Z軸的移動
    • Freeze Rotation:有選擇地停止剛體圍繞局部X, Y, 和 Z軸的轉動

Collision Detection的效能消耗為Continuous Dynamic > Continuous Speculative > Continuous > Discrete

無剛體 Discrete Continuous Continuous Dynamic Continuous Speculative
無剛體 不檢測碰撞 Discrete Continuous Continuous Continuous Speculative
Discrete Discrete Discrete Discrete Discrete Continuous Speculative
Continuous Continuous Discrete Discrete Continuous Continuous Speculative
Continuous Dynamic Continuous Discrete Continuous Continuous Continuous Speculative
Continuous Speculative Continuous Speculative Continuous Speculative Continuous Speculative Continuous Speculative Continuous Speculative

將Animator包裝起來避免使用String輸入錯誤

在Unity中,使用Animator時,有時候會打錯字,造成找不到動畫,因此可以使用一個包裝類,將其包裝起來。

首先建立一個抽象類,AnimatorWrapper,在其中加入Animator依賴。

1
2
3
4
5
6
7
8
9
namespace Test
{
public abstract class AnimatorWrapper
{
protected Animator _animator;
public Animator Animator => _animator;
public AnimatorWrapper(Animator animator) => _animator = animator;
}
}

接著再需要播放動畫的物件實作對應的AnimatorWrapper類,將string參數放到這邊。

1
2
3
4
5
6
7
8
9
namespace Test
{
public class DoorAnimatorWrapper : AnimatorWrapper
{
public DoorAnimatorWrapper(Animator animator) : base(animator) { }
public void IsOpen(bool isOpen) => _animator.SetBool("Open", isOpen);
}
}

在使用時,透過AnimatorWrapper類曝露出來的IsOpen去操作animator。

1
2
3
4
5
6
7
8
9
private DoorAnimatorWrapper _animatorWrapper;
private void Awake()
{
var animator = GetComponent<Animator>();
_animatorWrapper = new DoorAnimatorWrapper(animator);
}

private void OpenDoor(bool isOpen)
=> _animatorWrapper.IsOpen(isOpen);

透過這種方式它能夠幫助減少因為打錯字符串而導致的錯誤,並提供了一個更加直觀、安全的介面來操作 Animator。

參考:Typos with string animation parameters

使用LiteDB

LiteDB是一個簡單且快速的NoSQL Database,它特色有

  • 輕巧,< 450kb並且完全由.NET C#受控程式碼(managed code)編寫
  • 可以使用NuGet套件管理器安裝
  • 跨平台
  • 單一存放檔案
  • 支援LINQ query

以下是簡易的使用方式

  1. 使用NuGet管理套件搜尋LiteDB並安裝
  2. 接下來便可以使用LiteDatabase建立或是開啟database
1
2
3
4
5
6
string dbPath = @"./MyData.db";

// Open database (or create if doesn't exist)
using (var db = new LiteDatabase(dbPath)){
...
}
  1. 建立一個POCO class
1
2
3
4
5
6
7
8
9
public class Customer
{
public int Id { get; set; }
public string Name { get; set; }
public int Age { get; set; }
public string[] Phones { get; set; }
public bool IsActive { get; set; }
}

  1. 使用 db.GetCollection<Customer>("customers") 去取得customer collection
  2. collection的Insert方法插入資料

以下是完整的例子(來自LiteDB)

1
2
3
4
5
6
7
8
9
10
11
12
13
14
15
16
17
18
19
20
21
22
23
24
25
26
27
28
29
30
31
32
string dbPath = @"./MyData.db";

// Open database (or create if doesn't exist)
using (var db = new LiteDatabase(dbPath))
{
// Get customer collection
var col = db.GetCollection<Customer>("customers");

// Create your new customer instance
var customer = new Customer
{
Name = "John Doe",
Phones = new string[] { "8000-0000", "9000-0000" },
Age = 39,
IsActive = true
};

// Create unique index in Name field
col.EnsureIndex(x => x.Name, true);

// Insert new customer document (Id will be auto-incremented)
col.Insert(customer);

// Update a document inside a collection
customer.Name = "123John Doe212";

col.Update(customer);

// Use LINQ to query documents (with no index)
var results = col.Find(x => x.Age > 20);
}

以下是方便你操作DB的GUI介面工具

  • OneBella:跨平台的GUI工具,支援修改和查詢,需要LiteDB 5+
    • 使用方式非常簡單,進入OneBella的 Release選擇下載對應平台的zip檔案即可
  • LiteDB.Studio
    • 一樣去Release下載最新版本即可,目前似乎只有Windows版本。