Factory pattern

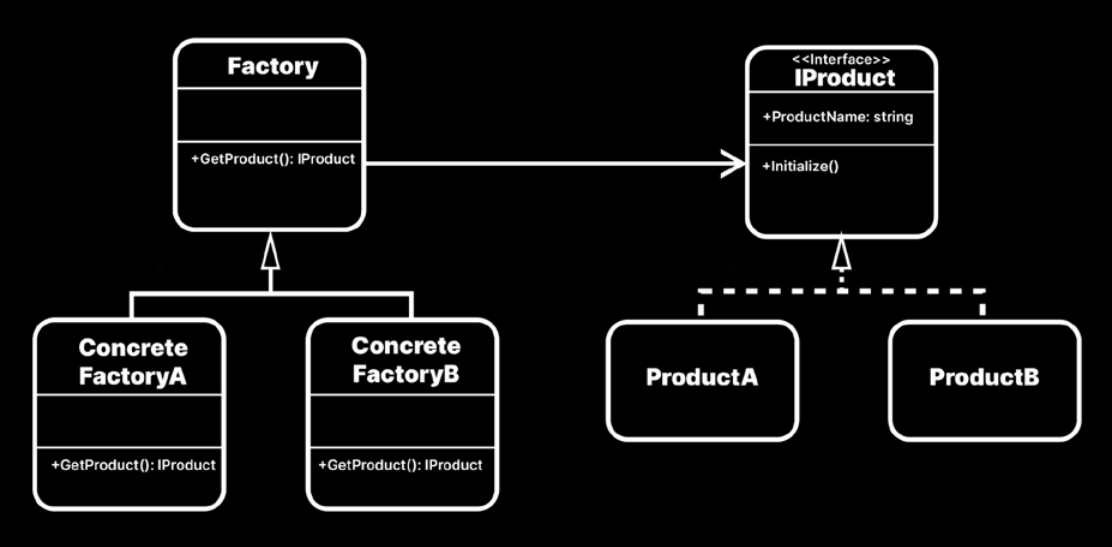
工廠模式(Factory pattern):讓一個特別的物件(工廠Factory)去建立其他物件(產品Product)。它封裝了生成其他物件(產品Product)的邏輯,最直接可見的好處是整理了你的程式碼。工廠物件可以有多種子類(subclass),用來產生多種不同的產品。

優點

  • 使用工廠模式的好處是當你增加產品時,你不需要修改先前的程式碼就可以增加產品

缺點

  • 增加程式碼的複雜度

建立一個IProduct介面,訂立產品必須要有的規則

  • 每個產品一定要有自己的名字(ProductName)
  • 每個產品有初始化自己的方式(Initialize())
  • 產品種類比較不會有共用的邏輯,因此將其設計為介面
    1
    2
    3
    4
    5
    public interface IProduct
    {
    public string ProductName { get; set; }
    public void Initialize();
    }

以下建立一個抽象工廠,抽象工廠用來規定工廠必須要有的動作

  • 每個工廠必須要能在對應的位置(Vector3 position)上生產產品(GetProduct())
    1
    2
    3
    4
    5
    6
    public abstract class Factory : MonoBehaviour
    {
    public abstract IProduct GetProduct(Vector3 position);
    // shared method with all factories

    }

建立一個產品A

  • 它含有一個ParticleSystem,並在初始化方法(Initialize)中會播放此ParticleSystem
    1
    2
    3
    4
    5
    6
    7
    8
    9
    10
    11
    12
    13
    14
    public class ProductA : MonoBehaviour, IProduct
    {
    [SerializeField] private string productName = "ProductA";
    public string ProductName { get => productName; set => productName = value ; }
    private ParticleSystem particleSystem;
    public void Initialize()
    {
    // any unique logic to this product
    gameObject.name = productName;
    particleSystem = GetComponentInChildren<ParticleSystem>();
    particleSystem?.Stop();
    particleSystem?.Play();
    }
    }

建立一個工廠A

  • 它含有一個產品A的依賴,在GetProduct()方法中建立產品A實體之後,會呼叫產品A實體上的Initialize()方法用來初始化該實體。
    1
    2
    3
    4
    5
    6
    7
    8
    9
    10
    11
    12
    13
    public class ConcreteFactoryA : Factory
    {
    [SerializeField] private ProductA productPrefab;
    public override IProduct GetProduct(Vector3 position)
    {
    // 使用Prefab在指定的position上建立一個instance
    GameObject instance = Instantiate(productPrefab.gameObject, position, Quaternion.identity);
    ProductA newProduct = instance.GetComponent<ProductA>();
    // 初始化產品A
    newProduct.Initialize();
    return newProduct;
    }
    }

建立一個產品B

  • 它含有一個AudioSource,在初始化方法(Initialize)中會播放此AudioSource
    1
    2
    3
    4
    5
    6
    7
    8
    9
    10
    11
    12
    13
    14
    15
    16
    public class ProductB : MonoBehaviour, IProduct
    {
    [SerializeField] private string productName = "ProductB";
    public string ProductName { get => productName; set => productName = value; }

    private AudioSource audioSource;

    public void Initialize()
    {
    // do some logic here
    audioSource = GetComponent<AudioSource>();
    audioSource?.Stop();
    audioSource?.Play();

    }
    }

建立一個工廠B

  • 工廠B與工廠A類似,不過依賴換為產品B
    1
    2
    3
    4
    5
    6
    7
    8
    9
    10
    11
    12
    13
    14
    15
    16
    17
    18
    19
    20
    21
    public class ConcreteFactoryB : Factory
    {
    // used to create a Prefab
    [SerializeField] private ProductB productPrefab;

    public override IProduct GetProduct(Vector3 position)
    {
    // create a Prefab instance and get the product component
    GameObject instance = Instantiate(productPrefab.gameObject, position, Quaternion.identity);
    ProductB newProduct = instance.GetComponent<ProductB>();

    // each product contains its own logic
    newProduct.Initialize();

    // add any unique behavior to this factory
    instance.name = newProduct.ProductName;
    Debug.Log(GetLog(newProduct));

    return newProduct;
    }
    }

建立一個使用工廠的類

  • ClickToCreate這個類使用了工廠A與工廠B,
    1
    2
    3
    4
    5
    6
    7
    8
    9
    10
    11
    12
    13
    14
    15
    16
    17
    18
    19
    20
    21
    22
    23
    24
    25
    26
    27
    28
    29
    30
    31
    32
    public class ClickToCreate : MonoBehaviour
    {
    [SerializeField] private LayerMask layerToClick;
    [SerializeField] private Vector3 offset;
    [SerializeField] Factory[] factories;

    private Factory factory;

    private void Update()
    {
    GetProductAtClick();
    }

    private void GetProductAtClick()
    {
    // check click with raycast
    if (Input.GetMouseButtonDown(0))
    {
    // choose a random factory
    factory = factories[Random.Range(0, factories.Length)];

    // instantiate product at raycast intersection
    Ray ray = Camera.main.ScreenPointToRay(Input.mousePosition);
    RaycastHit hitInfo;

    if (Physics.Raycast(ray, out hitInfo, Mathf.Infinity, layerToClick) && factory != null)
    {
    factory.GetProduct(hitInfo.point + offset);
    }
    }
    }
    }

SOLID principles

SOLID principles是程式設計師必須了解的五個原則

  • 單一職責原則(Single responsibility):確保類只負責一件事。
  • 開閉原則(Open-closed):在不更改現有程式碼的情況下,可以擴展一個類的功能。
  • 里氏替換原則(Liskov substitution):子類可以替代基類,而不影響程式的正確性。
  • 介面隔離原則(Interface segregation):讓介面(interface)盡可能簡單,確保實作類只需要實作其所需的介面方法。
  • 依賴倒置原則(Dependency inversion):高層模組不應依賴於低層模組,兩者都應依賴於抽象。具體實現應依賴於抽象,而不是抽象依賴於具體實現。

這些原則可以讓你的程式設計更具彈性和可維護性,但在不確定是否要使用它們時,請記住KISS(Keep It Simple, Stupid)原則,不要強迫將其應用於程式碼中。

Dependency inversion principle

依賴倒置原則(Dependency inversion principle)有兩個主要部分:

  • 高層模組不應該依賴於低層模組。兩者都應該依賴於抽象。
  • 抽象不應該依賴於具體實現。具體實現應該依賴於抽象。

在軟體設計中,如果一個類(class)使用了另一個類稱為依賴(dependencycoupling),每增加一點依賴,就會增加一些風險,因為當某個類A知道了另一個類B的內容太多的話(稱為高度耦合high degree of coupling),當B更改的話,那麼A也會需要大量的修改,這樣很容易產生錯誤。

在設計中,有些類是high-level的,而有些類是low-level的,high-level的類會依靠low-level的類去完成某些工作。我們在設計時,要考慮依賴倒置原則,減少一些耦合度。

如果要建立一個遊戲,其中角色可以探索房間,並使用開關(switch)將門(dor)打開,在實作時,你可能會想到要建立一個Switch類與一個Door類,其中

  • Switch屬於high-level的類,它負責判斷角色是否移動到對應的位置,並是否觸發對應的行為
  • Door屬於low-level的類,它負責開關門的實際操作邏輯

如果沒有使用依賴倒置原則的話,可能會如下實作

  • Switch依賴於Door,當條件觸發時,呼叫door去開門
    1
    2
    3
    4
    5
    6
    7
    8
    9
    10
    11
    12
    13
    14
    15
    16
    17
    18
    19
    20
    21
    22
    23
    24
    25
    26
    27
    28
    29
    30
    31
    32
    public class Switch
    {
    public Door door;
    public bool isActivated;

    public void Toggle()
    {
    if (isActivated)
    {
    isActivated = false;
    door.Close();
    }
    else
    {
    isActivated = true;
    door.Open();
    }
    }
    }

    public class Door
    {
    public void Open()
    {
    Debug.Log("The door is open.");
    }

    public void Close()
    {
    Debug.Log("The door is closed.");
    }
    }

這樣的實作沒有問題,但是如果開關(Switch)不只是開門,還可能會觸發一些陷阱的話,就不得不去修改Switch類,這樣違反了開閉原則(Open-closed principle)

你可以將開關這個動作抽象=>ISwitchable。

1
2
3
4
5
6
public interface ISwitchable
{
bool IsActive { get; }
void Activate();
void Deactivate();
}

讓Door去實作這個抽象ISwitchable

1
2
3
4
5
6
7
8
9
10
11
12
13
14
15
16
17
public class Door : MonoBehaviour, ISwitchable
{
private bool isActive;
public bool IsActive => isActive;

public void Activate()
{
isActive = true;
Debug.Log("The door is open.");
}

public void Deactivate()
{
isActive = false;
Debug.Log("The door is closed.");
}
}

而Switch則依賴這個抽象ISwitchable

1
2
3
4
5
6
7
8
9
10
11
12
13
14
15
16
public class Switch : MonoBehaviour
{
public ISwitchable client;

public void Toggle()
{
if (client.IsActive)
{
client.Deactivate();
}
else
{
client.Activate();
}
}
}

透過這種方式將上層對底層的依賴剝離至抽象,讓上層可以不需更改程式碼,只需傳入不同的ISwitch實作便可以做到開關不同的物件。

Interface segregation principle

介面隔離原則(Interface segregation principle):不應該讓一個類(class)為了實作某個介面(interface)而去讓這個類實作用不到的方法,簡單的說就是要避免一個大型的介面(interface)。最簡單的思考方向是使用單一職責(singleresponsibility principle)去考慮,讓每個介面保持單一並簡單。

假設要製作一個策略遊戲,這個遊戲有多個角色單位,每個單位會有血量,速度,等狀態,
可能會想將這些單位的狀態抽象為一個介面,如下:

1
2
3
4
5
6
7
8
9
10
11
12
13
14
15
16
17
public interface IUnitStats
{
float Health { get; set; }
int Defense { get; set; }
void Die();
void TakeDamage();
void RestoreHealth();
float MoveSpeed { get; set; }
float Acceleration { get; set; }
void GoForward();
void Reverse();
void TurnLeft();
void TurnRight();
int Strength { get; set; }
int Dexterity { get; set; }
int Endurance { get; set; }
}

但是在遊戲中,有會有一些不可移動但是可以破壞的物件,這些物件也會需要生命值(Health),但是不需要移動相關的方法(如GoForward),因此這個介面太臃腫了。

可以考慮將這些行為切割為較小的介面,每個介面負責專一的職責

1
2
3
4
5
6
7
8
9
10
11
12
13
14
15
16
17
18
19
20
21
22
23
public interface IMovable
{
float MoveSpeed { get; set; }
float Acceleration { get; set; }
void GoForward();
void Reverse();
void TurnLeft();
void TurnRight();
}
public interface IDamageable
{
float Health { get; set; }
int Defense { get; set; }
void Die();
void TakeDamage();
void RestoreHealth();
}
public interface IUnitStats
{
int Strength { get; set; }
int Dexterity { get; set; }
int Endurance { get; set; }
}

在實作時,敵人單位會移動,有狀態,並且是可損壞的

1
2
3
4
5
6
7
8
9
10
11
12
13
14
15
16
17
18
public class EnemyUnit : MonoBehaviour, IDamageable, IMovable, IUnitStats
{
public float Health { get; set; }
public int Defense { get; set; }
public float MoveSpeed { get; set; }
public float Acceleration { get; set; }
public int Strength { get; set; }
public int Dexterity { get; set; }
public int Endurance { get; set; }

public void Die() { ... }
public void TakeDamage() { ... }
public void RestoreHealth() { ... }
public void GoForward() { ... }
public void Reverse() { ... }
public void TurnLeft() { ... }
public void TurnRight() { ... }
}

箱子只能被損壞

1
2
3
4
5
6
7
8
9
public class Box : MonoBehaviour, IDamageable
{
public float Health { get; set; }
public int Defense { get; set; }

public void Die() { ... }
public void TakeDamage() { ... }
public void RestoreHealth() { ... }
}

這樣,每個類只需要實作其所需的介面,避免了因為實作不必要的方法而增加的複雜性。

Liskov substitution principle

里氏替換原則(Liskov substitution principle):子類(Subclass)必須要可以替代父類(Super class),即任何父類出現的地方,都可以使用其子類替換,而不影響程式的正確性。

在考慮里氏替換原則時,可以遵循以下幾點:

  • 避免移除特性:如果在父類的行為中,如果子類中沒有這個特性的話,你可能違反了里氏替換原則(If you are removing features when subclassing, you are likely breaking Liskov substitution)。在設計時,
    • 如果子類中出現了NotImplementedException,那你可能違反了里氏替換原則
    • 如果出現只能是空白的方法也可能違反了里氏替換原則
  • 保持抽象簡單:盡量讓抽象保持簡單(Keep abstractions simple):如果在基類放入越多的邏輯,那你有很大的機率違反了里氏替換原則。基類應只包含子類可以共有的方法。
  • 子類需要有與基類相同的公有成員(A subclass needs to have the same public members as the base class):這些成員在呼叫時還需要具有相同的行為。
  • 先考慮類的API再建立層次結構:在建立類的層次結構前先考慮它們的API(Consider the class API before establishing class hierarchies):現實中的分類並不總能完全轉為類的結構,例如汽車(Car)與火車(Train)皆是車輛但它們不能直接繼承同一個父類,最好是將它們分開繼承
  • 優先考慮組合而非繼承(Favor composition over inheritance):在實作時,先考慮使用介面 (Interface) 或是將行為委託給其他類,而不是直接使用繼承。

例如:假設有一個交通工具 (Vehicle) 的類層次結構,會思考:汽車 (Car) 和卡車 (Truck) 繼承自交通工具 (Vehicle),

1
2
3
4
5
6
7
8
9
10
11
12
13
14
15
16
17
18
19
20
21
22
23
24
25
public class Vehicle
{
public float Speed { get; set; }
public Vector3 Direction { get; set; }

public virtual void GoForward()
{
// 移動向前的邏輯
}

public virtual void Reverse()
{
// 倒車的邏輯
}

public virtual void TurnRight()
{
// 右轉的邏輯
}

public virtual void TurnLeft()
{
// 左轉的邏輯
}
}
1
2
3
4
5
6
7
8
9
10
11
public class Navigator
{
public void Move(Vehicle vehicle)
{
vehicle.GoForward();
vehicle.TurnLeft();
vehicle.GoForward();
vehicle.TurnRight();
vehicle.GoForward();
}
}

但若是將火車(Train)作為車輛(Vehicle)的子類則會違反里氏替換原則,這是因為火車沒有右轉(TurnRight)與左轉(TurnLeft)的行為,因此火車不能作為車輛(Vehicle)的子類。

為了修正,可以將轉彎(Turn)和移動(Move)動作抽象為介面可轉彎(ITurnable)和可移動(IMovable)

1
2
3
4
5
6
7
8
9
10
11
public interface ITurnable
{
void TurnRight();
void TurnLeft();
}

public interface IMovable
{
void GoForward();
void Reverse();
}

並將車輛分為可以在一般道路上行駛的車輛RoadVehicle,它實作可轉彎(ITurnable)和可移動(IMovable)

1
2
3
4
5
6
7
8
9
10
11
12
13
14
15
16
17
18
19
20
21
22
23
24
25
public class RoadVehicle : IMovable, ITurnable
{
public float Speed { get; set; }
public float TurnSpeed { get; set; }

public virtual void GoForward()
{
// 移動向前的邏輯
}

public virtual void Reverse()
{
// 倒車的邏輯
}

public virtual void TurnLeft()
{
// 左轉的邏輯
}

public virtual void TurnRight()
{
// 右轉的邏輯
}
}

與需要在軌道上行駛的車輛RailVehicle,它只實作可移動(IMovable)

1
2
3
4
5
6
7
8
9
10
11
12
13
14
public class RailVehicle : IMovable
{
public float Speed { get; set; }

public virtual void GoForward()
{
// 移動向前的邏輯
}

public virtual void Reverse()
{
// 倒車的邏輯
}
}

最後,定義汽車和火車的類:

1
2
3
4
5
6
7
8
9
public class Car : RoadVehicle
{
// Car特有的實作
}

public class Train : RailVehicle
{
// Train特有的實作
}

這樣,Navigator 類可以安全地操作所有可以移動的交通工具,而不需要關心它們是否能轉彎:

1
2
3
4
5
6
7
8
9
10
11
12
13
14
public class Navigator
{
public void Move(IMovable movable)
{
movable.GoForward();
movable.Reverse();
}

public void Turn(ITurnable turnable)
{
turnable.TurnLeft();
turnable.TurnRight();
}
}

Open-closed principle

開閉原則(Open-closed principle):開閉原則指的是類(Class)要可以對外擴展(open for extension),但是對內部修改封閉(closed for modification)。簡單的說就是可以為你的程式添加新的行為,但是不去修改現有程式碼。

一個經典的例子是計算體積,我們要建立一個 AreaCalculator 類,用來計算物體的體積,

下面是一個不遵守開閉原則的例子。

  • 定義了一個AreaCalculator類,它含有GetRectangleAreaGetCircleArea方法,分別用來計算四邊形與圓形的體積
  • 定義了一個Rectangle類,用來存放四邊形的寬和高
  • 定義了一個Circle類,用來存放圓形半徑
    1
    2
    3
    4
    5
    6
    7
    8
    9
    10
    11
    12
    13
    14
    15
    16
    17
    18
    19
    20
    21
    22
    public class AreaCalculator
    {
    public float GetRectangleArea(Rectangle rectangle)
    {
    return rectangle.width * rectangle.height;
    }
    public float GetCircleArea(Circle circle)
    {
    return circle.radius * circle.radius * Mathf.PI;
    }
    }

    public class Rectangle
    {
    public float width;
    public float height;
    }

    public class Circle
    {
    public float radius;
    }
    這個AreaCalculator類是可以運作的如預期,但是如果添加更多計算體積的方法(例如三角形或五邊形),就會一直變更這個AreaCalculator類,這違反了開閉原則。

建立一個Shape基類,

1
2
3
4
public abstract class Shape
{
public abstract float CalculateArea();
}

所有物體皆繼承這個Shape基類

1
2
3
4
5
6
7
8
9
10
11
12
13
14
15
16
17
18
19
public class Rectangle : Shape
{
public float width;
public float height;
public override float CalculateArea()
{
return width * height;
}
}

public class Circle : Shape
{
public float radius;
public override float CalculateArea()
{
return radius * radius * Mathf.PI;
}
}

AreaCalculator類更改為依賴Shape

1
2
3
4
5
6
7
public class AreaCalculator
{
public float GetArea(Shape shape)
{
return shape.CalculateArea();
}
}

如此每當添加新物體時,也不用更改AreaCalculator類,只需要新增一個繼承Shape的類即可

Single-responsibility principle

單一職責(Single-responsibility principle):一個類(class)應該只因為它負責的那件事而被更改。

注意:在單一職責中,要取得平衡,不要過度的拆分,例如拆分到一個類中只有一個方法。

拆分時可以考慮以下因素:

  • 可讀性(Readability):簡短的類通常比較容易閱讀和理解。雖然“簡短”沒有明確的定義,但通常開發者認為200~300行的類是比較合適的。
  • 擴展性(Extensibility):類是否容易擴展,修改或替換這些類時不應該無意破壞其他部分。
  • 可重用性(Reusability):是否可以更方便地重新使用這些類

以下是一個將聲音,輸入,移動皆包含在一起的Player類,隨著專案的發展,這個類會越來愈難維護,例如更改聲音會動到這個類,更改移動輸入會動到這個類…

1
2
3
4
5
6
7
8
9
10
11
12
13
14
15
16
17
18
19
20
21
22
23
24
public class UnrefactoredPlayer : MonoBehaviour
{
[SerializeField] private string inputAxisName;
[SerializeField] private float positionMultiplier;
private float yPosition;
private AudioSource bounceSfx;

private void Start()
{
bounceSfx = GetComponent<AudioSource>();
}

private void Update()
{
float delta = Input.GetAxis(inputAxisName) * Time.deltaTime;
yPosition = Mathf.Clamp(yPosition + delta, -1, 1);
transform.position = new Vector3(transform.position.x, yPosition * positionMultiplier, transform.position.z);
}

private void OnTriggerEnter(Collider other)
{
bounceSfx.Play();
}
}

應考慮將這些行為拆分到各自的類,如 PlayerAudio、PlayerInput、PlayerMovement 等。Player 類仍然依賴這些行為,但這些行為已經被拆分到各自的類中。

1
2
3
4
5
6
7
8
9
10
11
12
13
14
15
16
17
18
19
20
21
22
23
24
25
26
27
28
29
[RequireComponent(typeof(PlayerAudio), typeof(PlayerInput), typeof(PlayerMovement))]
public class Player : MonoBehaviour
{
private PlayerAudio playerAudio;
private PlayerInput playerInput;
private PlayerMovement playerMovement;

private void Start()
{
playerAudio = GetComponent<PlayerAudio>();
playerInput = GetComponent<PlayerInput>();
playerMovement = GetComponent<PlayerMovement>();
}
}

public class PlayerAudio : MonoBehaviour
{
// PlayerAudio specific implementation
}

public class PlayerInput : MonoBehaviour
{
// PlayerInput specific implementation
}

public class PlayerMovement : MonoBehaviour
{
// PlayerMovement specific implementation
}

Observer pattern

在遊戲中,會發生很多事,例如擊敗一個敵人,玩家升級等,如果直接將這些行為直接在各個物件中執行,會增加很多依賴,當程式碼成長到一定程度時,會變得很難維護。

觀察者模式(Observer pattern)通常會用來解決此問題。它使用一種one-to-many依賴(dependency),讓你的物件之間的溝通可以保持在一種低耦合(loosely coupled)的關係,當一個物件的狀態改變時,會自動通知所有想要接收此訊息的物件。例如廣播系統,廣播會向外發送音樂給收聽者,廣播不需要知道誰在收聽,它只要使用固定的頻道發送音樂即可,而收聽者只需要將頻道調整到該廣播系統的頻道即可收到音樂。

  • 發送消息的物件稱為subject
  • 其他接收此消息的物件稱為observers

優點:

  • 發送消息的物件(subject)與接收此消息的物件(observers)解耦(Loose coupling)
    • 發送消息的物件不需要知道關於接收此消息的物件的資訊,它只需要負責將消息發送出去;
    • 接收此消息的物件會有一個發送消息物件的依賴,但是接收此消息的物件之間互相不知道彼此
  • 將observer需要對訊息做出反應的邏輯放到對應的observer中,讓他們各自維護。變得較容易測試與除錯
  • 非常適合使用者介面(User Interface),MVPMVC patterns就是使用觀察者模式(Observer pattern)

缺點:

  • 增加程式複雜度,
  • 如果要刪除Subject的話會比較麻煩
  • Observer仍然會對Subject有依賴,
    • 可以使用一個static EventManager除去
  • 會消耗一些效能

在C#中已經有實作Observer pattern => Event

  • publisher(即subject):有一個或多個event,在執行時,會將訊息發送給註冊這些event的物件
  • observers:這些物件會有一些event handler的方法,當publisher發送訊息時,便會執行對應的event handler方法

以下是一個最簡單的例子
Subject有一個 event ThingHappened,它暴露給其他物件讓它們可以註冊

1
2
3
4
5
6
7
8
9
public class Subject
{
public event Action ThingHappened;

public void DoThing()
{
ThingHappened?.Invoke();
}
}

Observer有一個Subject依賴,用來註冊;並且有一個OnEventHandler,當Subject發送訊息時,便會執行這個方法

1
2
3
4
5
6
7
8
9
10
11
12
13
14
15
16
public class Observer
{
private Subject subjectToObserve;

public Observer(Subject subject)
{
subjectToObserve = subject;
subjectToObserve.ThingHappened += OnEventHandle;
}

private void OnEventHandler()
{
// any logic that responds to event goes here
Debug.Log("Observer responds");
}
}

Reference: https://unity.com/how-to/create-modular-and-maintainable-code-observer-pattern

Runtime DataBinding(使用UI Builder)

以下將示範如何使用UI BuilderScriptableObject來建立DataBinding

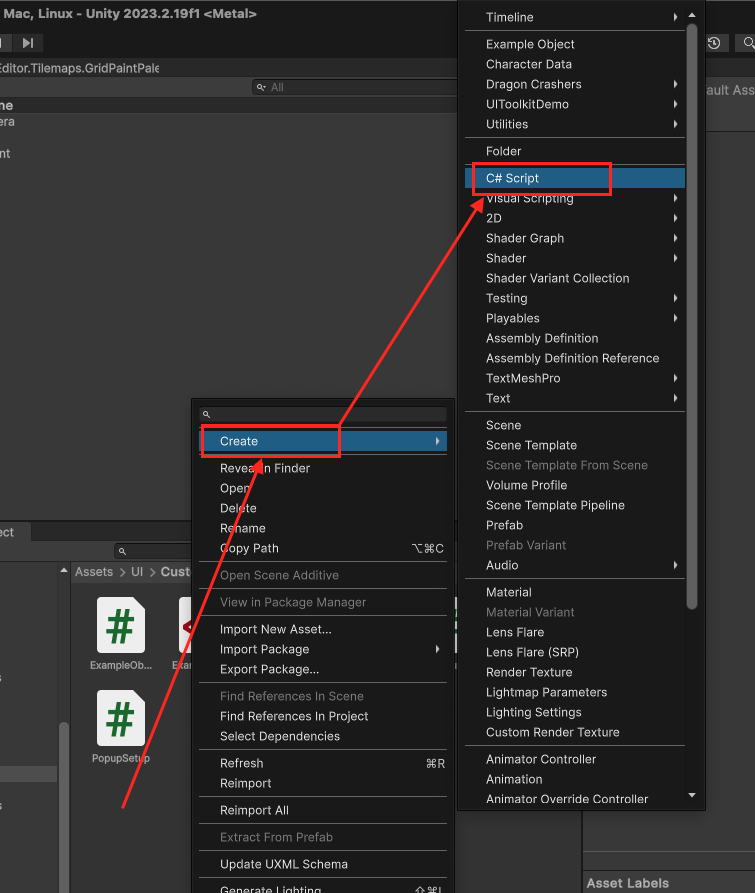
  1. 在Unity編輯器中,建立一個Script
  2. 建立一個名為ExampleObjectScriptableObject(檔案會是 ExampleObject.cs),它包含了
    • 一個string vector3Label,
    • 一個Vector3 vector3Value
    • 一個float sumOfVector3Properties,這個sumOfVector3Properties是一個readonly的屬性其值來自於vector3Label中的xyz之和,
    • 一個float dangerLevel是一個 0 ~ 1之間的數值。之後在UI Builder中更改使用Value To Progress設定,讓它可以根據ConverterGroup顯示對應的值
      1
      2
      3
      4
      5
      6
      7
      8
      9
      10
      11
      12
      13
      14
      15
      16
      17
      18
      19
      20
      21
      22
      23
      24
      25
      26
      27
      28
      29
      30
      31
      32
      33
      34
      35
      36
      37
      38
      39
      40
      41
      using Unity.Properties;
      using UnityEditor;
      using UnityEngine;
      using UnityEngine.UIElements;

      [CreateAssetMenu]
      public class ExampleObject : ScriptableObject
      {
      [InitializeOnLoadMethod]
      public static void RegisterConverters()
      {

      // Create local Converters
      var group = new ConverterGroup("Value To Progress");

      // Converter groups can have multiple converters. This example converts a float to both a color and a string.
      group.AddConverter((ref float v) => new StyleColor(Color.Lerp(Color.red, Color.green, v)));
      group.AddConverter((ref float value) =>
      {
      return value switch
      {
      >= 0 and < 1.0f / 3.0f => "Danger",
      >= 1.0f / 3.0f and < 2.0f / 3.0f => "Neutral",
      _ => "Good"
      };
      });

      // Register the converter group in InitializeOnLoadMethod to make it accessible from the UI Builder.
      ConverterGroups.RegisterConverterGroup(group);
      }

      [Header("Bind to multiple properties")]
      public string vector3Label;
      public Vector3 vector3Value;

      [CreateProperty]
      public float sumOfVector3Properties => vector3Value.x + vector3Value.y + vector3Value.z;

      [Header("Binding using a converter group")]
      [Range(0, 1)] public float dangerLevel;
      }
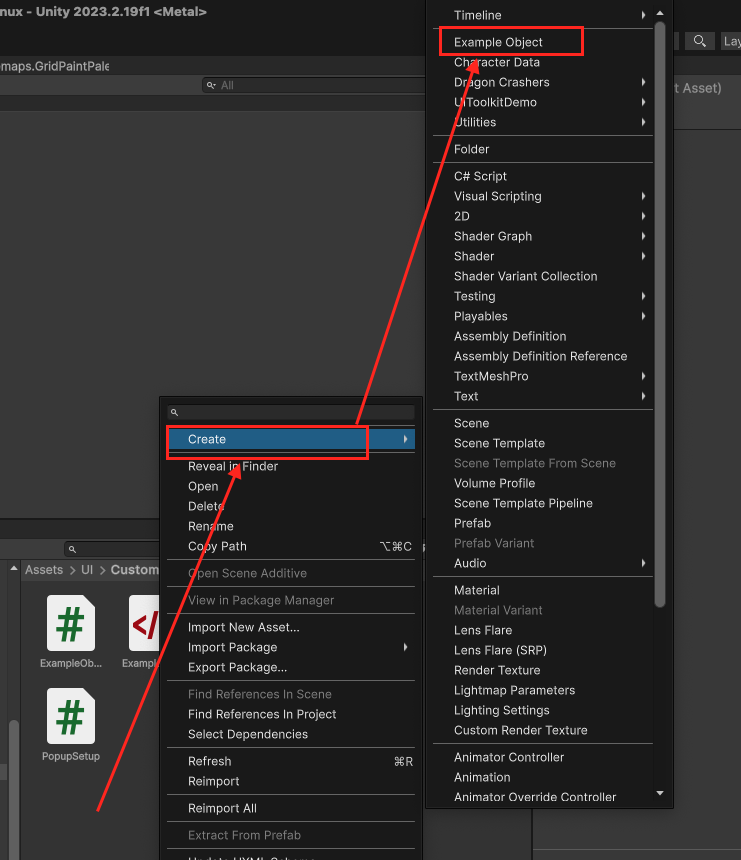
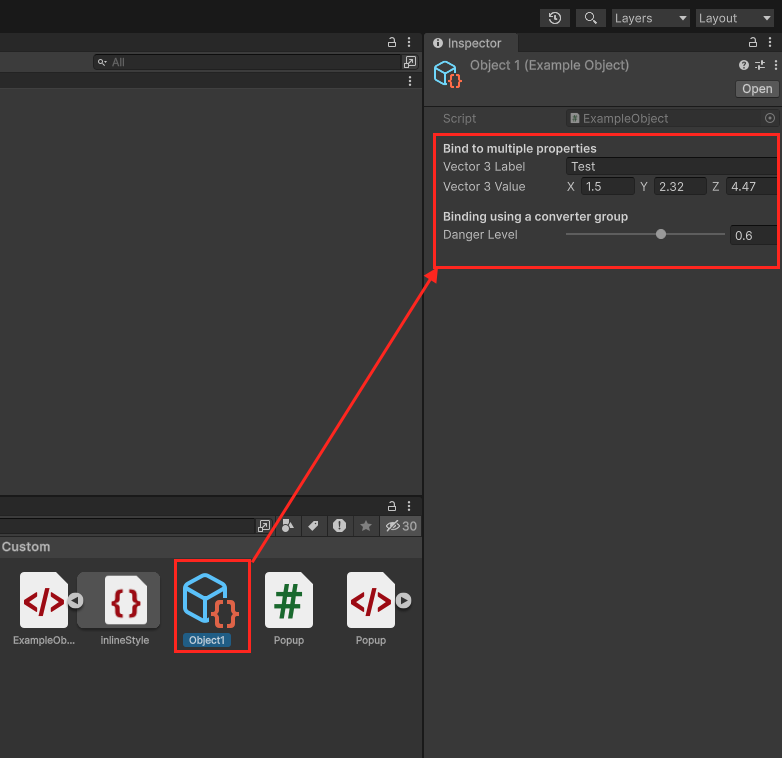
  3. 在Unity編輯器中,選擇 Create > Example Object ,建立一個Example Object並命名為Object1 (檔案會是 Object1.asset)
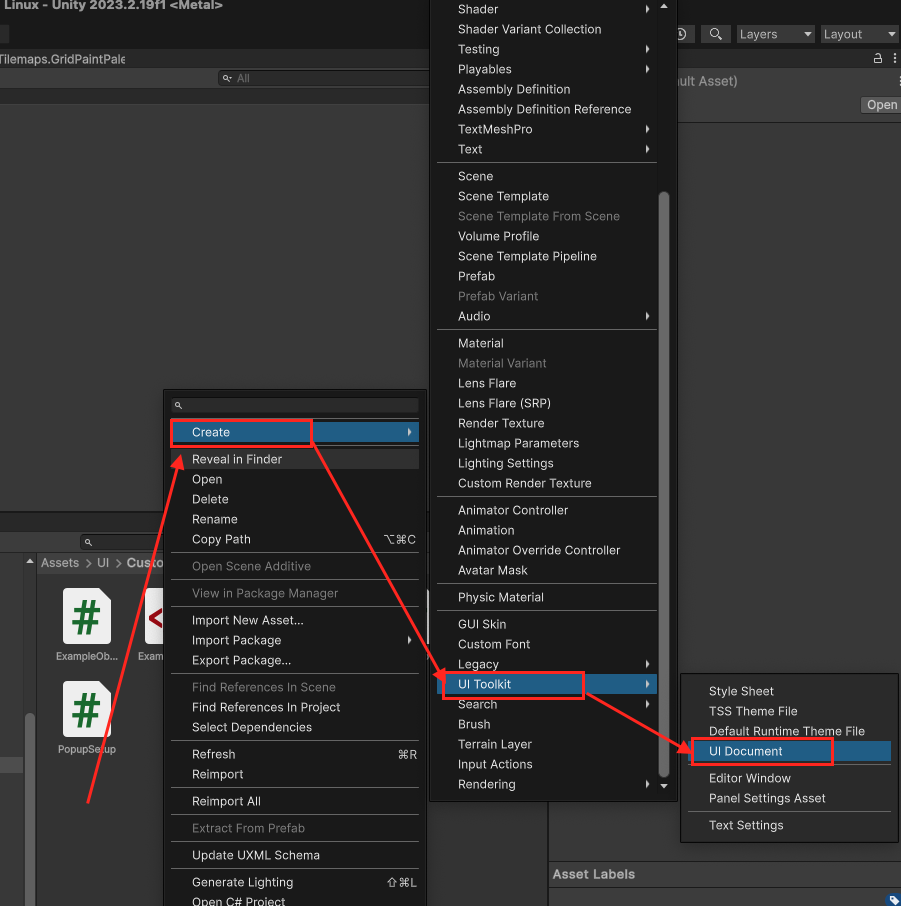
  4. 建立一個UXML,命名為ExampleObject(檔案會是ExampleObject.uxml)
  5. 點擊剛剛建立的ExampleObject.uxml,開啟UI Builder
  6. 在Hierarchy panel中,加入一個VisualElement
  7. 在剛剛建立的VisualElement中加入Vector3FieldFloatFieldLabel
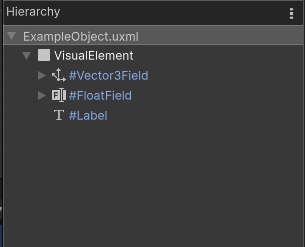
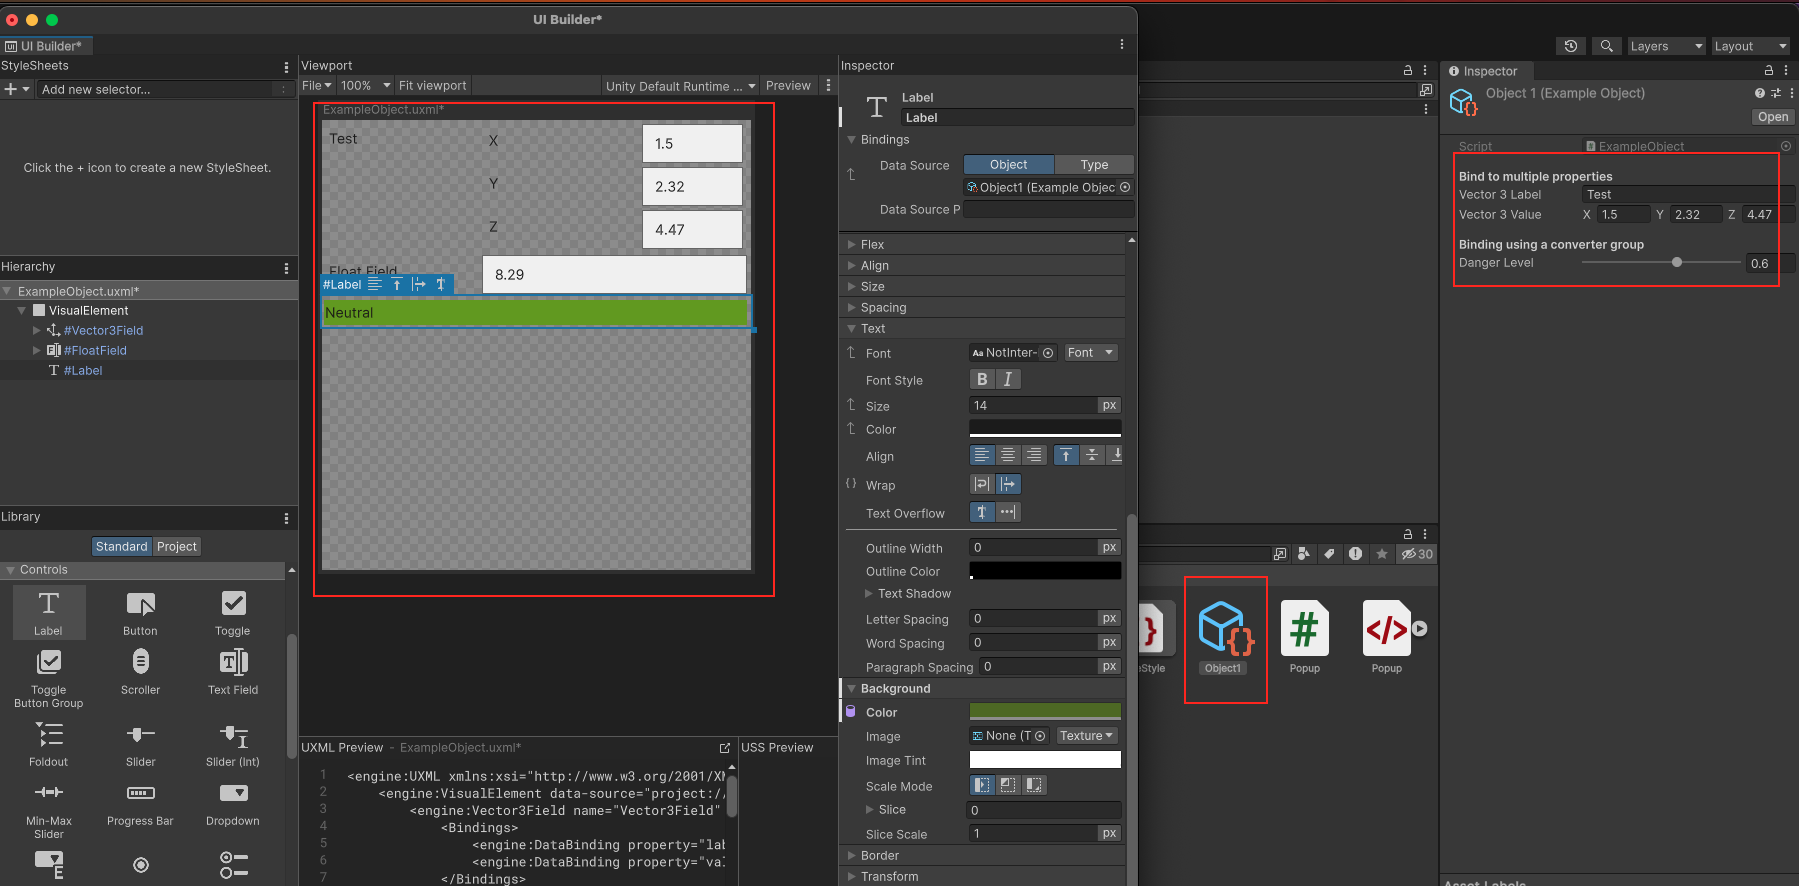
  8. 最後Hierarchy panel畫面為
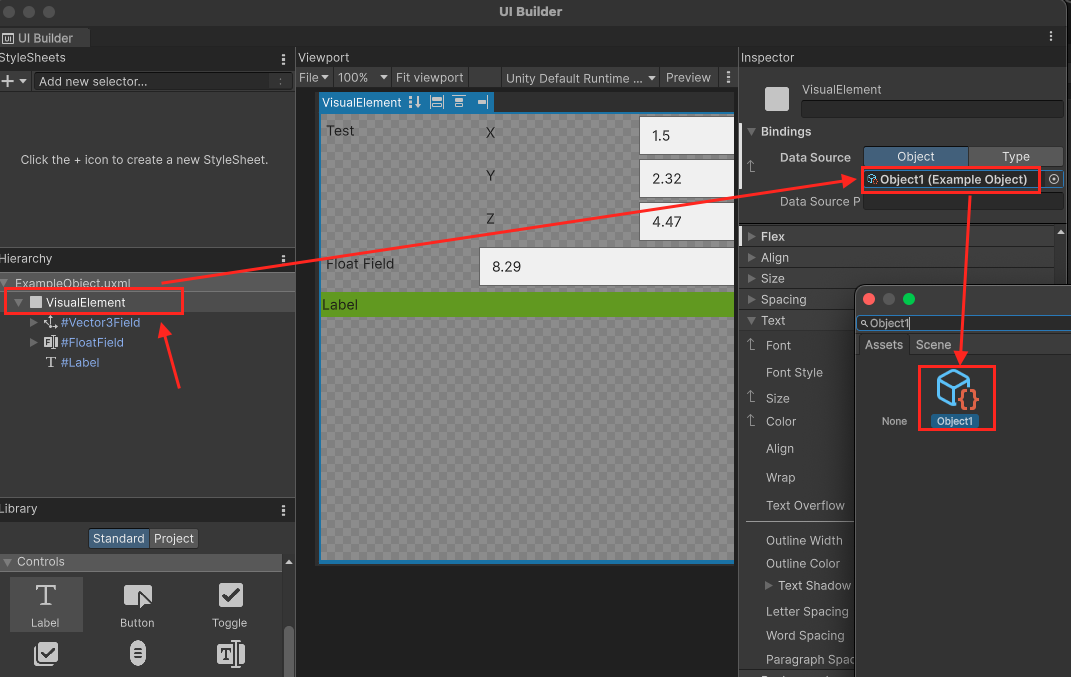
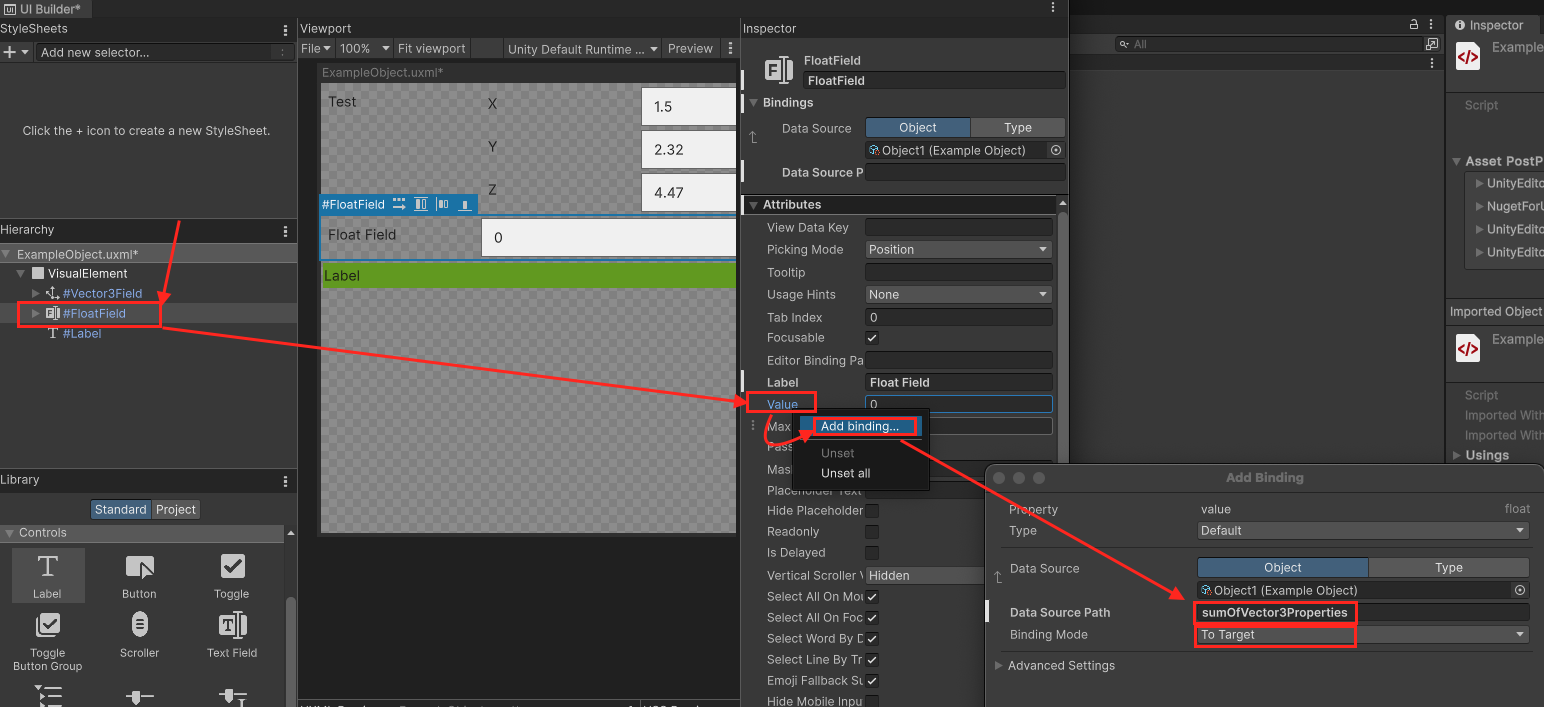
  9. 選擇最上層的VisualElement UI Element,在右邊找到Data Source,選擇之前建立的Object1.asset,這樣做,會將它的Child Elements都預設綁定Object1
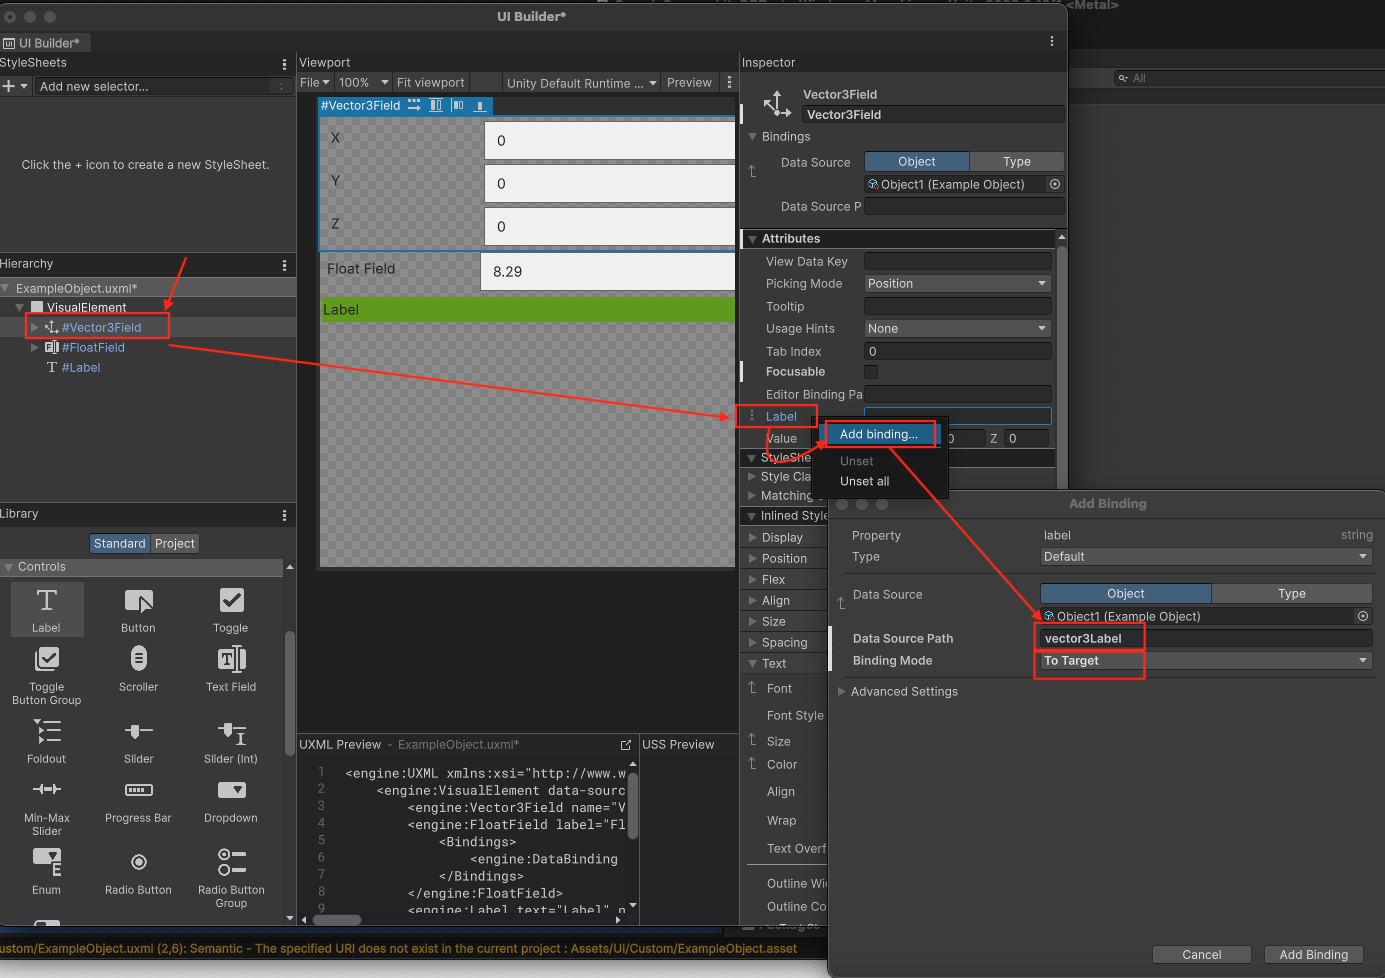
  10. 選擇Vector3Field UI Element,在右邊找到Label,對Label按一下滑鼠右鍵,點選Add binding...,在Data Source Path中找到並選擇vector3Label,Binding Mode選擇To Target
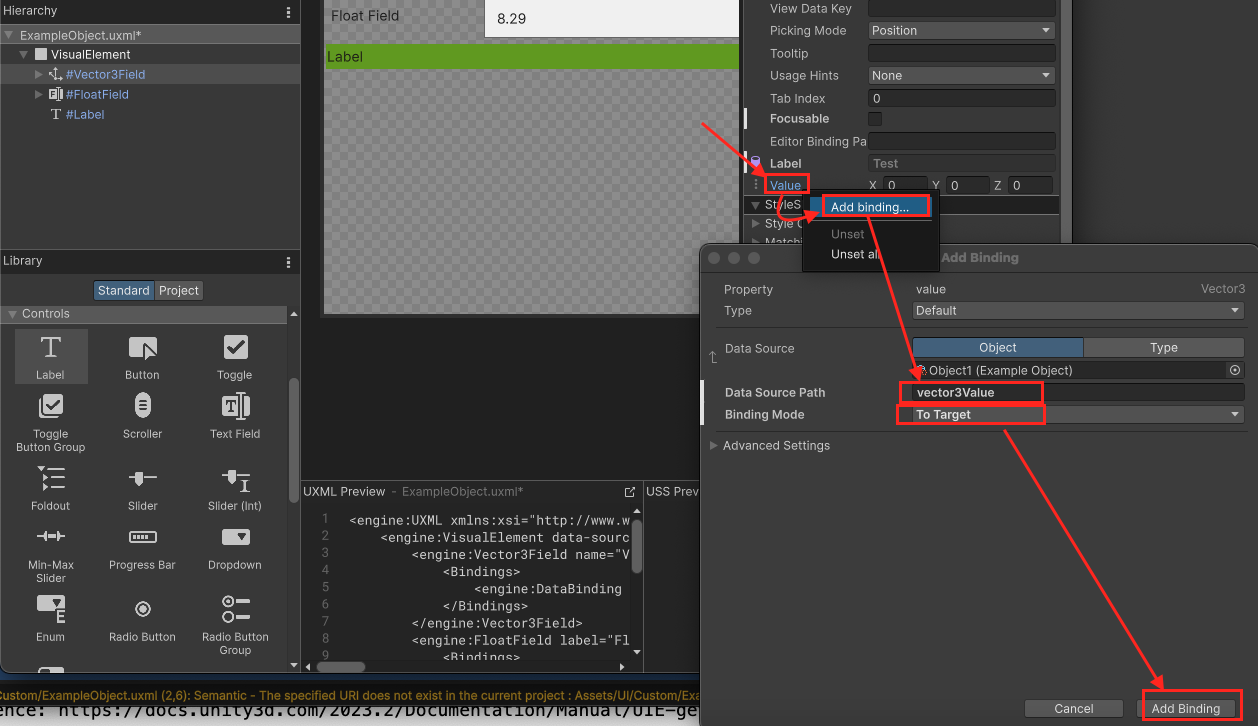
  11. 接下來,對Vector3FieldValue按一下滑鼠右鍵,點選Add binding...,在Data Source Path中找到並選擇vector3Value,Binding Mode選擇To Target
  12. 選擇Float UI Element,在右邊找到Value按一下滑鼠右鍵,點選Add binding...,在Data Source Path中找到並選擇sumOfVector3Properties,Binding Mode選擇To Target
  13. 選擇Label UI Element,
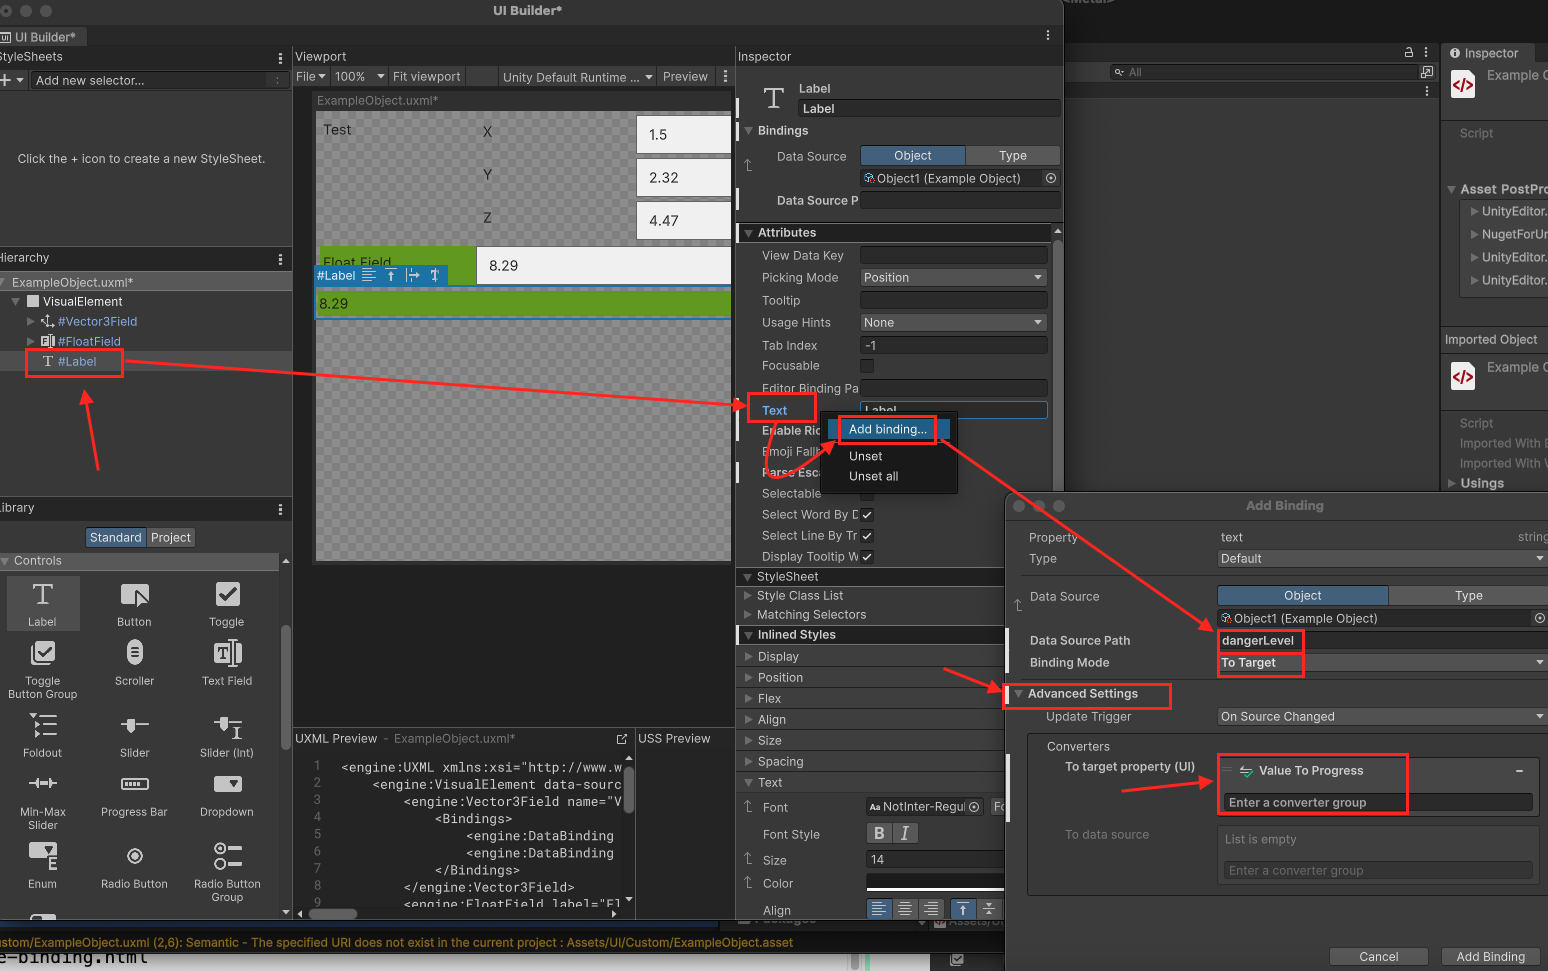
    • 在右邊找到Text,對Text按一下滑鼠右鍵,點選Add binding...,在Data Source Path中找到並選擇dangerLevel,Binding Mode選擇To Target
    • 接著打開Advanced Settings 找到 Converters > To target property (UI) 選擇 Value To Progress
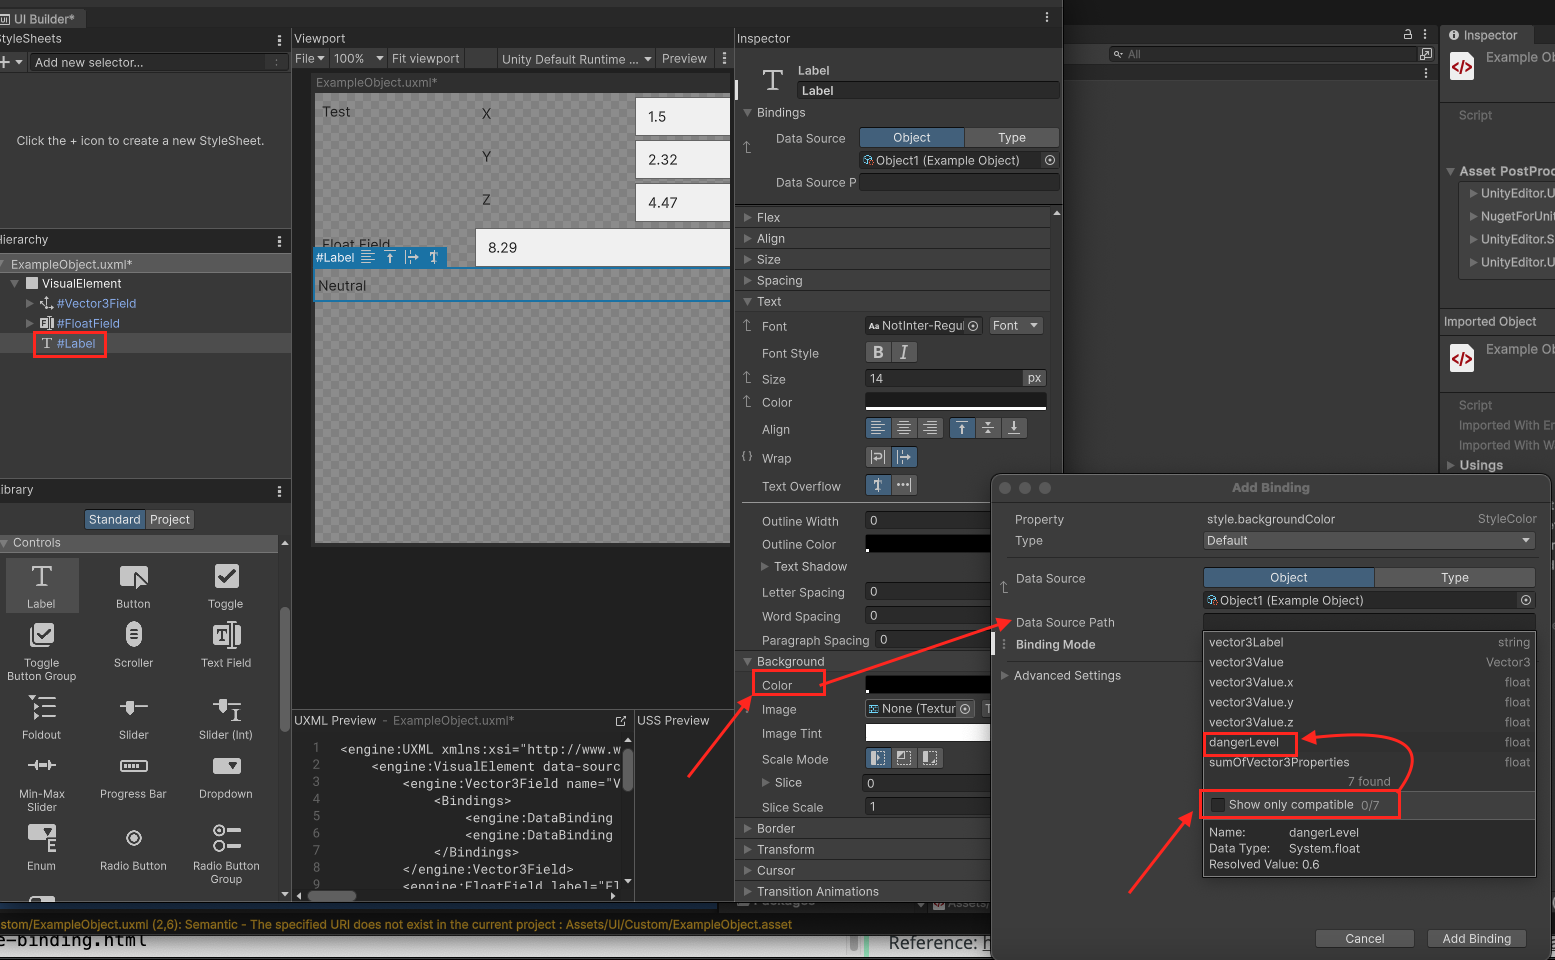
    • 接下來,在右邊找到Color,對Color按一下滑鼠右鍵,點選Add binding...,在Data Source Path勾選Show only compatible之後才會出現可以選擇的相容屬性,選擇dangerLevel,Binding Mode選擇To Target
    • 接著打開Advanced Settings 找到 Converters > To target property (UI) 選擇 Value To Progress
  14. 至此,這個UI與 ExampleObject的綁定就算完成了,UXML可能會為
    1
    2
    3
    4
    5
    6
    7
    8
    9
    10
    11
    12
    13
    14
    15
    16
    17
    18
    19
    20
    21
    22
    23
    24
    <engine:UXML xmlns:xsi="http://www.w3.org/2001/XMLSchema-instance" xmlns:engine="UnityEngine.UIElements" xmlns:editor="UnityEditor.UIElements" noNamespaceSchemaLocation="../../../UIElementsSchema/UIElements.xsd" editor-extension-mode="False">
    <engine:VisualElement data-source="project://database/Assets/UI/Custom/Object1.asset?fileID=11400000&amp;guid=a0e72bbf894f04543b805067235fe91c&amp;type=2#Object1" style="flex-grow: 1;">
    <engine:Vector3Field name="Vector3Field" focusable="false">
    <Bindings>
    <engine:DataBinding property="label" binding-mode="ToTarget" data-source-path="vector3Label" />
    <engine:DataBinding property="value" binding-mode="ToTarget" data-source-path="vector3Value" />
    </Bindings>
    </engine:Vector3Field>
    <engine:FloatField label="Float Field" name="FloatField">
    <Bindings>
    <engine:DataBinding property="value" binding-mode="ToTarget" data-source-path="sumOfVector3Properties" />
    <engine:DataBinding property="text" binding-mode="ToTarget" data-source-path="dangerLevel" source-to-ui-converters="Value To Progress" />
    <engine:DataBinding property="text" binding-mode="ToTarget" data-source-path="dangerLevel" source-to-ui-converters="Value To Progress" />
    </Bindings>
    </engine:FloatField>
    <engine:Label text="Label" name="Label" enable-rich-text="false" parse-escape-sequences="true">
    <Bindings>
    <engine:DataBinding property="value" binding-mode="ToTarget" data-source-path="sumOfVector3Properties" />
    <engine:DataBinding property="text" binding-mode="ToTarget" data-source-path="dangerLevel" source-to-ui-converters="Value To Progress" />
    <engine:DataBinding property="text" binding-mode="ToTarget" data-source-path="dangerLevel" source-to-ui-converters="Value To Progress" />
    </Bindings>
    </engine:Label>
    </engine:VisualElement>
    </engine:UXML>
  15. 可以調整Object1來觀察UI的變化
  16. 結果

Reference: https://docs.unity3d.com/2023.2/Documentation/Manual/UIE-get-started-runtime-binding.html

Eclipse常用快速鍵

以下是Eclipse常用快速鍵(shortcuts)

格式化程式碼(auto-format code):

  • Windows 或是 Linux : Ctrl + Shift + f
  • Mac : + + f

轉為大寫(Upper case)

  • Windows 或是 Linux : Ctrl + Shift + x
  • Mac : + + x

轉為小寫(Lower case)

  • Windows 或是 Linux : Ctrl + Shift + y
  • Mac : + + y

Reference: https://www.shortcutfoo.com/app/dojos/eclipse-mac/cheatsheet