分派事件(Dispatch event)

事件分派器(Event Dispacther)

UI Toolkit有一個Event System它負責監聽事件,這些事件可能來自OS或是Scripts,當事件發生時,EventDispatcher會使用最適合的分派策略(appropriate dispatching strategy)將事件分派給對應的visual elements。

Visual elements對於一些預設行為以實作多個事件,這些事件在建立,執行時可能會產生一些額外的事件,例如:MouseMoveEvent會連帶產生一個MouseEnterEvent與一個MouseLeaveEvent這些事件會被放入一個Queue中,當目前的事件處理完之後在依序處理。(MouseMoveEvent處理完之後才處理連帶產生MouseEnterEventMouseLeaveEvent)

分派行為(Dispatch Behavior)

每種Event類型都有它自己的分派行為(dispatch behavior),這些行為(behavior)可以被分為三個階段(stage):

  1. Trickles down: 事件會在這個Trickles down階段發送給element
  2. Bubbles up: 事件會在這個Bubble-up階段發送給element
  3. Cancellable: 事件取消(execution cancelled),停止(stopped)或是阻止(prevented)自己原先的動作。

事件傳播(Event propagation)

事件分派器(event dispatcher)在選好事件目標(event target)之後,就會開始計算這個事件的傳播路徑(propagation path),傳播路徑是一個list,這個list為會收到該事件的Visual elements組成,且這些Elements是經過排序的。傳播路徑發生的順序:

  1. trickle-down phase:路徑從visual element treeroot visual element開始往下延伸(descends),直到找到事件目標(event target),這個過程稱為trickle-down phase
  2. 事件目標(event target)接收到事件
  3. bubble-up phase:事件沿著tree往上延伸(ascends)直到root element,這個過程稱為bubble-up phase

事件傳播時,會根據不同的type有不同的行為,

  • 例如有些event types會忽略bubble-up phase,有些event types只會發送給event target。
  • 此外,假設有個element被隱藏(hide)或是(停用)disable,那麼這個element就不會收到事件,但是祖先(ancestors)與子孫(descendants)傳播

事件目標(Event Target)

事件的目標是根據event type而定,例如滑鼠事件(mouse event)它的目標一般來說都是最上層被點擊的element;而鍵盤事件(keyboard event)它的目標則是有焦點(focus)的element。

  • Event.target:UI Toolkit的events都有一個target屬性,它持有事件發生element的參考(reference),此外這個Event.target在分派處理(dispatch process)時是不會改變的。
  • Event.currentTargetEvent.currentTarget存放目前正在處理event的visual element

滑鼠事件

PickingMode:大部分的mouse event會使用picking mode來決定它們的target,VisualElement class有一個pickingMode屬性來做這件事,其中

  • PickingMode.Position (預設): 根據位置矩形(position rectangle)來挑選
  • PickingMode.Ignore: 防止被mouse event選到
  • 此外,你可以override VisualElement.ContainsPoint()來自定挑選邏輯

Capture events:在MouseDownEvent之後,一些elements必須捕獲指標位置(pointer position),以確保它接收到所有後續的滑鼠事件,即使游標不再懸停(hovering over)在該element上。例如,當你點擊button、slider或scroll bar時。

  • element.CaptureMouse()或是MouseCaptureController.CaptureMouse()可以獲取滑鼠。
  • MouseCaptureController.ReleaseMouse()會釋放滑鼠。
  • 當某個element持有滑鼠時,另外一個element呼叫CaptureMouse()的話,原先持有滑鼠的element會收一個MouseCaptureOutEvent並失去滑鼠
    • 應用程式中一次只能有一個element捕獲滑鼠。當一個element捕獲了滑鼠時,除了滑鼠滾輪事件(mouse wheel event)之外,它將成為所有後續滑鼠事件的target。(這僅適用於那些尚未設定target且依賴於分派過程來確定targer的滑鼠事件。)

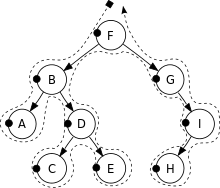
Focus Order:每個UI Toolkit panel都會有一個 focus ring,用來決定elements的focus order,預設是使用depth-first search(DFS)來決定

  • 下圖中的focus order為F,B,A,D,C,E,G,I,H
  • 有些events會使用focus order來決定來決定哪些element持有focus,例如鍵盤事件(keyboard event)的目標(target)就是具有焦點(focus)的element
  • focusable屬性決定一個visual element是否為可聚焦的(focusable)。預設中,VisualElement不是focusable的,但它的一些子類(subclass)如TextField預設是focusable。
  • tabIndex屬性可以控制focus order,
    • 預設tabIndex為零,
    • 如果tabIndex為負數,則無法使用tab鍵來聚焦在該element上。
    • 如果tabIndex為零,則由focus ring algorithm決定。
    • 如果tabIndex為正數,則比該element小的element會先被聚焦,之後才是該element。

Reference:https://docs.unity3d.com/Manual/UIE-Events-Dispatching.html

使用UQuery來查找element

UQuery受到JQueryLinq啟發,UQuery被設計為會限制動態記憶體分配(dynamic memory allocation),讓手機平台上可以擁有最佳化的效能。
可以使用QueryQ(QQuery<T>.First()的縮寫)這兩個extension method來使用UQuery。

  • QQuery實際上是使用UQueryBuilder來建構一個query,這些extension method可以減少在建立UQueryBuilder時需要撰寫的模板程式碼。
  • 在使用UQuery之前,你必須要先載入並實體化UXML,然後才能用QQuery建立選取規則(selection rules)
    • 透過選擇規則返回的elements你還可以使用UQueryBuilder上的FirstLastAtIndexChildrenWhere公開方法(public method)來更進一步的過濾它們。
  • 可以透過element的nameUSS classelement type (C# type)來找到想要的element。
  • 也可以使用predicate或是組合[複雜結構的query](#Complex hierarchical queries)來找到想要的element
  • UQuery會在初始化時Cache這些選出來的Elements。
  • UI Toolkit不會自行銷毀沒用到的visual elements,它是使用C# garbage collector 來處理,因此最好不要在UIDocuments或Window之外建立這些elements的引用,避免讓C# garbage collector無法回收。

以下使用一個UXML來說明

1
2
3
4
5
6
7
8
9
10
11
12
13
14
<UXML xmlns="UnityEngine.UIElements">
<VisualElement name="container1">
<Button name="OK" text="OK" />
<Button name="Cancel" text="Cancel" />
</VisualElement>
<VisualElement name="container2">
<Button name="OK" class="yellow" text="OK" />
<Button name="Cancel" text="Cancel" />
</VisualElement>
<VisualElement name="container3">
<Button name="OK" class="yellow" text="OK" />
<Button name="Cancel" class="yellow" text="Cancel" />
</VisualElement>
</UXML>

Query by name

語法為: Query(name: "element-name") 或是 Q(name: "element-name") ;你也可以省略參數名稱name,直接使用Query("element-name")

1
2
// 這句會回傳所有name為OK的element。
List<VisualElement> result = root.Query("OK").ToList();
1
2
3
4
// 這句會回傳找到name為OK的第一個element。
VisualElement result = root.Query("OK").First();
// 你也可以直接寫Q
VisualElement result = root.Q("OK");
1
2
// 這句是選name為OK的第二個element(第一個element的index是0)
VisualElement result3 = root.Query("OK").AtIndex(1);
1
2
// 這句是選name為OK的最後一個element
VisualElement result4 = root.Query("OK").Last();

Query by USS class

語法為:Query(className: "class-name") 或是 Q(className: "class-name")

1
2
// 這句會選出所有class name為yellow的element
List<VisualElement> result = root.Query(className: "yellow").ToList();
1
2
// 這句會選class name為yellow的第一個element
VisualElement result = root.Q(className: "yellow");

Query by element type

語法為:Query<Type>() 或是 Q<Type>()

注意:你只能使用actual type來選出Element,而不能使用base type。

1
2
3
4
// 這句會選出第一個Button element
VisualElement result = root.Q<Button>();
// 將這個button的tooltip更改
result.tooltip = "This is a tooltip!";
1
2
// 這句會選出第三個Button element
VisualElement result = root.Query<Button>().AtIndex(2);

Query with a predicate

除了可以使用nameclass-nametype來選出element以外,還可以搭配Where做更進一步的篩選,Where的參數是一個VisualElement

1
2
// 這句會選出所有class name為yellow的element,然後在找出tooltip為空字串的element
List<VisualElement> result = root.Query(className: "yellow").Where(elem => elem.tooltip == "").ToList();

Complex hierarchical queries

可以將nameclass-nametype等組合在一起,做更複雜的選擇。

1
2
// 這句將name,type,class-name做組合,選出class-name為yellow,name為OK的Button element
VisualElement result = root.Query<Button>(className: "yellow", name: "OK").First();
1
2
// 這句將選出container2中所有name為Cancel的Button element
VisualElement result = root.Query<VisualElement>("container2").Children<Button>("Cancel").First();

UI Builder - 3 (使用C# Script操控UI)

UI-Builder-2-(開始使用UI-Builder)中以建立一個空白的UI,接下來我們要開始為這個UI添加內容。

建立空白UI

  1. 首先需要為這些Element命名,為了方便起見,先將這段UXML複製
    1
    2
    3
    4
    5
    6
    7
    8
    9
    10
    11
    12
    13
    14
    15
    16
    17
    <ui:UXML xmlns:ui="UnityEngine.UIElements" xmlns:uie="UnityEditor.UIElements" editor-extension-mode="False">
    <Style src="MainView.uss" />
    <ui:VisualElement name="background">
    <ui:VisualElement name="main-container">
    <ui:ListView focusable="true" name="character-list" />
    <ui:VisualElement name="right-container">
    <ui:VisualElement name="details-container">
    <ui:VisualElement name="details">
    <ui:VisualElement name="character-portrait" />
    </ui:VisualElement>
    <ui:Label text="Label" name="character-name" />
    <ui:Label text="Label" display-tooltip-when-elided="true" name="character-class" />
    </ui:VisualElement>
    </ui:VisualElement>
    </ui:VisualElement>
    </ui:VisualElement>
    </ui:UXML>
  2. 接著在專案中,找到MainView.uxml,滑鼠左鍵點選旁邊的小箭頭,把它點開,會出現會出現inlineStyle
  3. 對著inlineStyle滑鼠左鍵點兩下,就會用IDE開啟MainView.uxml
  4. 接著把上面的UXML內容複製進去,存檔。
  5. 再開啟MainView.uss,把下面這一段內容複製進去,存檔
    1
    2
    3
    4
    5
    6
    7
    8
    9
    10
    11
    12
    13
    14
    15
    16
    17
    18
    19
    20
    21
    22
    23
    24
    25
    26
    27
    28
    29
    30
    31
    32
    33
    34
    35
    36
    37
    38
    39
    40
    41
    42
    43
    44
    45
    46
    47
    48
    49
    50
    51
    52
    53
    54
    55
    56
    57
    58
    59
    60
    61
    62
    63
    64
    #background {
    flex-grow: 1;
    align-items: center;
    justify-content: center;
    background-color: rgb(115, 37, 38);
    }

    #main-container {
    flex-direction: row;
    height: 350px;
    }

    #character-list {
    width: 230px;
    border-color: rgb(49, 26, 17);
    border-width: 4px;
    background-color: rgb(110, 57, 37);
    border-radius: 15px;
    margin-right: 6px;
    }

    #character-name {
    -unity-font-style: bold;
    font-size: 18px;
    }

    #CharacterClass {
    margin-top: 2px;
    margin-bottom: 8px;
    padding-top: 0;
    padding-bottom: 0;
    }

    #right-container{
    justify-content: space-between;
    align-items: flex-end;
    }

    #details-container{
    align-items: center;
    background-color: rgb(170, 89, 57);
    border-width: 4px;
    border-color: rgb(49, 26, 17);
    border-radius: 15px;
    width: 252px;
    justify-content: center;
    padding: 8px;
    height: 163px;
    }

    #details{
    border-color: rgb(49, 26, 17);
    border-width: 2px;
    height: 120px;
    width: 120px;
    border-radius: 13px;
    padding: 4px;
    background-color: rgb(255, 133, 84);
    }

    #character-portrait{
    flex-grow: 1;
    -unity-background-scale-mode: scale-to-fit;
    }
  6. 接著再打開UI Builder,就可以看到一個空白的UI了。

建立一個List Enrty

  1. 在專案畫面,建立一個ListEntry.uxmlCreate > UI Toolkit > UI Document
  2. 將以下內容貼上
    1
    2
    3
    4
    5
    6
    <ui:UXML xmlns:ui="UnityEngine.UIElements" xmlns:uie="UnityEditor.UIElements" editor-extension-mode="False">
    <Style src="ListEntry.uss" />
    <ui:VisualElement name="list-entry">
    <ui:Label text="Label" display-tooltip-when-elided="true" name="character-name" />
    </ui:VisualElement>
    </ui:UXML>
  • 其中<Style src="ListEntry.uss" />會引用等一下建立的ListEntry.uss
  1. 使用類似的方式,Create > UI Toolkit > Style Sheet,建立一個ListEntry.uss,並將以下內容貼上
    1
    2
    3
    4
    5
    6
    7
    8
    9
    10
    11
    12
    13
    14
    15
    16
    #list-entry {
    height: 41px;
    align-items: flex-start;
    justify-content: center;
    padding-left: 10px;
    background-color: rgb(170, 89, 57);
    border-color: rgb(49, 26, 17);
    border-width: 2px;
    border-radius: 15px;
    }

    #character-name {
    -unity-font-style: bold;
    font-size: 18px;
    color: rgb(49, 26, 17);
    }
  2. 可以使用UI Builder打開這個ListEntry.uxml來觀看UI的樣貌

建立 C# Script與其互動

  1. Asset資料夾下面,建立一個Scripts資料夾
  2. 建立一個CharacterData.cs
  3. 將以下內容複製到CharacterData.cs
1
2
3
4
5
6
7
8
9
10
11
12
13
14
using UnityEngine;

public enum ECharacterClass
{
Knight, Ranger, Wizard
}

[CreateAssetMenu] // 這個Attribute會在Create選單中加入這個CharacterData
public class CharacterData : ScriptableObject
{
public string CharacterName;
public ECharacterClass Class;
public Sprite PortraitImage;
}
  1. Asset資料夾下面,建立一個Resources資料夾
  2. Resources資料夾下面,建立一個Characters資料夾
  3. Characters資料夾中,選擇Create > Character Data建立一個ScriptableObject

將UI放到Sence中

  1. Scene選擇GameObject > UI Toolkit > UI Document,建立一個UI Document GameObject
  2. Hierarchy視窗中選擇UIDocument Game Object,將MainView.uxml拖放到右側的Source Asset

建立Controllers

在專案中建立兩個C# controller,與一個MainView

  1. CharacterListEntryController:負責更新ListEntry.uxmlLabel
  2. CharacterListController:負責處理MainView.uxml
  3. MainView繼承MonoBehaviour,主要用來與UIDocument GameObject連結,取得UIDocument Game Object後,把它放入CharacterListController
1
2
3
4
5
6
7
8
9
10
11
12
13
14
15
16
17
18
using UnityEngine.UIElements;

public class CharacterListEntryController
{
Label NameLabel;

// 這個function用來設定VisualElement,讓這個controller可以更改label
public void SetVisualElement(VisualElement visualElement)
{
NameLabel = visualElement.Q<Label>("character-name");
}

// 使用CharacterData設定Label的Text
public void SetCharacterData(CharacterData characterData)
{
NameLabel.text = characterData.CharacterName;
}
}
1
2
3
4
5
6
7
8
9
10
11
12
13
14
15
16
17
18
19
20
21
22
23
24
25
26
27
28
29
30
31
32
33
34
35
36
37
38
39
40
41
42
43
44
45
46
47
48
49
50
51
52
53
54
55
56
57
58
59
60
61
62
63
64
65
66
67
68
69
70
71
72
73
74
75
76
77
78
79
80
81
82
83
84
85
86
87
88
89
90
91
92
93
94
95
96
97
98
99
100
using System.Collections.Generic;
using UnityEngine;
using UnityEngine.UIElements;

public class CharacterListController
{
// UXML template for list entries
VisualTreeAsset ListEntryTemplate;

// UI element references
ListView CharacterList;
Label CharClassLabel;
Label CharNameLabel;
VisualElement CharPortrait;

public void InitializeCharacterList(VisualElement root, VisualTreeAsset listElementTemplate)
{
EnumerateAllCharacters();

// Store a reference to the template for the list entries
ListEntryTemplate = listElementTemplate;

// Store a reference to the character list element
CharacterList = root.Q<ListView>("character-list");

// Store references to the selected character info elements
CharClassLabel = root.Q<Label>("character-class");
CharNameLabel = root.Q<Label>("character-name");
CharPortrait = root.Q<VisualElement>("character-portrait");

FillCharacterList();

// Register to get a callback when an item is selected
CharacterList.onSelectionChange += OnCharacterSelected;
}

List<CharacterData> AllCharacters;

void EnumerateAllCharacters()
{
AllCharacters = new List<CharacterData>();
AllCharacters.AddRange(Resources.LoadAll<CharacterData>("Characters"));
}

void FillCharacterList()
{
// Set up a make item function for a list entry
CharacterList.makeItem = () =>
{
// Instantiate the UXML template for the entry
var newListEntry = ListEntryTemplate.Instantiate();

// Instantiate a controller for the data
var newListEntryLogic = new CharacterListEntryController();

// Assign the controller script to the visual element
newListEntry.userData = newListEntryLogic;

// Initialize the controller script
newListEntryLogic.SetVisualElement(newListEntry);

// Return the root of the instantiated visual tree
return newListEntry;
};

// Set up bind function for a specific list entry
CharacterList.bindItem = (item, index) =>
{
(item.userData as CharacterListEntryController).SetCharacterData(AllCharacters[index]);
};

// Set a fixed item height
CharacterList.fixedItemHeight = 45;

// Set the actual item's source list/array
CharacterList.itemsSource = AllCharacters;
}

void OnCharacterSelected(IEnumerable<object> selectedItems)
{
// Get the currently selected item directly from the ListView
var selectedCharacter = CharacterList.selectedItem as CharacterData;

// Handle none-selection (Escape to deselect everything)
if (selectedCharacter == null)
{
// Clear
CharClassLabel.text = "";
CharNameLabel.text = "";
CharPortrait.style.backgroundImage = null;

return;
}

// Fill in character details
CharClassLabel.text = selectedCharacter.Class.ToString();
CharNameLabel.text = selectedCharacter.CharacterName;
CharPortrait.style.backgroundImage = new StyleBackground(selectedCharacter.PortraitImage);
}
}
1
2
3
4
5
6
7
8
9
10
11
12
13
14
15
16
17
18
using UnityEngine;
using UnityEngine.UIElements;

public class MainView : MonoBehaviour
{
[SerializeField]
VisualTreeAsset ListEntryTemplate;

void OnEnable()
{
// The UXML is already instantiated by the UIDocument component
var uiDocument = GetComponent<UIDocument>();

// Initialize the character list controller
var characterListController = new CharacterListController();
characterListController.InitializeCharacterList(uiDocument.rootVisualElement, ListEntryTemplate);
}
}
  1. MainView拖入UIDocument GameObject。
  2. ListEntry.uxml拖入ListEntryTemplate

Reference:https://docs.unity3d.com/Manual/UIE-HowTo-CreateRuntimeUI.html


上一篇:UI-Builder-2-(開始使用UI-Builder)

Unity Style Sheet (USS)

USS檔案以.uss為副檔名,它是一個文字檔,可以定義UI共用的風格(style),讓App更容易管理整體的風格。
一個USS會包含以下

  • Style rules:一個style rule會有一個selector與一個declaration block。
    • Selector定義了哪些visual element會應用這個style rule
    • Declaration block:使用角括弧(curly braces),在其中可以定義多個style。
      • 每個sytle都會有一個property與value,並在結尾要加上一個分號(semi-colon)

句法如下

1
2
3
4
selector {
property1: value;
property2: value;
}

例子

1
2
3
Button {
width: 200px;
}

Type selector:會挑選符合對應C#或是visual element type的elements

1
2
3
4
Button {
border-radius: 8px;
width: 100px;
}

注意以下是不合法的Type selector

1
2
3
UnityEngine.UIElements.Button { 
...
}

Class selector:會挑選有指定該USS class的elements。

在class的命名中:

  • 在名字中不要有英文句號
    • 假設一個class名為yellow.button,在建立USS規則(USS rule)的話會這樣使用.yellow.button{...},這樣會被當成yellowbutton兩個class
  • 不可以以數字作為開頭
  • class名稱是大小寫敏感的(case-sensitive)
  • USS中,class selector要以英文句號 . (period)開頭
  • UXML中,只需設定class名稱,如:class="yellow"即可

下面定義了一個 yellow class selector rule,注意它前面有一個英文句號(period),

1
2
3
.yellow {
background-color: yellow;
}

在UXML中要使用的話,使用class="名稱"例如:
<Button name="OK" class="yellow" text="OK" />

一個簡單的例子如下:

1
2
3
4
5
6
7
8
<UXML xmlns="UnityEngine.UIElements">
<VisualElement name="container1">
<VisualElement name="container2" class="yellow">
<Button name="OK" class="yellow" text="OK" />
<Button name="Cancel" text="Cancel" />
</VisualElement>
</VisualElement>
</UXML>

Name selector:會挑選name相符合的elements。(有點類似CSS中的ID selector)。

name的使用:

  • 為element設定name的方式有兩種
    1. 在C# script中使用 VisualElement.name
    2. 在UXML中使用 name 屬性,例如:<VisualElement name="my-nameName">.
  • 為了避免意外,name必須唯一。
  • 在USS中,name selector需要以 #(number sign) 開頭
    • 例如#ElementName { ... }
  • 在UXML中,只需設定class名稱,如:name="my-nameName"即可
    • `<Button name="#OK" />`這個是不合法的。
      

下面定義一個name為Cancel的name selector rule

1
2
3
4
5
#Cancel {
border-width: 2px;
border-color: DarkRed;
background-color: pink;
}

在UXML中使用的話,使用name="名稱"例如:<Button name="Cancel" text="Cancel" />

1
2
3
4
5
6
7
8
<UXML xmlns="UnityEngine.UIElements">
<VisualElement name="container1">
<VisualElement name="container2" class="yellow">
<Button name="OK" class="yellow" text="OK" />
<Button name="Cancel" text="Cancel" />
</VisualElement>
</VisualElement>
</UXML>

Universal selector:也稱為wildcard selector,它會匹配所有的element。

* (asterisk)為Universal selector

下面定義一個Universal selector

1
2
3
* {
background-color: yellow;
}

以下的UXML的所有element都會應用這個background-color: yellowstyle

1
2
3
4
5
6
7
8
<UXML xmlns="UnityEngine.UIElements">
<VisualElement name="container1">
<VisualElement name="container2" class="yellow">
<Button name="OK" class="yellow" text="OK" />
<Button name="Cancel" text="Cancel" />
</VisualElement>
</VisualElement>
</UXML>

Descendant selector:會在visual tree中選出匹配的後代elements。注意,使用這個selector比較消耗效能

語法如下:

1
selector1 selector2 {...}

例子:這個例子會選擇#container1之下含有yellow class的所有child elements。

1
2
3
4
#container1 .yellow {
background-color: yellow;
}

在UXML中的設定如下,#container1有一個child element,#container2class="yellow"

1
2
3
4
5
6
7
8
9
<UXML xmlns="UnityEngine.UIElements">
<VisualElement name="container1">
<VisualElement name="container2" class="yellow">
<Button name="OK" class="yellow" text="OK" />
<Button name="Cancel" text="Cancel" />
</VisualElement>
</VisualElement>
</UXML>

結果如下圖,#container2#OK以及#Cancel的背景色都被改變了,但#container1的背景沒有被改變


Child selector:會在visual tree中選出匹配的child elements。

語法如下:

1
selector1 > selector2 {...}

例子:這個例子會選擇#container1的child中含有yellow class的所有child elements。

1
2
3
4
#container1 > .yellow {
background-color: yellow;
}

在UXML中的設定如下,

1
2
3
4
5
6
7
8
<UXML xmlns="UnityEngine.UIElements">
<VisualElement name="container1">
<VisualElement name="container2" class="yellow">
<Button name="OK" class="yellow" text="OK" />
<Button name="Cancel" text="Cancel" />
</VisualElement>
</VisualElement>
</UXML>

這個的child selector style rule 只會匹配到#container2

  • 這是因為#container2#container1的child element,並且含有yellow class。
  • #OK#Cancel不匹配的原因是因為它們是屬於#container2的child而不直接的屬於#container1的child,所以匹配不到。

你也可以把wildcard selector使用在這些複雜的selector,例如以下這個selector rule,它會找出yellow class下的所有Button element

1
.yellow > * > Button{..}

Multiple selector:Multiple selector是組合多個simple selector它會選出符合simple selector的elements。

以下是語法

1
selector1selector2 {...}

如果Multiple selector區分不出selector的話,會把它們當作一個,例如ListViewButton這兩個type selector,若想使用Multiple selector會變成下面這樣

1
ListViewButton{...}

USS parser無法辨識出它是兩個selector,會把它當作一個ListViewButton
因為Class與Name selector有一個前綴詞(分別是.#),所以可以辨認出來,而Type selector沒有,所以在使用Multiple selector若是想要用Type selector的話,Type selector必須放到第一個。

1
ListView.yellow#vertical-list{...}

在下面這個例子中,最後會選出來的是<Button name="OK" class="yellow" text="OK" />

1
2
3
Button.yellow {
background-color: yellow;
}
1
2
3
4
5
6
7
8
<UXML xmlns="UnityEngine.UIElements">
<VisualElement name="container1">
<VisualElement name="container2" class="yellow">
<Button name="OK" class="yellow" text="OK" />
<Button name="Cancel" text="Cancel" />
</VisualElement>
</VisualElement>
</UXML>

Reference: https://docs.unity3d.com/Manual/UIE-about-uss.html

Unity Extensible Markup Language(UXML)

UXML啟發於HTMLXAMLXML,它定義並保存了UI的結構,可以使用Inline Style或是透過Unity Style Sheet來更改UI的風格(Style)。

UXML使用了類似樹狀的結構來保存UI,它存在父子關係(parent-child relationships)以及一個根元素(root element)

以下是UXML的範例

1
2
3
4
5
6
7
8
9
10
11
12
<?xml version="1.0" encoding="utf-8"?>
<UXML ...>
<Box>
<Toggle name="boots" label="Boots" value="false" />
<Toggle name="helmet" label="Helmet" value="false" />
<Toggle name="cloak" label="Cloak of invisibility" value="false"/>
</Box>
<Box>
<Button name="cancel" text="Cancel" />
<Button name="ok" text="OK" />
</Box>
</UXML>
  • UXML declaration:在上面範例的第一行,是UXML declaration,它是可選的,
    • 如果你使用UXML declaration的話,必須把它放在第一行,
    • 使用UXML declaration的話,必須為它設定version
    • encoding則是可選的,但是如果使用encoding的話,必須指定它的編碼。
  • Document root:<UXML>為文件的根element,在此定義namespace與schema definition files的位置。
    • Namespace:在UI Toolkit中每個element的Namespace不是在UnityEngine.UIElements就是在UnityEditor.UIElements
      • UnityEngine.UIElements:此命名空間下的elements會作為Unity runtime時的一部分
      • UnityEditor.UIElements:此命名空間下的elements可在Unity Editor使用
      • 在使用時,你可以指定element的namespace,例如:<UnityEngine.UIElements:Button />
      • 或是在UXML declaration中指定它的prefix,如xmlns:engine="UnityEngine.UIElements",在使用時會變為<engine:Button />
      • 注意:不要把自訂的control class放到UnityEngine.UIElementsUnityEditor.UIElements不然UI Builder會把你自訂的control隱藏。
    • Schema definition:它指定了每個UXML element可以包含哪些attributes和子element。

所有Element都會繼承VisualElement,這個VisualElement提供了以下attributes

  • name: 用來辨認這個element,它的名稱應該要唯一。
  • picking-mode: 設定為Position表示可以回應滑鼠事件,設定為Ignore表示忽略滑鼠事件
  • focus-index: (OBSOLETE過時了) Use tabIndex and focusable.
  • tabindex: 一個整數,定義這個element的tabbing position
  • focusable: 一個Boolean,表示這個element是focusable.
  • class: 類似HTML的class,你可以為特定的element加上class,讓它們應用到指定的style;你也可以把它當做篩選element的工具,透過UQuery來找到特定class的elements。
  • tooltip: 當滑鼠指到該element時,會顯示提示字串
  • view-data-key : 一個字串,作為element序列化(serialization)時使用的Key

使用Unity建立UXML:

  • 選擇Asset -> Create -> UI Toolkit -> UI Document
  • 預設它會幫你建立一個noNamespaceSchemaLocation
1
2
3
<ui:UXML xmlns:ui="UnityEngine.UIElements" xmlns:uie="UnityEditor.UIElements" xsi="http://www.w3.org/2001/XMLSchema-instance" engine="UnityEngine.UIElements" editor="UnityEditor.UIElements" noNamespaceSchemaLocation="../../UIElementsSchema/UIElements.xsd" editor-extension-mode="False">
</ui:UXML>

Reference: https://docs.unity3d.com/Manual/UIE-WritingUXMLTemplate.html

UI Builder - 2 (開始使用UI Builder)

使用UI Builder建立UI的流程一般會是

  1. 建立一個新UI Document (UXML)
  2. 為你的UI結構加入element
  3. 在 Inspector 中調整element的attributes與style
  4. 如果有多個element使用相同的style,可以建立USS style sheets與selectors(類似網頁的css)
  5. 測試UI是否符合你的需求,並將inline style放到USS中
  6. 儲存UI Document (UXML)

以下範例將

  • 建立一個root element作為background,這個root element會含有兩個containers。
    • 一個container用來放角色名稱的list,
    • 另外一個用來放角色的詳細資訊。
      • 在這個角色的詳細資訊container中會加入background與foreground frames。
      • 以及兩個label,用來顯示角色名稱

建立Root Element

  1. 首先建立一個Unity專案
  2. 開啟UI Builder, Window > UI Toolkit > UI Builder
  3. 在UI Builder的Viewpoint中左上角找到File > New建立一個新的UXML document
  4. 選擇Save,儲存為MainView.uxml
  5. 在左下角Library中,找到VisualElement,將它拖入Viewport中(雙擊VisualElement也可以)
  6. 在右側``Inspector`中,找到Inlined Styled,可以在此處修改element的風格
  7. 找到Flex,將Grow設為1,這會把flex-grow的值設為1,讓它填滿整個螢幕
  8. 接著找到Align,將Align ItemsJustify Content都設為Center
  9. Background的Color設為#732526,並將透明度設為255

建立Parent Container

  1. 在左下角Library中,將VisualElement拖入前面建立的rootVisualElement中。
  2. 將這個新建VisualElement它的Flex中的Direction設為row,並把它Size中的Height設為350 pixels

建立角色名稱List Container

  1. 在左下角Library中,找到ListView將它拖入前面建立的Parent ContainerVisualElement
  2. 修改這個ListView的name,改為CharacterList
  3. 將這個ListViewSize中的Width設為230 pixels,並找到Margin & Padding > Margin > RightRight設為6
  4. 設定它的Background > Color#6E3925,並設定透明度為255
  5. 設定它的Border > Color#311A11,並設定透明度為255
  6. 設定它的Border > Width設為4pixels,Radius設為15pixels。

此時你的UI看起來會長這樣

建立角色詳細訊息 Container

  1. 在Parent Container中再加入一個VisualElement
  2. 將它 Align > Align Items設為flex-end,並且把Align > Justify Content設為space-between
  3. 將它Flex > Basis > Shrink設為0,並且把Flex > Basis > Grow也設為0
  4. 在這個VisualElement中加入一個VisualElement
  5. 為這個VisualElement設定Size > Width276pixels;Align > Align ItemscenterAlign > Justify Contentcenter;最後設定Margin & Padding > Padding8 pixels。
  6. 為這個VisualElement設定Background > Color#AA5939,並設定透明度為255
  7. 為這個VisualElement設定Border > Color#311A11,透明度設為255
  8. 為這個VisualElement設定Border > Width設為4pixels,Radius設為15pixels。

此時你的UI看起來會長這樣

建立角色詳細訊息框背景

  1. 在角色詳細訊息 Container中加入一個VisualElement
  2. 將它的SizeWidthHeight設為120pixels
  3. 將它的Margin & Padding > Padding設為4pixels
  4. 將它的Background > Color設為#FF8554,透明度設為255
  5. 將它的Border > Color#311A11,透明度設為255
  6. 將它的Border > Width設為4pixels,Radius設為15pixels

    此時你的UI看起來會長這樣

建立USS來管理Style

在建立UI時,可以發現Border的Style都是一樣的,因此我們可以把它們拿出來放到一個USS中方便管理

  1. StyleSheet選擇 + > Create New USS
  2. 儲存為MainView.uss
  3. 點擊新建的MainView.uss,並在右側的InspertorSelector輸入框中輸入.border,之後在點擊Create New USS Selector
  4. 接著你可以在左側的StyleSheet中看到剛剛建立的.borderclass
  5. 點擊.borderclass後,在右側的Inspertor,將Border > Color設為#311A11
  6. 將它的Border > Width設為2pixels,Radius設為15pixels
  7. 將這個.borderclass拖動到角色詳細訊息 Container角色詳細訊息框VisualElement
  8. 點選角色詳細訊息 Container角色詳細訊息框VisualElement,在右側的Inspertor中找到Border,並對Border按下滑鼠右鍵,會跳出一個選單,選擇Unset將Border的inline style清除。

建立角色詳細訊息框前景

  1. 角色詳細訊息框背景VisualElement加入一個VisualElement並將它命名為CharacterPortrait
  2. 設定它的Flex > Grow1,這樣它裡面的圖片就可以充滿整個可用空間。
  3. 設定它的Background > Scale Modescale-to-fit,這樣它的圖片就可以充滿element size,並且保持適當的長寬比(aspect ratio)

建立角色詳細訊息Labels

  1. 角色詳細訊息框背景VisualElement加入兩個Labels,並分別命名為CharacterNameCharacterClass
  2. 選擇#CharacterName,將它的Text > Font Style改為BText > Size改為18 pixels
  3. Attributes > Text中可以更改顯示的字串

最後你的UI看起來會長這樣

Reference: https://docs.unity3d.com/Manual/UIB-getting-started.html


上一篇:UI Builder - 1 (UI Builder介面簡介)

下一篇:UI Builder - 3 (使用C# Script操控UI)

UI Builder - 1 (UI Builder介面簡介)

UI Builder,是一個可視化的UI編輯工具,讓你可以在使用UI Toolkit時可以編輯UI assets,如UI Documents(.uxml)與StyleSheets(.uss),此外還可以安裝以下的package增加額外的功能

  • com.unity.vectorgraphics:讓你可以將VectorImage指定為元素(element)的background style
  • com.unity.2d.sprite:讓你可以將 2D Sprite asset(或sub-asset)指定為元素的background style。安裝了此套件後,還可以直接從Inspector窗格中打開2D Sprite編輯器。

選擇 Window -> UI Toolkit -> UI Builder便可開啟UI Builder畫面

  • StyleSheets:讓你編輯目前UI Document(UXML)的StyleSheets(USS)
  • Hierarchy:顯示目前UI Document的element結構樹
    • 在這個Hierarchy中顯示的是element的name attribute,如果這個element沒有name則顯示它的C# type
  • Library:顯示目前可以使用的elements,其中Standard為Unity內建的elements;Project則為專案中自訂的element (.uxml assets以及繼承VisualElement並有在UxmlFactory設定可以被UXML實體化的C# element )。
  • Viewport:會顯示UI Document (UXML) 的畫面,並會儲存目前UI Document (UXML)的平移(pan)和縮放(zoom)狀態
    • 使用滑鼠中鍵(Middle-click),或是使用Ctrl/Cmd + Alt/Option + 滑鼠左鍵可以拖動Viewport。
    • 使用滑鼠滾輪可以縮放Viewport。
  • UXML Preview與USS Preview:此處可以預覽UI Builder產生的UXML與USS
  • Inspector:與Unity原有的Inspector類似,根據選擇的element顯示對應的設定內容

下一篇:UI-Builder-2-(開始使用UI-Builder)

Visual Tree

UI Toolkit是用於開發使用者介面 (UI) 功能、資源和工具的集合,UI Toolkit啟發於 web technologies。它是一個retained-mode UI system,支援stylesheets,dynamic與contextual event handling

  • Visual element:在UI Toolkit中,組成UI的最基礎block為Visual element,在C#程式碼中,它繼承VisualElement,你可以設定它的風格(style),定義它的行為,讓它作為UI的一部份顯示在screen上面。
  • Visual Tree:由Visual element組成的有序且具父子關係(parent-child relationships)的樹狀結構(hierarchy tree)。

    一個簡單的 Visual Tree
    • 所有在Visual Tree中的node都繼承VisualElement,VisualElement的子類定義了各種UI的功能如ButtonText input fields等,稱為Controls,Unity提供很多內建的Controls
    • Panels:是一個visual tree的parent object,它擁有rootVisualElement,但是它不是visual element,panel也負責處理focus control與為visual tree分派事件(event dispatching)。
    • Draw order:visual tree是使用depth-first search,因此他的順序會是
      1. 最上面的visual element
      2. 這個visual element的第一個child element
      3. 這個child element的後代
    • 座標(Coordinate)與位置(Position)系統:在UI Toolkit中,它使用style properties中的layout parameters去計算每個element的座標與位置,基於Flexbox。
      • 相對(Relative)位置:相對於元素計算位置的座標,布局系統(layout system)計算元素的位置,然後將座標添加為偏移量。父元素可以影響子元素的大小和位置,因為布局引擎在計算元素位置時將它們考慮在內。子元素只能影響父元素的大小。
      • 絕對(Absolute)位置:相對於父元素的座標,這繞過自動布局計算,直接設置元素的位置。在相同父元素下的同級元素(Sibling elements)對該元素的位置沒有影響。同樣地,該元素不影響相同父元素下其他同級元素的位置和大小。

Reference: https://docs.unity3d.com/Packages/com.unity.ui.builder@1.0/manual/uib-interface-overview.html
https://docs.unity3d.com/Manual/UIElements.html