Spring Console Line App

以下紀錄如何使用 Spring Boot 作為 Console Line App
Spring Boot 的版本是 3.4.2

在 application.properties 中加入 spring.main.web-application-type=NONE , 告訴 Spring Boot 不啟動 Web 環境

1
spring.main.web-application-type=NONE

新增一個實作 CommandLineRunner 的類,並標記上 @Component
之後你就可以在這個類的 run() 方法中寫你的 Console Line App 邏輯並使用 Spring 的依賴注入了

1
2
3
4
5
6
7
8
9
10
11
12
13
14
15
16
17
18
@Component
public class AppCommandLineRunner implements CommandLineRunner {

Logger logger = LoggerFactory.getLogger(AppCommandLineRunner.class);


@Autowired
private SomeService service;

@Override
public void run(String... args) throws Exception {

logger.info("run the app, args="+ Arrays.toString(args));

service.do();
}

}

如果你每次在執行 Console Line App 時,不想要顯示 Spring banner 的訊息的話,可以在 application.properties 中加入

1
spring.main.banner-mode=off

Java 時間

GMT(Greenwich Mean Time): GMT 是格林威治標準時間,基於地球自轉,定義為通過倫敦格林威治天文台的子午線(本初子午線)的時間。
UTC(Coordinated Universal Time):UTC 是全球協調時間,基於原子鐘的精確計時,與 GMT 基本一致。
在 Java 等程式語言中,通常使用 UTC 作為標準時間,如 Instant.now() 獲取的是 UTC 時間。

台灣的時區是 GMT+8,這表示台灣的時間比格林威治標準時間(GMT)快 8 小時
而英國的時區為 GMT+0 ,這意味著英國的時間與 GMT 相同。
而這兩個地區的時間差了 8 小時 。

如果在台灣的時間是 2025年2月19日 15:30(GMT+8),那麼同一個時間裡,在英國(GMT+0)看到的時間會是 2025年2月19日 15:30 - 8小時 = 2025年2月19日 07:30

Timestamp(時間戳) 是一個整數,代表著從 UTC 1970 年 1 月 1 日 0 時 0 分 0 秒 起至現在的總秒數。

  • 在 Java 中使用 System.currentTimeMillis() 取得 Timestamp

Java 8 以前, 使用 Date ,而 Date 有以下缺陷,不建議使用

  • 是可變的(mutable),是執行緒不安全的
  • 時區 和 Timestamp 混在一起,會因不同的電腦系統導致顯示不同時間。
  • 若要處理時區需借助 SimpleDateFormat 或其他 Library 輔助。
    • SimpleDateFormat 是執行緒不安全的
  • 日期與時間沒有分開,無法只單獨處理時間或是日期。
    • 你只想要日期的話,在 Date 物件中仍然會有時間的部分,它會顯示為 2025-02-06 00:00:00

Java 8 推出了 java.time

無時區的日期時間

LocalDate

  • LocalDate 代表日期,只儲存了年、月、日。
  • 是不可變的(immutable)
1
2
3
4
5
6
7
8
9
10
LocalDate date = LocalDate.now();
System.out.println(date1); // 2025-02-06

date = LocalDate.of(2025, 2, 6);
// 由於是不可變的,因此透過重新賦值來更改。
date = date.plusDays(5); // 增加 5 天
System.out.println(date.getYear()); // 2025
System.out.println(date.getMonth()); // FEBRUARY
System.out.println(date.getMonthValue()); // 2
System.out.println(date.getDayOfMonth()); // 11

LocalTime

  • 代表時間,只儲存時間,時、分、秒,此外,也儲存奈秒。
  • 是不可變的(immutable)
1
2
3
4
5
6
7
LocalTime time = LocalTime.now();
System.out.println(time); // 15:40:54.204743

time = time.minusSeconds(5); // 減少 5 秒
System.out.println(time.getHour()); // 15
System.out.println(time.getMinute()); // 40
System.out.println(time.getSecond()); // 49

LocalDateTime

  • 封裝了 LocalDateLocalTime 代表日期時間
  • 是不可變的(immutable)
1
2
3
4
5
6
7
8
9
10
11
LocalDateTime dateTime = LocalDateTime.now();
System.out.println(dateTime); // 2025-02-19T15:43:26.124154

dateTime = dateTime.plusDays(30);

System.out.println(dateTime.getYear()); // 2025
System.out.println(dateTime.getMonthValue()); // 3
System.out.println(dateTime.getDayOfMonth()); // 21
System.out.println(dateTime.getHour()); // 15
System.out.println(dateTime.getMinute()); // 43
System.out.println(dateTime.getSecond()); // 26

DateTimeFormatter

  • 和 SimpleDateFormat 類似,用來進行日期時間物件,與字串之間的互換,但不用處理 ParseException 這個 checked exception。
1
2
3
4
5
var formatter = DateTimeFormatter.ofPattern("yyyy/MM/dd HH:mm:ss");

LocalDateTime dateTime = LocalDateTime.parse("2025/02/06 01:02:03", formatter);
System.out.println(dateTime); // 2025-02-06T01:02:03
System.out.println(formatter.format(dateTime)); // 2025/02/06 01:02:03

有時區的日期時間

ZonedDateTime

  • 有時區的日期時間

ZoneId

  • 可以使用 ZoneId.getAvailableZoneIds() 取得支援的 key 值。
1
2
3
4
5
6
7
8
ZonedDateTime now = ZonedDateTime.now();
System.out.println("Current ZonedDateTime: " + now); // Current ZonedDateTime: 2025-02-19T15:56:36.652708+08:00[Asia/Taipei]

ZonedDateTime nowInUTC = ZonedDateTime.now(ZoneId.of("UTC"));
System.out.println("Current time in UTC: " + nowInUTC); // Current time in UTC: 2025-02-19T07:56:36.652850Z[UTC]

ZonedDateTime nowInTaipei = ZonedDateTime.now(ZoneId.of("Asia/Taipei"));
System.out.println("Current time in Taipei: " + nowInTaipei); // Current time in Taipei: 2025-02-19T15:56:36.652881+08:00[Asia/Taipei]

亦可直接使用偏移量即 UTC/GMT,來定義 ZoneId

1
2
3
4
5
6
7
8
9
10
11
12
13
14
15
var dateTime = LocalDateTime.now();

// 定義東京的 ZoneId (UTC+9)
var tokyoZoneId = ZoneId.of("+0900");
var tokyoDateTime = ZonedDateTime.of(dateTime, tokyoZoneId);

// 定義倫敦的 ZoneId (UTC+0)
var londonZoneId = ZoneId.of("+0000");
var londonDateTime = tokyoDateTime.withZoneSameInstant(londonZoneId);

// 輸出東京時間
System.out.println(tokyoDateTime); // 2025-02-19T16:04:38.833229+09:00
// 輸出倫敦時間
System.out.println(londonDateTime); // 2025-02-19T07:04:38.833229Z


參考

Google Cloud Vision API with Java

以下說明如何在 Java 中使用 Google Cloud Vision API。

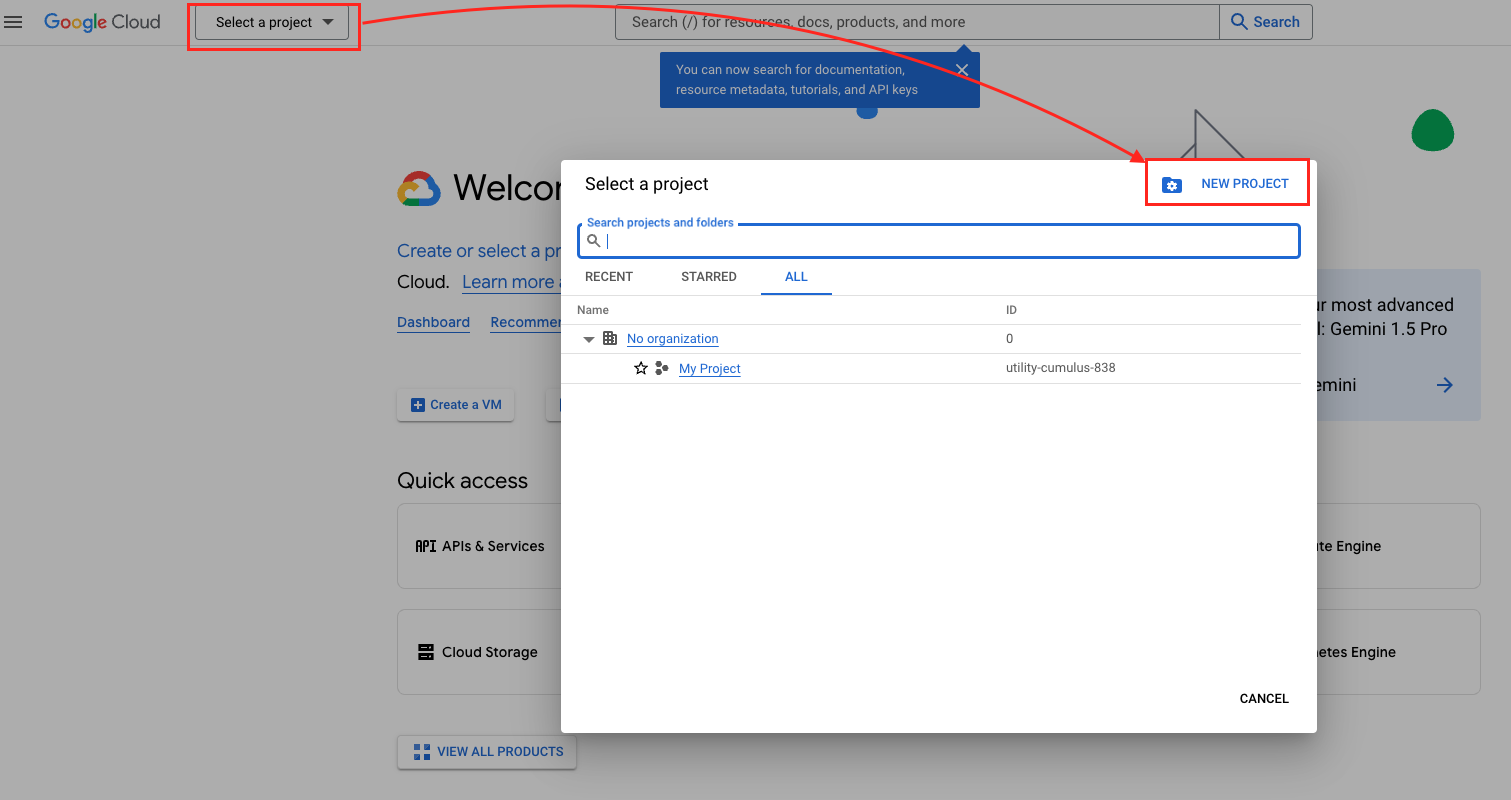
  1. 前往 Google Cloud Console https://console.cloud.google.com/
  2. 建立一個專案。
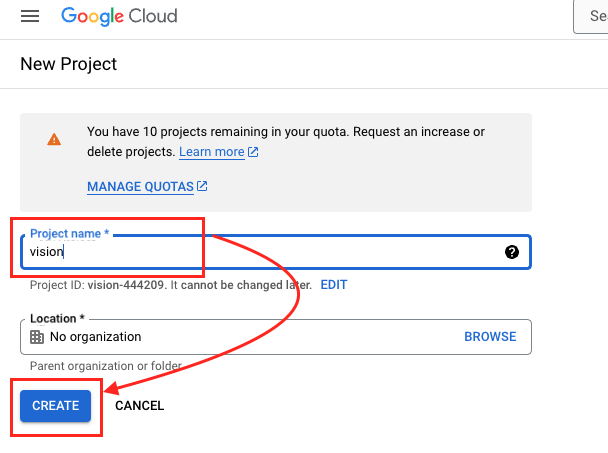
  3. 輸入專案名稱。
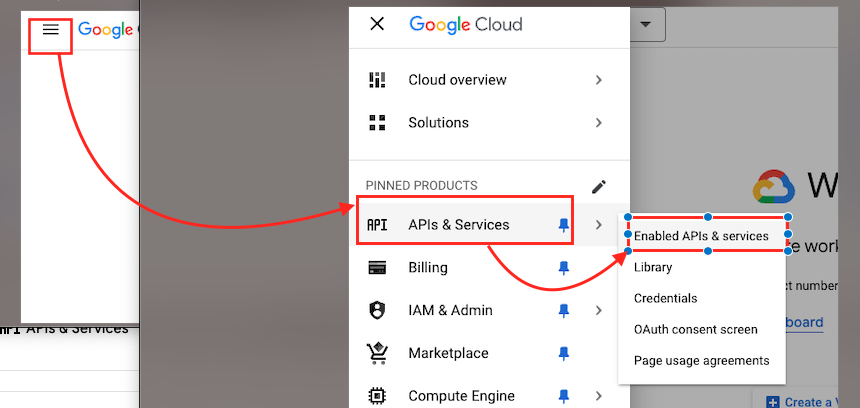
  4. 選擇 APIs Services -> Enabled APIs & services。
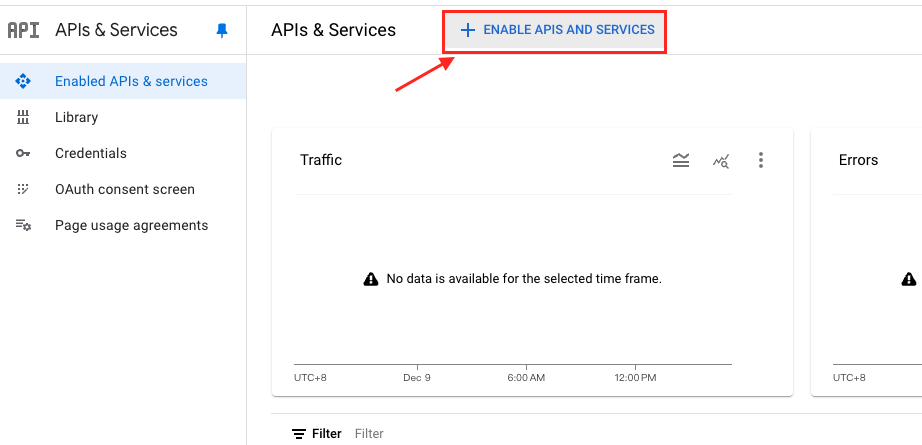
  5. 選擇 ENABLED APIs AND SERVICES。
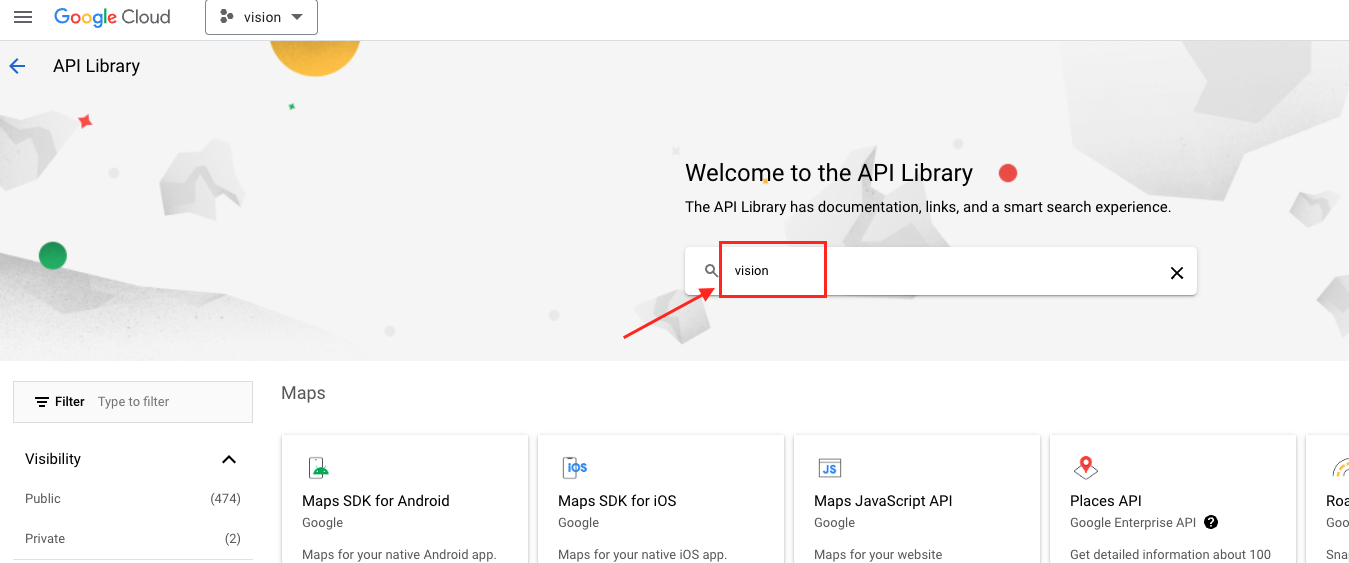
  6. 在搜尋框中輸入 vision
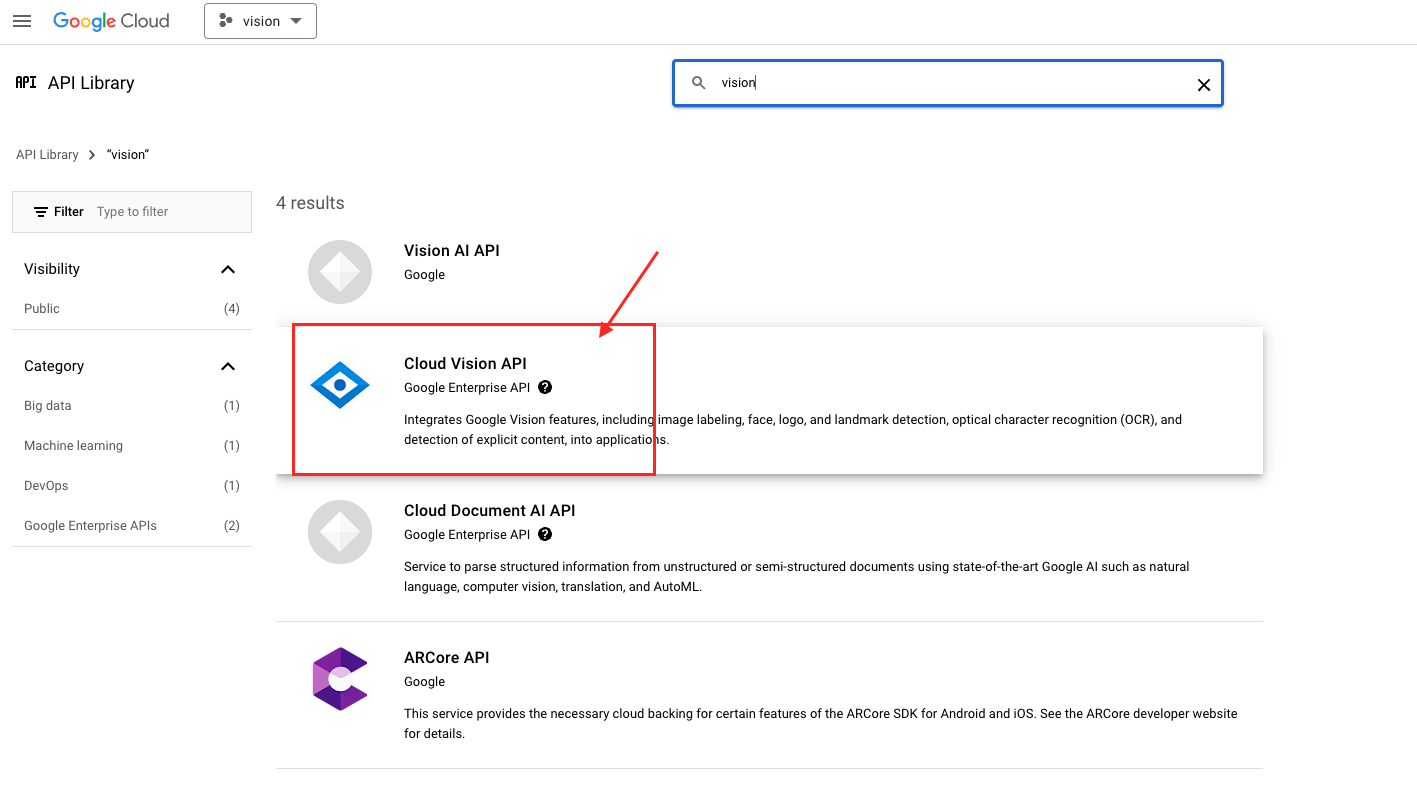
  7. 找到 Cloud Vision API 點擊進入。
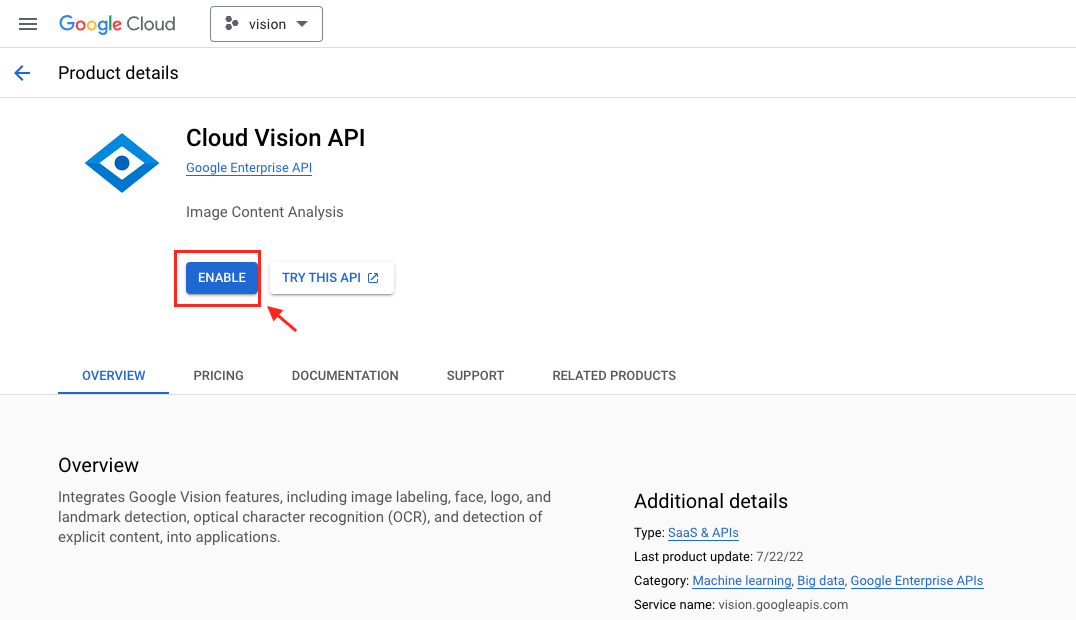
  8. 啟用這個 Cloud Vision API API
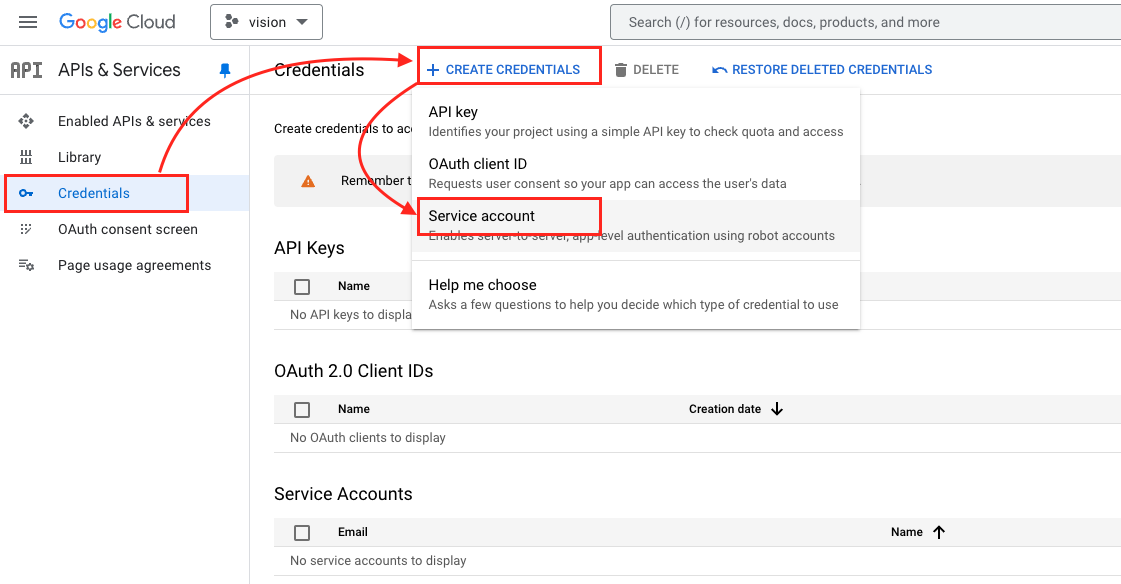
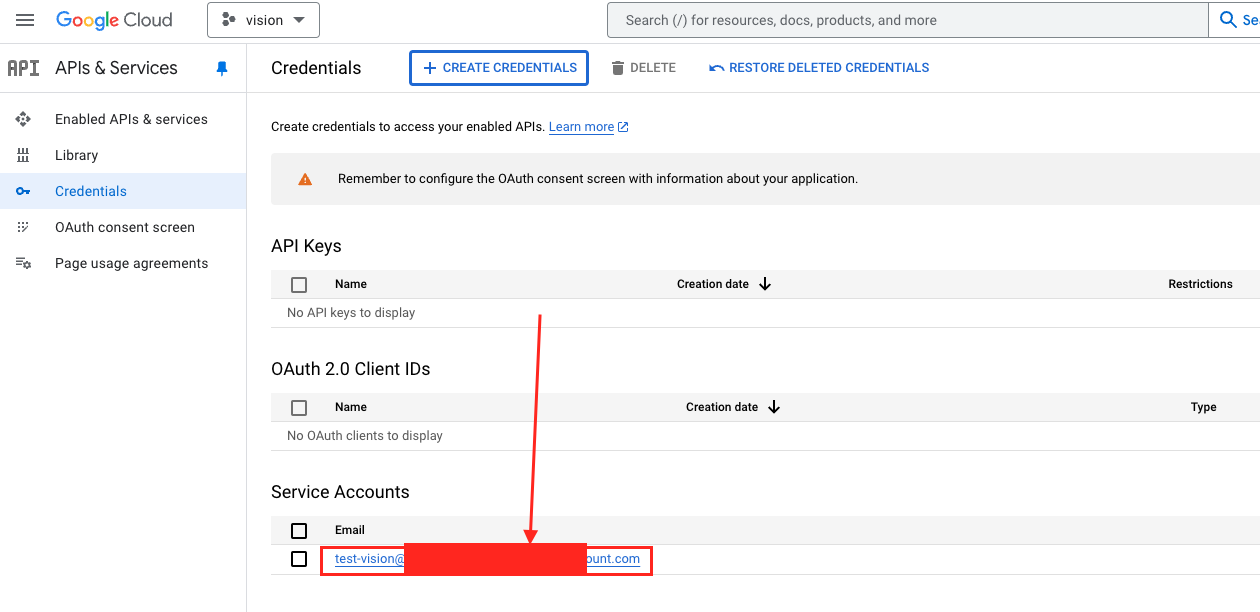
  9. 建立一個 Service account 。選擇 Credentials -> + CREATE CREDENTIALS -> Service account
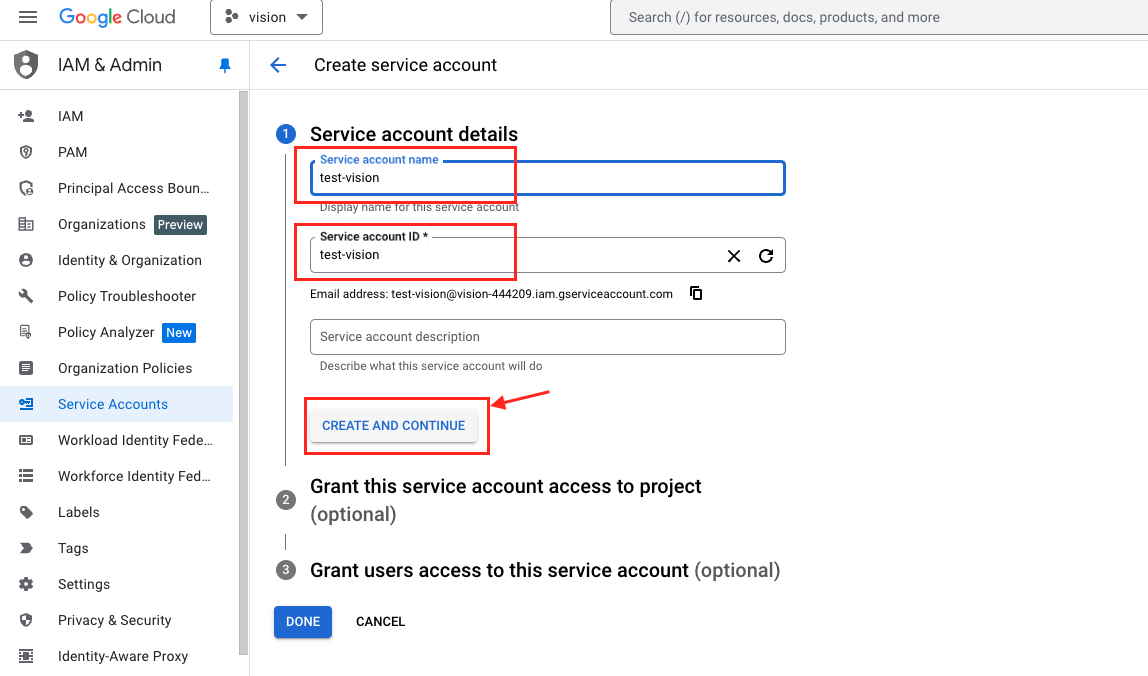
  10. 輸入 Service account 的 name 與 ID 並選擇 CREATE AND CONTINUE
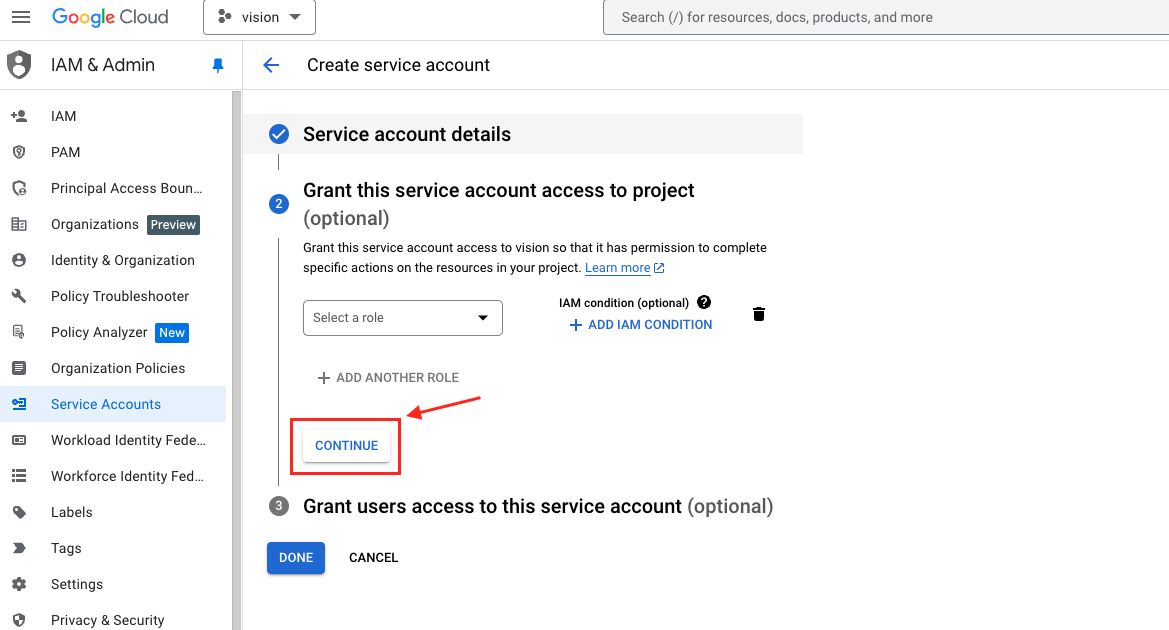
  11. 第二步,可以跳過,選擇 CONTINUE
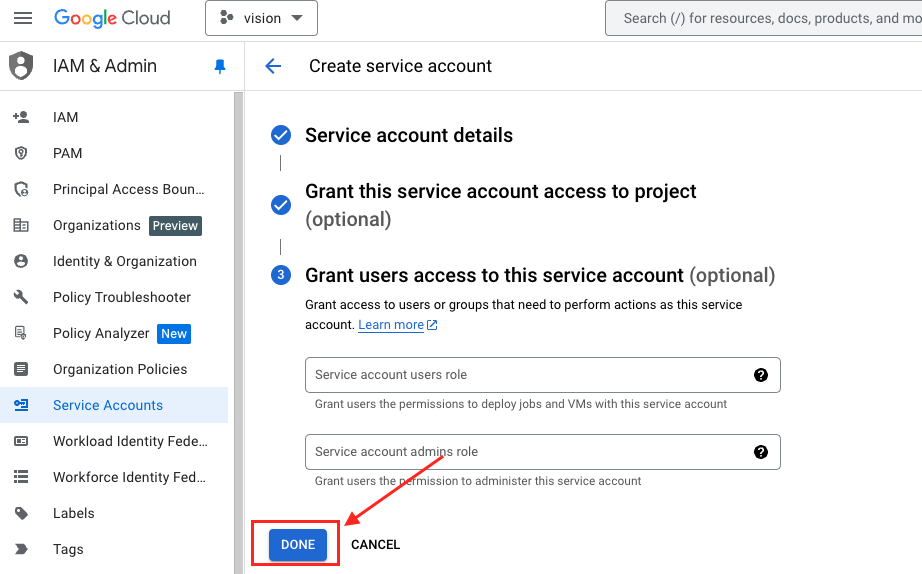
  12. 第三步,可以跳過,選擇 DONE ,建立 Service Account
  13. 點擊剛剛建立的 Service Account
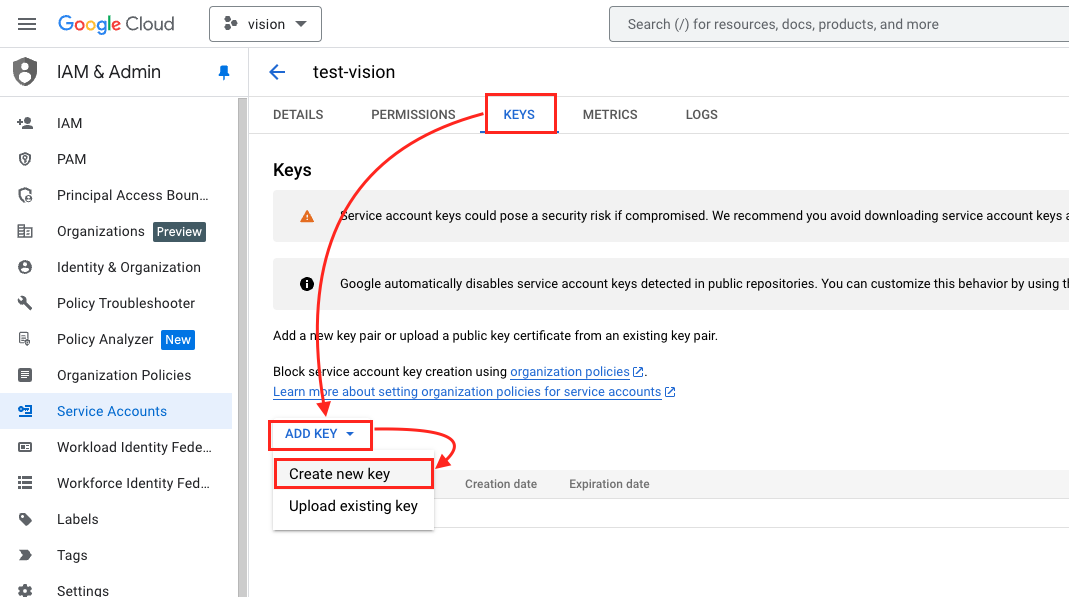
  14. 選擇 KEYS -> ADD KEY -> Create new key
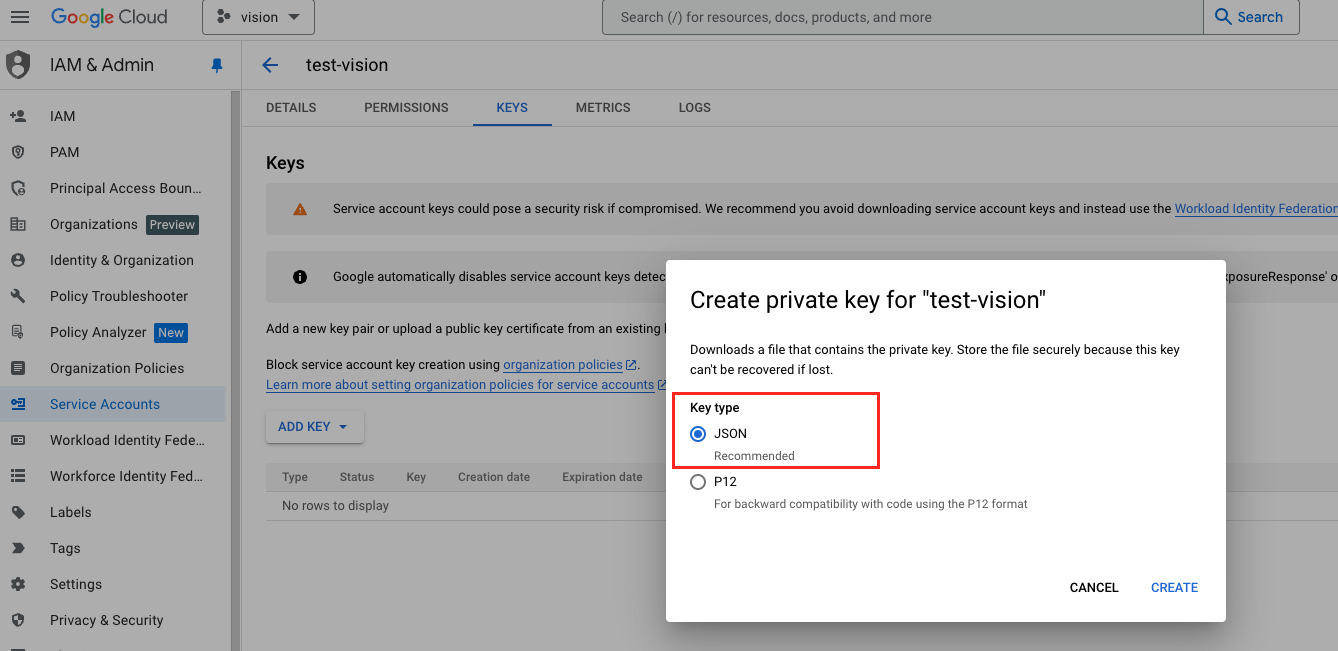
  15. 選擇 JSON ,就會產生一個 JSON 檔案,供之後 Java 程式使用
  16. 建立一個 Java 專案,並引用 google-cloud-vision 依賴,
    1
    2
    3
    4
    5
    6
    7
    8
    9
    10
    11
    12
    13
    14
    15
    16
    17
    18
    <dependencyManagement>
    <dependencies>
    <dependency>
    <groupId>com.google.cloud</groupId>
    <artifactId>libraries-bom</artifactId>
    <version>26.50.0</version>
    <type>pom</type>
    <scope>import</scope>
    </dependency>
    </dependencies>
    </dependencyManagement>

    <dependencies>
    <dependency>
    <groupId>com.google.cloud</groupId>
    <artifactId>google-cloud-vision</artifactId>
    </dependency>
    </dependencies>
  17. 在程式碼中使用以下程式碼引入上面建立的 GoogleCredentials
    1
    2
    GoogleCredentials credentials = GoogleCredentials
    .fromStream(new FileInputStream("<在步驟15產生的json檔案>"));
  18. 使用以下程式碼將 圖片文字的 Pdf 轉為 文字
    1
    2
    3
    4
    5
    6
    7
    8
    9
    10
    11
    12
    13
    14
    15
    16
    17
    18
    19
    20
    21
    22
    23
    24
    25
    26
    27
    28
    29
    30
    31
    32
    33
    34
    35
    36
    37
    38
    39
    40
    41
    42
    43
    44
    45
    46
    47
    48
    49
    public static void processPdf() throws IOException {

    GoogleCredentials credentials = GoogleCredentials
    .fromStream(new FileInputStream("<在步驟15產生的json檔案>"));

    ImageAnnotatorSettings imageAnnotatorSettings = ImageAnnotatorSettings.newBuilder()
    .setCredentialsProvider(FixedCredentialsProvider.create(credentials)).build();

    try (ImageAnnotatorClient vision = ImageAnnotatorClient.create(imageAnnotatorSettings)) {

    String fileName = "./image-based-pdf-sample.pdf";
    Path path = Paths.get(fileName);
    byte[] data = Files.readAllBytes(path);
    ByteString pdfBytes = ByteString.copyFrom(data);

    InputConfig inputConfig = InputConfig.newBuilder().setMimeType("application/pdf") // Supported MimeTypes:
    // "application/pdf",
    // "image/tiff"
    .setContent(pdfBytes).build();

    Feature feature = Feature.newBuilder().setType(Feature.Type.DOCUMENT_TEXT_DETECTION).build();

    AnnotateFileRequest request = AnnotateFileRequest.newBuilder().setInputConfig(inputConfig)
    .addFeatures(feature).build();
    List<AnnotateFileRequest> requests = new ArrayList<>();
    requests.add(request);

    BatchAnnotateFilesResponse response = vision.batchAnnotateFiles(requests);
    List<AnnotateFileResponse> responses = response.getResponsesList();

    for (AnnotateFileResponse res : responses) {
    if (res.hasError()) {
    System.out.format("Error: %s%n", res.getError().getMessage());
    return;
    }

    int pageSize = res.getTotalPages();

    System.out.println("pageSize = " + pageSize);

    for (int i = 0; i < pageSize; i++) {
    AnnotateImageResponse annotateImageResponse = res.getResponses(i);

    System.out.format("%nText: %s%n", annotateImageResponse.getFullTextAnnotation().getText());
    }
    }

    }
    }
  19. 使用以下程式碼,可以辨認圖片
    1
    2
    3
    4
    5
    6
    7
    8
    9
    10
    11
    12
    13
    14
    15
    16
    17
    18
    19
    20
    21
    22
    23
    24
    25
    26
    27
    28
    29
    30
    31
    32
    33
    34
    35
    36
    37
    public static void image() throws IOException {

    GoogleCredentials credentials = GoogleCredentials
    .fromStream(new FileInputStream("<在步驟15產生的json檔案>"));

    ImageAnnotatorSettings imageAnnotatorSettings = ImageAnnotatorSettings.newBuilder()
    .setCredentialsProvider(FixedCredentialsProvider.create(credentials)).build();

    try (ImageAnnotatorClient vision = ImageAnnotatorClient.create(imageAnnotatorSettings)) {

    String fileName = "./test.jpg";

    Path path = Paths.get(fileName);
    byte[] data = Files.readAllBytes(path);
    ByteString imgBytes = ByteString.copyFrom(data);

    List<AnnotateImageRequest> requests = new ArrayList<>();
    Image img = Image.newBuilder().setContent(imgBytes).build();
    Feature feat = Feature.newBuilder().setType(Type.LABEL_DETECTION).build();
    AnnotateImageRequest request = AnnotateImageRequest.newBuilder().addFeatures(feat).setImage(img).build();
    requests.add(request);

    BatchAnnotateImagesResponse response = vision.batchAnnotateImages(requests);
    List<AnnotateImageResponse> responses = response.getResponsesList();

    for (AnnotateImageResponse res : responses) {
    if (res.hasError()) {
    System.out.format("Error: %s%n", res.getError().getMessage());
    return;
    }

    for (EntityAnnotation annotation : res.getLabelAnnotationsList()) {
    annotation.getAllFields().forEach((k, v) -> System.out.format("%s : %s%n", k, v.toString()));
    }
    }
    }
    }

整個 Java 程式碼

1
2
3
4
5
6
7
8
9
10
11
12
13
14
15
16
17
18
19
20
21
22
23
24
25
26
27
28
29
30
31
32
33
34
35
36
37
38
39
40
41
42
43
44
45
46
47
48
49
50
51
52
53
54
55
56
57
58
59
60
61
62
63
64
65
66
67
68
69
70
71
72
73
74
75
76
77
78
79
80
81
82
83
84
85
86
87
88
89
90
91
92
93
94
95
96
97
98
99
100
101
102
103
104
105
106
107
108
109
110
111
112
113
114
115
package ultrasigncorp.vision;

import java.io.FileInputStream;
import java.io.IOException;
import java.nio.file.Files;
import java.nio.file.Path;
import java.nio.file.Paths;
import java.util.ArrayList;
import java.util.List;
import java.util.concurrent.TimeUnit;
import java.util.regex.Matcher;
import java.util.regex.Pattern;

import com.google.cloud.vision.v1.AnnotateImageRequest;
import com.google.cloud.vision.v1.Feature;
import com.google.cloud.vision.v1.Feature.Type;
import com.google.cloud.vision.v1.Image;
import com.google.api.gax.core.FixedCredentialsProvider;
import com.google.api.gax.longrunning.OperationFuture;
import com.google.auth.oauth2.GoogleCredentials;
import com.google.cloud.storage.Blob;
import com.google.cloud.storage.Bucket;
import com.google.cloud.storage.Storage;
import com.google.cloud.storage.Storage.BlobListOption;
import com.google.cloud.storage.StorageOptions;
import com.google.cloud.vision.v1.*;
import com.google.protobuf.ByteString;
import com.google.protobuf.util.JsonFormat;
import com.google.cloud.vision.v1.AnnotateFileResponse.Builder;

public class Main {
public static void main(String... args) throws Exception {
image();
processPdf();
}

public static void image() throws IOException {
GoogleCredentials credentials = GoogleCredentials
.fromStream(new FileInputStream("./test.json"));
ImageAnnotatorSettings imageAnnotatorSettings = ImageAnnotatorSettings.newBuilder()
.setCredentialsProvider(FixedCredentialsProvider.create(credentials)).build();
try (ImageAnnotatorClient vision = ImageAnnotatorClient.create(imageAnnotatorSettings)) {
String fileName = "./test.jpg";
Path path = Paths.get(fileName);
byte[] data = Files.readAllBytes(path);
ByteString imgBytes = ByteString.copyFrom(data);
List<AnnotateImageRequest> requests = new ArrayList<>();
Image img = Image.newBuilder().setContent(imgBytes).build();
Feature feat = Feature.newBuilder().setType(Type.LABEL_DETECTION).build();
AnnotateImageRequest request = AnnotateImageRequest.newBuilder().addFeatures(feat).setImage(img).build();
requests.add(request);
BatchAnnotateImagesResponse response = vision.batchAnnotateImages(requests);
List<AnnotateImageResponse> responses = response.getResponsesList();

for (AnnotateImageResponse res : responses) {
if (res.hasError()) {
System.out.format("Error: %s%n", res.getError().getMessage());
return;
}

for (EntityAnnotation annotation : res.getLabelAnnotationsList()) {
annotation.getAllFields().forEach((k, v) -> System.out.format("%s : %s%n", k, v.toString()));
}
}
}
}

public static void processPdf() throws IOException {

GoogleCredentials credentials = GoogleCredentials
.fromStream(new FileInputStream("./test.json"));

ImageAnnotatorSettings imageAnnotatorSettings = ImageAnnotatorSettings.newBuilder()
.setCredentialsProvider(FixedCredentialsProvider.create(credentials)).build();

try (ImageAnnotatorClient vision = ImageAnnotatorClient.create(imageAnnotatorSettings)) {

String fileName = "./image-based-pdf-sample.pdf";
Path path = Paths.get(fileName);
byte[] data = Files.readAllBytes(path);
ByteString pdfBytes = ByteString.copyFrom(data);

InputConfig inputConfig = InputConfig.newBuilder().setMimeType("application/pdf")
.setContent(pdfBytes).build();

Feature feature = Feature.newBuilder().setType(Feature.Type.DOCUMENT_TEXT_DETECTION).build();

AnnotateFileRequest request = AnnotateFileRequest.newBuilder().setInputConfig(inputConfig)
.addFeatures(feature).build();
List<AnnotateFileRequest> requests = new ArrayList<>();
requests.add(request);

BatchAnnotateFilesResponse response = vision.batchAnnotateFiles(requests);
List<AnnotateFileResponse> responses = response.getResponsesList();

for (AnnotateFileResponse res : responses) {
if (res.hasError()) {
System.out.format("Error: %s%n", res.getError().getMessage());
return;
}

int pageSize = res.getTotalPages();

System.out.println("pageSize = " + pageSize);

for (int i = 0; i < pageSize; i++) {
AnnotateImageResponse annotateImageResponse = res.getResponses(i);

System.out.format("%nText: %s%n", annotateImageResponse.getFullTextAnnotation().getText());
}
}

}
}
}

Reference:

Java 複製檔案的方式

方法一: 使用 java.io 的 FileInputStream 讀取,在使用 FileOutputStream 寫入。這種方式使用 byte stream 直接讀取來源檔案內容,在寫入到目標檔案。比 Files.copy 慢。

1
2
3
4
5
6
7
8
9
FileInputStream fis = new FileInputStream("source.txt");
FileOutputStream fos = new FileOutputStream("destination.txt");
byte[] buffer = new byte[1024];
int length;
while ((length = fis.read(buffer)) > 0) {
fos.write(buffer, 0, length);
}
fis.close();
fos.close();

方法二: 使用 java.nio 的 transferTo 讀取,在使用 transferFrom 寫入。這種方式可以直接在 FileChannel 中傳輸資料。它可以快速的將資料從一個 channel 傳輸到另外一個 channel ,而不需要在 User space 與 Kernal space 進行資料複製,是一種實現 zero copy 的複製方式。但是在某些作業系統中, transferTo 可能會限制傳輸的最大 Byte ,因此在使用時,可能需要進行分段傳輸。

1
2
3
4
5
FileChannel sourceChannel = new FileInputStream("source.txt").getChannel();
FileChannel destChannel = new FileOutputStream("destination.txt").getChannel();
sourceChannel.transferTo(0, sourceChannel.size(), destChannel);
sourceChannel.close();
destChannel.close();

方法三: 使用 java.nio 的 Files.copy 。java NIO 提供的一種高級操作方式,但是它本身不實現 zero copy 技術

1
2
3
Path sourcePath = Paths.get("source.txt");
Path destinationPath = Paths.get("destination.txt");
Files.copy(sourcePath, destinationPath, StandardCopyOption.REPLACE_EXISTING);

注意:以上的操作都沒有使用 try finally 或是 try-with-resources 關閉資源,正確的使用需要關閉資源才不會造成 Memory leak

1
2
3
4
5
6
7
8
9
10
try (FileInputStream fis = new FileInputStream("source.txt");
FileOutputStream fos = new FileOutputStream("destination.txt")) {
byte[] buffer = new byte[1024];
int length;
while ((length = fis.read(buffer)) > 0) {
fos.write(buffer, 0, length);
}
} catch (IOException e) {
e.printStackTrace();
}